
In this tutorial, we will learn about AWS S3 Buckets and create one. We will also explore S3 versioning and S3 encryption and in the last, we will generate an AWS S3 Bucket policy and apply it to our S3 Bucket. But before getting started let's see what is Amazon s3.
Overview on Amazon S3
According to what's mentioned on the official website of AWS,
Amazon Simple Storage Service (Amazon S3) is an object storage service that offers industry-leading scalability, data availability, security, and performance. Customers of all sizes and industries can use Amazon S3 to store and protect any amount of data for a range of use cases, such as data lakes, websites, mobile applications, backup and restore, archive, enterprise applications, IoT devices, and big data analytics. Amazon S3 provides management features so that you can optimize, organize, and configure access to your data to meet your specific business, organizational, and compliance requirements.
Basically, it's an object storage service that stores data as objects inside buckets where an object is a file, and any metadata that describes the file and a bucket is a container for objects.
Create AWS S3 Bucket and Objects - Hands-On
Step-1: Create an S3 Bucket
First, we will log in to our AWS console then under the Services tab type S3. Currently, we don't have any S3 Buckets available. In order to create an S3 bucket, we will click on Create bucket.
![Complete AWS S3 Bucket Tutorial [Practical Examples]](/aws-s3-bucket-tutorial/1-21-e1637588109715.webp)
Here we will enter a bucket name that should be globally unique. Let's see what will happen if we provide the name my-s3-test-bucket. Now we will click on Create Bucket.
![Complete AWS S3 Bucket Tutorial [Practical Examples]](/aws-s3-bucket-tutorial/2-19-e1637588244332.webp)
Here we can see that bucket with the same name already exists.
![Complete AWS S3 Bucket Tutorial [Practical Examples]](/aws-s3-bucket-tutorial/3-21-e1637588268571.webp)
Now we will enter a new name for our bucket that is globally unique. After that, we will choose a Region where our bucket will reside. I have chosen it to be US East (Ohio). You can choose a region that is near to you. Note that the S3 console is Global.
![Complete AWS S3 Bucket Tutorial [Practical Examples]](/aws-s3-bucket-tutorial/6-16-e1637588352645.webp)
Here we will Block all public access to our S3 bucket that are the default settings. This will be unchecked if we require public access to our buckets like in the case of hosting a website that we will cover in our next tutorial.
![Complete AWS S3 Bucket Tutorial [Practical Examples]](/aws-s3-bucket-tutorial/4-18-e1637588301105.webp)
Currently, we will keep the Bucket Versioning disabled. We will play with it in the later sections of this tutorial. We can also add tags to our bucket. We will leave the Server-side encryption disabled for now and will see it in the later sections. Now we will click on Create bucket.
![Complete AWS S3 Bucket Tutorial [Practical Examples]](/aws-s3-bucket-tutorial/5-21-e1637588327661.webp)
Here we can see our bucket in the list of available buckets.
![Complete AWS S3 Bucket Tutorial [Practical Examples]](/aws-s3-bucket-tutorial/7-15-e1637588375862.webp)
Step-2: Create an Object
Now we will create objects in our S3 bucket. Note that objects are fundamental entities stored in Amazon s3. Here we will click on Upload.
![Complete AWS S3 Bucket Tutorial [Practical Examples]](/aws-s3-bucket-tutorial/8-18-e1637588538939.webp)
After that, we will click on Add files. We can also add a folder. Here we can see our uploaded object named aws.png.
![Complete AWS S3 Bucket Tutorial [Practical Examples]](/aws-s3-bucket-tutorial/9-11-e1637588560315.webp)
We will leave the remaining settings to default and then click on Upload.
![Complete AWS S3 Bucket Tutorial [Practical Examples]](/aws-s3-bucket-tutorial/10-12-e1637588580369.webp)
Here we can see the details of the object uploaded which include Properties, Permissions, and Versions. Note that we can see an Object URL over here. If we copy this URL and paste it into the browser let's see what happens.
![Complete AWS S3 Bucket Tutorial [Practical Examples]](/aws-s3-bucket-tutorial/11-10-e1637588605524.webp)
The access to the file is denied and the reason is that we blocked public access while creating our S3 bucket. Now let's see what happens if we click on the Open button present in the top right corner.
![Complete AWS S3 Bucket Tutorial [Practical Examples]](/aws-s3-bucket-tutorial/12-9-e1637588632303.webp)
Here we can see that our file is accessible now. Note that this is a pre-signed URL to access this object. We can view the difference between both URLs.
![Complete AWS S3 Bucket Tutorial [Practical Examples]](/aws-s3-bucket-tutorial/13-7-e1637588659762.webp)
Step-3: S3 Bucket Versioning
Now we will explore the topic of S3 versioning. Note that with versioning we can keep multiple variants of an object in the same bucket. Versioning is used to restore, retrieve and preserve every version of every object and through it, we can also recover from both unintended user actions and application failures.
![Complete AWS S3 Bucket Tutorial [Practical Examples]](/aws-s3-bucket-tutorial/14-7-e1637588855957.webp)
Now we will click on Edit and Enable Bucket Versioning and then click on Save Changes.
![Complete AWS S3 Bucket Tutorial [Practical Examples]](/aws-s3-bucket-tutorial/15-7-e1637588882794.webp)
Now we will upload the aws.png file again.
![Complete AWS S3 Bucket Tutorial [Practical Examples]](/aws-s3-bucket-tutorial/16-7-e1637588918298.webp)
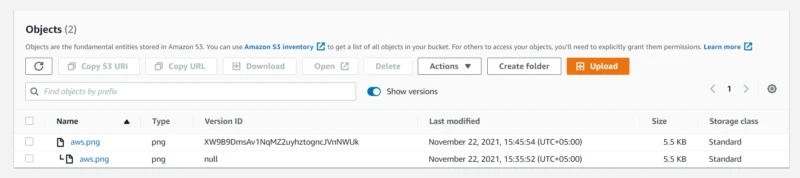
Now when we will turn on the Show versions option, we can clearly see both the objects one which we uploaded previously without versioning enabled has Version ID equal to null and the other which we uploaded now has a Version ID.
![Complete AWS S3 Bucket Tutorial [Practical Examples]](/aws-s3-bucket-tutorial/18-7-e1637588962971.webp)
Here for deleting an object permanently we will explicitly select an object and then click on Delete. To confirm deletion we will write permanently delete and then click on Delete objects.
![Complete AWS S3 Bucket Tutorial [Practical Examples]](/aws-s3-bucket-tutorial/19-6-e1637589031703.webp)
Now we will explore one more thing. After uploading the aws.png object again and disabling the Show versions option we will select the object and then delete it.
![Complete AWS S3 Bucket Tutorial [Practical Examples]](/aws-s3-bucket-tutorial/20-6-e1637589054582.webp)
![Complete AWS S3 Bucket Tutorial [Practical Examples]](/aws-s3-bucket-tutorial/21-6-e1637589090735.webp)
Here we can see that deleting specified objects adds delete markers to them. Now we will type delete and then click on Delete objects.
![Complete AWS S3 Bucket Tutorial [Practical Examples]](/aws-s3-bucket-tutorial/22-6-e1637589112720.webp)
Here we will enable Show versions again to view the delete marker. Note that a delete marker is a placeholder for a versioned object named in a simple DELETE request. When we delete an object with versioning enabled the object is not deleted. The delete marker makes Amazon S3 behave as if the object has been deleted. To restore the object here, we can delete the delete marker.
![Complete AWS S3 Bucket Tutorial [Practical Examples]](/aws-s3-bucket-tutorial/23-4-e1637589134868.webp)
Step-4: S3 Bucket Encryption
Now we will explore encryption in S3 Buckets. When we will get in the details of an object, we can see that Default Encryption is Disabled that is set at the bucket level. When it is enabled the new objects that are uploaded to the S3 bucket will be encrypted by default.
![Complete AWS S3 Bucket Tutorial [Practical Examples]](/aws-s3-bucket-tutorial/24-4-e1637589473792.webp)
When we will get into the Server-side encryption settings of the object we can specify an Encryption key. It can be either Amazon s3 key (SSE-S3) that is an encryption key created, managed, and used for us by Amazon S3, or an AWS Key Management Service key (SSE-KMS) that is protected by AWS Key Management Service. Note that to upload an object with SSE-C that is a customer-provided encryption key we need to use AWS CLI, AWS SDK, or Amazon S3 REST API.
![Complete AWS S3 Bucket Tutorial [Practical Examples]](/aws-s3-bucket-tutorial/25-4-e1637589498588.webp)
![Complete AWS S3 Bucket Tutorial [Practical Examples]](/aws-s3-bucket-tutorial/26-4-e1637589522215.webp)
Now when we will go to the bucket level encryption it's disabled by default. We will enable it through which new objects that are stored in the bucket are automatically encrypted. Here also either we can do encryption through SSE-S3 or SSE-KMS. If we want to use SSE-C we will have to use AWS CLI, AWS SDK, or Amazon S3 REST API as stated above.
![Complete AWS S3 Bucket Tutorial [Practical Examples]](/aws-s3-bucket-tutorial/27-4-e1637589545909.webp)
![Complete AWS S3 Bucket Tutorial [Practical Examples]](/aws-s3-bucket-tutorial/28-2-e1637589573519.webp)
Now when we will upload the object again in the bucket, we can see that the Default encryption is enabled.
![Complete AWS S3 Bucket Tutorial [Practical Examples]](/aws-s3-bucket-tutorial/29-2-e1637589592141.webp)
AWS S3 Bucket Policies
According to what is mentioned on the official website of AWS,
A bucket policy is a resource-based AWS Identity and Access Management (IAM) policy. You add a bucket policy to a bucket to grant other AWS accounts or IAM users access permissions for the bucket and the objects in it. Object permissions apply only to the objects that the bucket owner creates
Create S3 Bucket Policies- Hands-On
In the Permissions section of the bucket we created earlier, we can see that there is no policy written for our bucket. We will click on Edit.
![Complete AWS S3 Bucket Tutorial [Practical Examples]](/aws-s3-bucket-tutorial/30-1-e1637589616383.webp)
This will take us to a new screen where we can see Bucket ARN which we will use when we will generate our policy through the Policy generator. Now we will click on Policy generator.
![Complete AWS S3 Bucket Tutorial [Practical Examples]](/aws-s3-bucket-tutorial/31-1-e1637589697907.webp)
This will lead us to this new screen where we can easily define policy for our bucket through this user-friendly UI. Here we can define policies that control access to AWS products and resources. First we will select the Policy Type that in our case is S3 Bucket Policy. We can also create different types of policies like IAM Policy, an S3 Bucket Policy, an SNS Topic Policy, a VPC Endpoint Policy, and an SQS Policy. Then we will add a statement that is a formal description of single permission. Here for Effect we will select Deny. In Principal we will write *. In Actions, we will select PutObject and in Amazon Resource Name we will enter the value we found on the previous screen with the name Bucket ARN. Note that we will add a /* after the Bucket ARN value. After that, we will click on Add Conditions.
![Complete AWS S3 Bucket Tutorial [Practical Examples]](/aws-s3-bucket-tutorial/32-e1637589719862.webp)
![Complete AWS S3 Bucket Tutorial [Practical Examples]](/aws-s3-bucket-tutorial/33-e1637589741434.webp)
Now here we will define that at what condition we don't want a specific object to be uploaded. We will select the Condition to Null, Key to s3:x-amz-server-side-encryption and Value to true. This means we are denying any object to be uploaded with Key s3:x-amz-server-side-encryption set to Null. Now we click on Add Condition.
![Complete AWS S3 Bucket Tutorial [Practical Examples]](/aws-s3-bucket-tutorial/34-e1637589770397.webp)
Here we can see the condition we just defined.
![Complete AWS S3 Bucket Tutorial [Practical Examples]](/aws-s3-bucket-tutorial/35-e1637589791431.webp)
Now we will click on Add Statement. Now we will add another statement in which all the other settings will remain the same except for the condition. In Condition we will select StringNotEquals, for Key, we will select s3:amz-server-side-encryption and the Value will be set to AES256. Now again we will click on Add Condition. Here it means that for Key s3:amz-server-side-encryption if the value is not equal to AES256 then we will not allow the object to get uploaded into our bucket.
![Complete AWS S3 Bucket Tutorial [Practical Examples]](/aws-s3-bucket-tutorial/36-e1637589815444.webp)
Again we will click on Add Statement.
![Complete AWS S3 Bucket Tutorial [Practical Examples]](/aws-s3-bucket-tutorial/37-e1637761836868.webp)
Now here we can see both our statements listed. Now we will click on Generate Policy.
![Complete AWS S3 Bucket Tutorial [Practical Examples]](/aws-s3-bucket-tutorial/38-e1637589835157.webp)
It returns us a JSON Document which we will use for our S3 Bucket Policy. Note that how easy it is to create policies with Policy Generator.
![Complete AWS S3 Bucket Tutorial [Practical Examples]](/aws-s3-bucket-tutorial/39-e1637589855316.webp)
Now we will copy the above JSON document and paste it into our Bucket Policy and after that, we will click on Save changes.
![Complete AWS S3 Bucket Tutorial [Practical Examples]](/aws-s3-bucket-tutorial/40-e1637589877217.webp)
Testing AWS Bucket Policy
Now we will upload aws.png again into our S3 bucket but this time without specifying any encryption key. Let's see what happens.
![Complete AWS S3 Bucket Tutorial [Practical Examples]](/aws-s3-bucket-tutorial/41-e1637589898937.webp)
We will receive an error message Upload Failed and we can clearly see that the access is denied since our object was not encrypted with AES256 i.e SSE-S3 while we uploaded it.
![Complete AWS S3 Bucket Tutorial [Practical Examples]](/aws-s3-bucket-tutorial/42-e1637589921366.webp)
Now we will upload the object again but this time we will specify an encryption key by overriding default encryption bucket settings and then select SSE-S3 and click on Upload.
![Complete AWS S3 Bucket Tutorial [Practical Examples]](/aws-s3-bucket-tutorial/43-e1637589942781.webp)
Here we can see that object has been uploaded successfully as it satisfies conditions set in our bucket policy.
![Complete AWS S3 Bucket Tutorial [Practical Examples]](/aws-s3-bucket-tutorial/44-e1637589966376.webp)
Conclusion
With this, we have come to the end of our tutorial. In this tutorial, we learned about
- S3 Buckets and Objects
- S3 Versioning
- S3 Encryption
- S3 Bucket Policy
Feel free to give any feedback in the comments section and stay tuned for some more informative tutorials coming ahead!
Happy learning!
![Golang AWS Lambda Example [In-depth Tutorial]](/golang-aws-lambda/golang-aws-lambda_hu_6a78d635269c3eec.webp)