
AWS Lambda Quick Cheat Sheet
Before diving deeper into AWS Lambda, here is a quick cheat sheet summarizing the most important Lambda concepts. This quick reference helps beginners quickly understand how AWS Lambda functions work, how they are triggered, and the key limits and configurations used in serverless applications.
| Concept | Description |
|---|---|
| Service Type | Serverless compute service |
| Execution Model | Event-driven function execution |
| Supported Languages | Python, Node.js, Java, Go, .NET, Ruby |
| Trigger Sources | S3, API Gateway, EventBridge, ALB, SQS, DynamoDB |
| Default Timeout | 3 seconds |
| Maximum Timeout | 15 minutes |
| Memory Allocation | 128 MB – 10,240 MB |
| Maximum Deployment Package | 50 MB (ZIP), 10 GB (container image) |
| Scaling | Automatically scales based on incoming events |
| Pricing Model | Pay only for compute time used |
| Logging | Integrated with Amazon CloudWatch |
| Retry Behavior | Automatic retries for asynchronous invocations |
| Common Use Cases | Serverless APIs, file processing, automation, event processing |
Getting Started with AWS Lambda: Beginner Guide
AWS Lambda is one of the core services in the AWS serverless ecosystem. It allows developers to run application code without provisioning or managing servers. Instead of maintaining infrastructure, developers only focus on writing functions that run automatically when events occur.
AWS Lambda automatically scales based on incoming events, making it ideal for building modern event-driven applications, APIs, automation tasks, and backend services. In this guide, we will understand how AWS Lambda works and how you can start building serverless applications.
What is AWS Lambda
AWS Lambda is a serverless compute service that lets you run code without managing servers or infrastructure. You simply upload your code and define when it should run, and AWS automatically handles execution, scaling, and resource management.
Key characteristics of AWS Lambda include:
- No server provisioning or infrastructure management
- Automatic scaling based on incoming events
- Pay only for the compute time used
- Integration with many AWS services such as S3, API Gateway, and EventBridge
Lambda functions run only when triggered, making them ideal for event-driven architectures and microservices.
Why Use AWS Lambda for Serverless Applications
AWS Lambda simplifies application deployment by eliminating the need to manage servers. Developers can focus entirely on writing application logic while AWS manages the underlying infrastructure.
Some key benefits of using AWS Lambda include:
- Reduced operational overhead since there are no servers to manage
- Automatic scaling based on demand
- Cost efficiency because billing occurs only when code executes
- Easy integration with AWS services and third-party applications
These advantages make Lambda a popular choice for building serverless APIs, automation workflows, and backend processing systems.
When to Use AWS Lambda
AWS Lambda is best suited for applications that follow an event-driven or serverless architecture. Instead of running continuously, Lambda functions execute only when triggered by events.
Common scenarios where AWS Lambda is used include:
- Processing files uploaded to Amazon S3
- Running scheduled tasks using Amazon EventBridge
- Building serverless APIs with Amazon API Gateway
- Processing real-time data streams
- Automating infrastructure or DevOps tasks
Lambda works especially well for workloads with variable traffic, where automatic scaling helps handle sudden spikes in demand.
How AWS Lambda Works
AWS Lambda executes code in response to events generated by AWS services or external applications. When an event occurs, AWS automatically runs the associated Lambda function inside a managed execution environment.
Instead of maintaining long-running servers, Lambda functions start only when triggered and terminate once execution is complete.
AWS Lambda Execution Model Explained
The AWS Lambda execution model follows a simple workflow:
- An event source triggers the Lambda function.
- AWS provisions a lightweight execution environment.
- The function code runs using the configured runtime.
- Lambda returns the output and terminates the execution environment.
Each Lambda invocation runs in an isolated environment, ensuring that functions execute independently and securely.
Event Driven Architecture in AWS Lambda
AWS Lambda is designed around an event-driven architecture, meaning that functions run in response to specific events.
Common event sources include:
- File uploads in Amazon S3
- API requests via API Gateway
- Scheduled events from Amazon EventBridge
- Messages in Amazon SQS
- Database updates from Amazon DynamoDB streams
This event-driven model allows applications to react instantly to changes in data or system activity.
Lambda Function Lifecycle
A Lambda function goes through several stages during its lifecycle:
- Initialization phase – AWS prepares the execution environment and loads the function code.
- Invocation phase – The function processes the event and executes the code.
- Shutdown phase – After execution completes, the environment may be reused or terminated.
In some cases, AWS reuses existing execution environments to improve performance and reduce latency.
AWS Lambda Architecture
The architecture of AWS Lambda consists of multiple components that work together to enable serverless computing. These components manage event processing, function execution, scaling, and monitoring automatically.
Understanding the Lambda architecture helps developers design scalable and efficient serverless applications.
Components of AWS Lambda Architecture
The main components involved in AWS Lambda architecture include:
- Lambda Function – The code that performs a specific task
- Event Source – The service or application that triggers the function
- Execution Environment – The managed environment where the function runs
- IAM Role – Defines permissions for accessing AWS services
- Monitoring and Logging – Handled through Amazon CloudWatch
These components work together to enable secure and scalable execution of Lambda functions.
How Events Trigger Lambda Functions
Lambda functions can be triggered in multiple ways depending on the application requirements.
Some common triggering mechanisms include:
- HTTP requests through API Gateway
- File uploads to Amazon S3
- Scheduled jobs using EventBridge
- Message processing using Amazon SQS
- Database updates through DynamoDB Streams
When an event occurs, AWS automatically invokes the Lambda function associated with that event.
Lambda Execution Environment and Containers
When AWS Lambda runs a function, it creates a secure execution environment. This environment contains the runtime, function code, and required dependencies.
Lambda internally uses lightweight containers to run functions. These environments are:
- Isolated for security
- Automatically managed by AWS
- Reused for multiple invocations when possible
This reuse helps reduce cold start latency and improves performance.
Integration with AWS Services
One of the biggest advantages of AWS Lambda is its seamless integration with other AWS services.
Lambda can easily interact with services such as:
- Amazon S3 for file processing
- Amazon DynamoDB for database operations
- Amazon API Gateway for serverless APIs
- Amazon EventBridge for event-based workflows
- Amazon SQS for message processing
These integrations allow developers to build powerful serverless architectures without managing infrastructure.
Prerequisites for Using AWS Lambda
Before creating and running AWS Lambda functions, there are a few basic requirements that must be completed. These prerequisites ensure that you can deploy, manage, and execute Lambda functions properly within your AWS environment.
You mainly need an AWS account, proper IAM permissions, and familiarity with a supported programming language.
AWS Account Setup
To use AWS Lambda, you must first create an AWS account.
- Visit the AWS website.
- Click Create an AWS Account.
- Provide the required information such as email address, password, and billing details.
- Verify your account using the verification process.
Once your account is created, log in to the AWS Management Console and search for Lambda in the services list to start working with AWS Lambda.
IAM Permissions Required for Lambda
AWS Lambda requires proper permissions to access other AWS services. These permissions are controlled using IAM (Identity and Access Management) roles.
When creating a Lambda function, AWS automatically creates a default execution role that allows the function to write logs to Amazon CloudWatch.
Typical permissions required for Lambda functions include:
- Access to CloudWatch Logs
- Permission to interact with services such as S3, SQS, DynamoDB, or EventBridge
- Permission to execute the Lambda function
IAM roles help enforce security by ensuring Lambda functions access only the resources they need.
Supported Programming Languages in AWS Lambda
AWS Lambda supports multiple programming languages through managed runtimes.
Some commonly used runtimes include:
- Python
- Node.js
- Java
- Go
- .NET
- Ruby
Developers can also create custom runtimes if they want to run other languages or specialized environments.
Each runtime provides libraries and dependencies required to run Lambda functions efficiently in the AWS environment.
Creating Your First AWS Lambda Function
Creating a Lambda function is straightforward using the AWS Management Console. AWS provides several options for creating and deploying Lambda functions depending on how your code is packaged.
In this section, we will create a simple Lambda function and understand the different deployment methods.
Create Lambda Function from AWS Console
To create a Lambda function using the AWS console:
- Log in to the AWS Management Console.
- Navigate to Services → Lambda.
- Click Create function.
- Select Author from scratch.
- Enter the Function name.
- Choose the Runtime (for example, Python).
- Select the Execution Role.
- Click Create function.

After creation, the Lambda editor opens where you can write or modify your function code.
Deploy Lambda Function Using ZIP Package
Lambda functions can also be deployed by uploading a ZIP package containing your application code and dependencies (see zip).
Steps to deploy using ZIP:
- Write your application code locally.
- Package the code and dependencies into a ZIP file.
- In the Lambda console, choose Upload from → ZIP file.
- Upload the package and save the function.
This method is commonly used when applications have multiple files or external libraries.
Upload Code Using AWS CLI
Developers can also deploy Lambda functions using the AWS Command Line Interface (CLI). On Ubuntu, install the v2 bundle or apt install awscli first—see install AWS CLI on Ubuntu.
Example command to create a Lambda function:
aws lambda create-function \
  --function-name myLambdaFunction \
  --runtime python3.9 \
  --handler lambda_function.lambda_handler \
  --role arn:aws:iam::123456789012:role/lambda-role \
  --zip-file fileb://function.zip
Using AWS CLI is useful for automation, CI/CD pipelines, and infrastructure-as-code workflows.
AWS Lambda Example: Simple Python Function
To understand AWS Lambda better, let's create a simple Python function that returns a message when invoked.
Sample Lambda Function Code in Python
Below is a basic Lambda function written in Python:
def lambda_handler(event, context):
    return {
        "statusCode": 200,
        "body": "Hello from AWS Lambda!"
}This function receives an event object and a context object, processes the request, and returns a response.
Deploying the Example Lambda Function
To deploy this function:
- Open the Lambda function editor.
- Replace the default code with the example Python code.
- Click Deploy.
AWS will save and prepare the function for execution.
Testing the Lambda Function
You can test the Lambda function directly from the AWS console.
Steps to test the function:
- Click the Test button.
- Create a new test event.
- Provide an event name and sample JSON input.
- Click Test again.
AWS will invoke the function and display the result.
Understanding the Lambda Response Output
After executing the function, AWS displays the output in the Execution Results panel.
The output typically contains:
- Status code returned by the function
- Response body
- Execution duration
- Memory usage
Logs generated during execution are automatically stored in Amazon CloudWatch Logs.
How to Run AWS Lambda Functions
AWS Lambda functions can be invoked in multiple ways depending on the use case. You can run Lambda functions manually, through events, or using external applications.
Understanding these invocation methods helps in building flexible serverless applications.
Invoke Lambda Function Manually
Lambda functions can be invoked manually through the AWS console or AWS CLI.
Manual invocation is useful for:
- Testing Lambda functions
- Debugging application logic
- Running ad-hoc operations
Using AWS CLI:
aws lambda invoke --function-name myLambdaFunction response.jsonThe response will be saved to the specified output file.
Testing Lambda Functions in AWS Console
The AWS console provides a built-in testing feature.
Steps:
- Open the Lambda function.
- Click Test.
- Provide sample input in JSON format.
- Execute the test.
This allows developers to quickly verify the function behavior without deploying external triggers.
Viewing Lambda Execution Results
After invocation, AWS shows detailed execution information including:
- Function response
- Execution time
- Memory usage
- Logs generated during execution
For detailed logs, open Amazon CloudWatch Logs, where each Lambda invocation creates a log entry containing debugging information and runtime output.
AWS Lambda Invocation Types
AWS Lambda functions can be invoked in multiple ways depending on the type of event source and application design. AWS supports different invocation models to handle synchronous requests, background processing, and event-driven workloads.
Understanding these invocation types helps developers design scalable and responsive serverless applications.
Synchronous Invocation Explained
In synchronous invocation, the caller waits for the Lambda function to finish processing the request and return a response.
This model is commonly used when an application requires an immediate response after the function executes.
Examples of synchronous invocation include:
- API requests through Amazon API Gateway
- Requests from Application Load Balancer
- Direct calls using AWS SDK or CLI
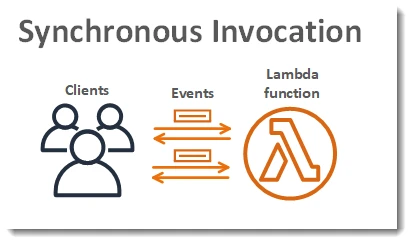
In this model:
- The client sends a request to the Lambda function.
- The function processes the event.
- The response is returned immediately to the caller.
Synchronous invocation is ideal for interactive applications and APIs where users expect instant responses.
Asynchronous Invocation Explained
In asynchronous invocation, the caller sends an event to Lambda and immediately receives a response that the request has been accepted. The Lambda service then processes the event in the background.
This method is useful when the caller does not need to wait for the function to complete.
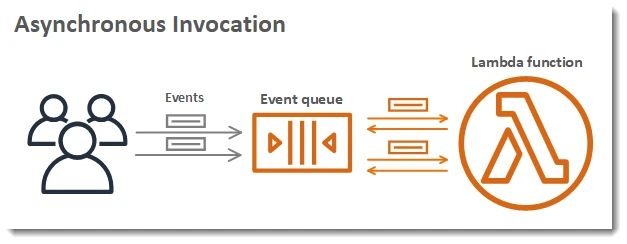
Examples include:
- Events triggered by Amazon S3
- Scheduled events from Amazon EventBridge
- Notifications from Amazon SNS
AWS Lambda automatically retries failed asynchronous invocations and can send failed events to a Dead Letter Queue (DLQ) such as Amazon SQS or SNS.
Event Based Invocation in AWS Lambda
AWS Lambda is commonly used in event-driven architectures, where functions execute automatically in response to events generated by other AWS services.
Common event sources include:
- File uploads in Amazon S3
- Database updates in Amazon DynamoDB
- Messages from Amazon SQS
- Scheduled tasks using EventBridge
This model allows systems to react automatically to changes without requiring continuous running servers.
Integrating AWS Lambda with Other AWS Services
AWS Lambda integrates seamlessly with many AWS services. These integrations allow developers to build complete serverless workflows where functions process events, transform data, or automate tasks.
Invoke Lambda from Application Load Balancer
An Application Load Balancer (ALB) can route HTTP requests directly to a Lambda function.
When configured this way:
- The client sends an HTTP request to the ALB.
- The ALB forwards the request to the Lambda function.
- Lambda processes the request and returns a response.
This approach allows developers to run serverless backend logic behind a load balancer without running EC2 instances.
Trigger Lambda Using Amazon EventBridge
Amazon EventBridge can invoke Lambda functions based on events or scheduled rules.
For example, you can configure EventBridge to:
- Run a Lambda function every hour
- Process application events
- Trigger workflows based on system activity
EventBridge is commonly used for scheduled automation tasks and event-driven applications.
Using Amazon S3 to Trigger Lambda Functions
Amazon S3 can automatically trigger Lambda functions when events occur within a bucket.
Common S3-triggered events include:
- File uploads
- File deletions
- Object updates
This integration is widely used for tasks such as:
- Processing uploaded images
- Data transformation
- Automated backups or notifications
Integrating Lambda with API Gateway
Amazon API Gateway is commonly used with Lambda to build serverless APIs.
In this setup:
- A client sends an HTTP request to API Gateway.
- API Gateway invokes the Lambda function.
- Lambda processes the request and returns the response.
This architecture enables developers to create fully serverless REST APIs without managing servers.
Monitoring and Logging AWS Lambda
Monitoring and logging are essential for understanding how Lambda functions behave in production. AWS provides built-in tools to track function performance, errors, and execution logs.
Viewing Logs in Amazon CloudWatch
AWS Lambda automatically sends logs to Amazon CloudWatch Logs.
Each Lambda invocation generates log entries that include:
- Function execution details
- Runtime errors
- Output from print or logging statements
Developers can view logs by navigating to:
Lambda → Monitor → View logs in CloudWatchCloudWatch logs help troubleshoot issues and monitor application behavior.
Understanding Lambda Metrics
AWS Lambda automatically publishes performance metrics to Amazon CloudWatch Metrics.
Common metrics include:
- Invocation count
- Duration of function execution
- Error count
- Throttling events
- Concurrent executions
These metrics help administrators understand how functions perform and whether scaling adjustments are needed.
Monitoring Lambda Errors and Failures
Lambda errors can occur due to:
- Execution timeouts
- Permission issues
- Code exceptions
- Resource limits
CloudWatch provides error metrics and logs that help identify and diagnose these failures. Developers can also configure alerts using CloudWatch Alarms to receive notifications when errors occur.
AWS Lambda Scaling and Performance
One of the biggest advantages of AWS Lambda is its ability to automatically scale based on incoming requests.
How AWS Lambda Automatically Scales
AWS Lambda automatically creates additional execution environments when request volume increases.
For example:
- If a function receives 1 request, Lambda runs 1 instance.
- If it receives 100 requests simultaneously, Lambda runs multiple instances in parallel.
This automatic scaling ensures applications can handle traffic spikes without manual intervention.
Concurrency Limits in AWS Lambda
Lambda uses the concept of concurrency to manage how many function instances can run simultaneously.
AWS provides:
- Account-level concurrency limits
- Reserved concurrency for critical functions
- Provisioned concurrency for reducing cold start latency
These controls help manage resource usage and prevent overload during heavy workloads.
Optimizing Lambda Performance
Several techniques can improve Lambda performance:
- Allocate sufficient memory and CPU resources
- Reduce function initialization time
- Minimize external dependencies
- Use provisioned concurrency for latency-sensitive workloads
Optimizing performance helps reduce execution time and overall costs.
AWS Lambda Pricing Explained
AWS Lambda uses a pay-per-use pricing model, meaning you only pay when your code runs.
Lambda Free Tier
AWS provides a free tier that includes:
- 1 million requests per month
- 400,000 GB-seconds of compute time per month
This free tier makes Lambda ideal for experimenting with serverless applications and running small workloads at no cost.
How AWS Lambda Pricing Works
Lambda pricing is based on two main factors:
- Number of requests
- Execution duration and memory usage
The total cost is calculated based on how long the function runs and the amount of memory allocated.
Estimating Lambda Costs
You can estimate Lambda costs by considering:
- Expected number of monthly requests
- Function execution time
- Memory configuration
AWS also provides the AWS Pricing Calculator to estimate costs for serverless workloads before deployment.
AWS Lambda Best Practices
When building serverless applications using AWS Lambda, following best practices helps improve reliability, security, and performance. Proper design ensures that Lambda functions scale efficiently and handle failures gracefully.
Write Idempotent Lambda Functions
A Lambda function should be idempotent, meaning that repeated execution of the same event should produce the same result without unintended side effects.
This is important because AWS Lambda may retry function executions automatically if failures occur.
To implement idempotent functions:
- Avoid duplicate database updates
- Use unique identifiers for event processing
- Implement checks before performing operations
Designing idempotent functions ensures that retries do not cause incorrect or duplicated results.
Reduce Cold Start Latency
A cold start occurs when AWS Lambda creates a new execution environment to run a function. During this initialization process, the function may take slightly longer to start.
To reduce cold start latency:
- Keep deployment packages small
- Avoid loading unnecessary libraries
- Initialize resources outside the handler when possible
- Use provisioned concurrency for latency-sensitive applications
Optimizing cold starts improves response times for serverless APIs and interactive applications.
Secure Lambda Functions with IAM Roles
Security is critical when running serverless workloads. AWS Lambda uses IAM roles to control access to other AWS resources.
Best practices for securing Lambda functions include:
- Follow the principle of least privilege
- Grant only required permissions
- Avoid using overly permissive policies
- Use environment variables securely
Proper IAM role configuration prevents unauthorized access to AWS services and sensitive data.
Troubleshooting AWS Lambda Issues
| Symptom | Likely cause | Fix |
|---|---|---|
| Function timeout | Work exceeds configured timeout or waits on slow dependencies | Raise timeout; optimize code; reduce external API latency; increase memory for more CPU |
| Permission denied on AWS API | Execution role missing IAM actions or resource policy blocks access | Review the Lambda execution role; add required policies; fix resource-based policies on the target service |
| Invocation fails at runtime | Bad event payload, env vars, or unhandled exception | Check CloudWatch logs; reproduce with a test event in the console; verify environment variables and handler configuration |
Frequently Asked Questions
1. What is AWS Lambda?
2. How do you run an AWS Lambda function?
3. What programming languages are supported in AWS Lambda?
4. What is the difference between synchronous and asynchronous Lambda invocation?
5. When should you use AWS Lambda?
Summary
AWS Lambda enables developers to build scalable and cost-efficient applications without managing servers. By running code in response to events, Lambda simplifies application deployment and supports modern serverless architectures.
In this tutorial, we explored how AWS Lambda works, how to create and run Lambda functions, and how to integrate them with services such as Application Load Balancer, Amazon EventBridge, Amazon S3, and API Gateway. We also covered monitoring, scaling, pricing, best practices, and troubleshooting techniques.
With these concepts, you can start building powerful serverless applications using AWS Lambda.
Official Documentation
You can explore more details about AWS Lambda from the official AWS documentation.