In this tutorial we will learn how to secure OpenLDAP server with either Optional, Mandatory MTLS or STARTTLS. Now since we don't have a third party signed certificate so we will generate our own set of server and client certificates and use them with our OpenLDAP server and client.
Here is a video tutorial covering the steps from this tutorial to secure OpenLDAP server:
Before we start, let me give you a brief overview on the difference between Mandatory, Optional MTLS and STARTTLS.
Mandatory Vs Optional MTLS Vs STARTTLS
Mandatory MTLS requires both the client and server to present and validate each other's certificates during the TLS handshake. This ensures that both parties are authenticated, providing a higher level of security by verifying the identity of both ends of the communication.
- Client Authentication: The server requests the client's certificate.
- Server Authentication: The client requests the server's certificate.
- Certificate Validation: Both certificates are validated by each party against trusted Certificate Authorities (CAs).
- Session Establishment: If validation is successful, a secure session is established.
You can learn more with an practical example at Setup & verify Mutual TLS Authentication (MTLS) with OpenSSL
Optional MTLS allows the client to decide whether to present its certificate or not. The server may accept or ignore the client certificate based on its configuration. This provides flexibility, allowing clients without certificates to still establish a connection while giving the server the option to validate client certificates if available.
- Client Authentication: The server may request the client's certificate but does not enforce its presentation.
- Server Authentication: The client requests the server's certificate.
- Certificate Validation: The server validates the client's certificate if presented. If not, it proceeds without client authentication.
- Session Establishment: A secure session is established regardless of client certificate validation, but with different levels of trust based on the presence of client authentication.
STARTTLS is an extension to plain text communication protocols,
The step below resolves a command name with which; see the which command for PATH lookup, -a, and portable command -v alternatives.
which offers a way to upgrade a plain text connection to a secure, encrypted connection using TLS (Transport Layer Security). It is widely used in protocols like SMTP (for email), IMAP, and POP3. The client initially connects using a non-encrypted connection, and then issues a STARTTLS command to switch to a secure, encrypted connection.
- Client Authentication: Client sends STARTTLS command to server.
- Server Authentication: Server presents its certificate to the client.
- Certificate Validation: Certificates are validated against trusted CAs.
- Session Establishment: If validation succeeds, a secure session is established.
My Lab Environment
You must be familiar with my lab environment as I will be using certain
DN specific to my lab which you should update based on your environment.
We can use ldapwhoami for this purpose:
ldapwhoami -x -D "cn=admin,dc=glc,dc=example,dc=com" -WAdditionally I have configured /etc/hosts of my ldap server to be able
to use hostname as ldap-server for any LDAP communication. So I will
be using the same through out the article. Here 10.10.1.28 is the IP
address of my LDAP server.
10.10.1.28 ldap-serverYou can refer Configure OpenLDAP Server for more details and steps which I had used to bring up my server.
Generate Required Certificates
If you already have the required certificates then you can skip this step. In a nutshell you basically have to perform the following steps:
- How to create Self-Signed CA Certificate with OpenSSL
- Create SAN Certificate
- OpenSSL create Client Certificate & Server Certificate with Example
You can also refer The Only OpenSSL CheatSheet You Will Need! for more information.
I will store all my certificates inside /etc/ldap/certs. All the following commands needs to be executed as either sudo user with root privilege or as root user.
mkdir /etc/ldap/certsGenerate CA private key:
openssl genrsa -out /etc/ldap/certs/ca.key 4096Generate CA certificate
openssl req -new -x509 -days 3650 -key /etc/ldap/certs/ca.key -out /etc/ldap/certs/ca.crt -subj "/C=US/ST=State/L=City/O=Organization/OU=Unit/CN=RootCA"Here is a shell script which will generate both server and client
certificates inside /etc/ldap/certs which we will also use to store
both server and client certificates. The script is very basic and I have
not added too many checks, if you intend to use it then I would
recommend you to modify the individual fields such as CSR, SAN Fields
based on your environment.
You can add multiple DNS and IP Addresses using DNS.1, DNS.2, DNS.3,...
and IP.1, IP.2, IP.3 and so on. These fields should contain the
FQDN/Hostname and IP of your LDAP server which will be used by clients
for communication. For example in my case I am planning to use
ldap-server to communication with LDAP server and the same has been
updated to /etc/hosts.
For client certificate the SAN Field is not required so we are not passing any custom extension or configuration.
#!/bin/bash

# Define directories and filenames
CERT_DIR="/etc/ldap/certs"
CA_KEY="${CERT_DIR}/ca.key"
CA_CERT="${CERT_DIR}/ca.crt"
CLIENT_KEY="${CERT_DIR}/client.key"
CLIENT_CSR="${CERT_DIR}/client.csr"
CLIENT_CERT="${CERT_DIR}/client.crt"
SERVER_KEY="${CERT_DIR}/server.key"
SERVER_CSR="${CERT_DIR}/server.csr"
SERVER_CERT="${CERT_DIR}/server.crt"

# Create the certs directory if it doesn't exist
[[ ! -d $CERT_DIR ]] && mkdir -p $CERT_DIR

# Generate server private key and CSR
openssl req -new -sha512 -nodes -out $SERVER_CSR -newkey rsa:4096 -keyout $SERVER_KEY -subj "/C=IN/ST=KARNATAKA/L=BENGALURU/O=GoLinuxCloud/OU=Admin/CN=ldap-server"

# Define OpenSSL configuration file for server extensions
SERVER_EXT_CONF="${CERT_DIR}/server_ext.cnf"
cat > $SERVER_EXT_CONF << EOF
[ v3_req ]
basicConstraints = CA:FALSE
keyUsage = critical, digitalSignature, keyEncipherment
extendedKeyUsage = serverAuth, clientAuth
subjectAltName = @alt_names
subjectKeyIdentifier = hash
authorityKeyIdentifier = keyid:always,issuer

[ alt_names ]
DNS.1 = ldap-server
IP.1 = 10.10.1.24
EOF

# Generate server certificate with the correct extensions
openssl x509 -req -in $SERVER_CSR -CA $CA_CERT -CAkey $CA_KEY -CAcreateserial -out $SERVER_CERT -days 3650 -sha512 -extfile $SERVER_EXT_CONF -extensions v3_req

# Generate client private key and CSR
openssl req -new -sha512 -nodes -out $CLIENT_CSR -newkey rsa:4096 -keyout $CLIENT_KEY -subj "/C=IN/ST=KARNATAKA/L=BENGALURU/O=GoLinuxCloud/OU=Admin/CN=ldap-client"

# Generate client certificate
openssl x509 -req -in $CLIENT_CSR -CA $CA_CERT -CAkey $CA_KEY -CAcreateserial -out $CLIENT_CERT -days 3650 -sha512

echo "Certificates generated successfully."
Verify if SAN field is properly updated on server certificate:
openssl x509 -noout -text -in server.crt | grep -A 2 "X509v3 Subject Alternative Name"The script will generate both server and client certificate. You can
copy the client certificates to your openldap client. In my case since
for demo purpose I am using same VM as openldap server and client so I
have copied all certs inside /etc/ldap/certs of same VM.
Assign proper permission to the certificates and keys so that it is accessible by the required users:
Ownership changes in this section use chown command syntax.
sudo chown -R openldap:openldap /etc/ldap/certs/
sudo chmod 644 /etc/ldap/certs/*
Configure Certificates on OpenLDAP Server
Configure your openldap server to consume the server certificates.
Create an LDIF file (e.g., enable_tls.ldif) with the following
content:
dn: cn=config
changetype: modify
replace: olcTLSCACertificateFile
olcTLSCACertificateFile: /etc/ldap/certs/ca.crt
-
replace: olcTLSCertificateFile
olcTLSCertificateFile: /etc/ldap/certs/server.crt
-
replace: olcTLSCertificateKeyFile
olcTLSCertificateKeyFile: /etc/ldap/certs/server.key
Apply the LDIF file:
sudo ldapmodify -Y EXTERNAL -H ldapi:/// -f enable_tls.ldif
Verify if the configuration is properly applied:
sudo ldapsearch -Y EXTERNAL -H ldapi:/// -b cn=config olcTLSCACertificateFile olcTLSCertificateFile olcTLSCertificateKeyFile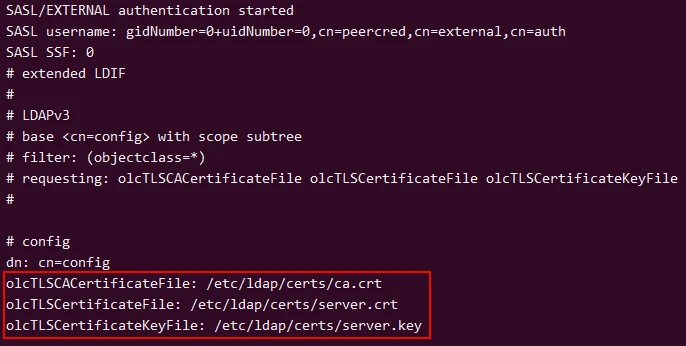
Enable LDAPS on OpenLDAP Server
By default LDAP runs on port 389 without TLS and with TLS it will run on
636. To configure OpenLDAP with TLS, open the slapd configuration
file, usually located at /etc/default/slapd.
Ensure that the SLAPD_SERVICES parameter includes ldaps:/// to make
OpenLDAP listen on port 636.
SLAPD_SERVICES="ldap:/// ldapi:/// ldaps:///"Apply the changes by restarting the OpenLDAP service.
After editing unit files, run systemctl daemon-reload before enable or restart; the systemctl command covers reload order and failed-unit checks.
sudo systemctl daemon-reload
sudo systemctl restart slapd
Check to confirm that the service is now listening on port 636.
LDAP TLS and plain-text binds show up in ss output; the ss command documents port and state filters for directory services.
sudo ss -tuln | grep 636
Verify the LDAP status:
sudo systemctl status slapd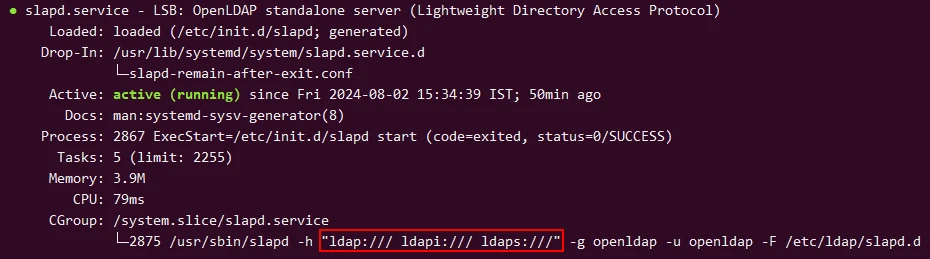
Understanding olcTLSVerifyClient and olcSecurity
Based on the type of security we will configure OpenLDAP server with two
options olcTLSVerifyClient and olcSecurity to control the OpenLDAP
security.
The olcSecurity attribute in OpenLDAP is used to configure
security-related policies for the LDAP server. Specifically, it can be
used to enforce various levels of security on the LDAP connections, such
as requiring encryption or stronger authentication mechanisms.
- tls=0: No security required.
- tls=1: Requires the use of TLS for all operations.
- ssf=128: Security Strength Factor of 128 bits required.
- transport=256: Requires a transport layer with a security strength factor of 256 bits.
The olcTLSVerifyClient directive in OpenLDAP specifies the level of
client certificate verification required during a TLS (SSL) handshake.
Here's what the different settings mean:
demand(orhard): The server requires the client to provide a certificate. If the client does not provide a certificate or the certificate is not valid, the connection is aborted.never: The server never asks the client for a certificate.allow: The server asks the client for a certificate, but the client may choose not to provide one. If a certificate is provided, it will be checked.try: The server asks the client for a certificate, but if the client does not provide one, the server proceeds with the connection anyway. If a certificate is provided, it will be checked.
We will be using these options in the next sections to configure OpenLDAP with TLS, MTLS or STARTTLS.
Configure Firewall and SELinux
Update UFW firewall settings and SELinux policies so that they don't block the connection:
sudo ufw status
sudo ufw allow 636/tcp
Check SELinux status:
sudo sestatusIf SELinux is enforcing, ensure it allows LDAPS connections.
sudo setsebool -P httpd_can_connect_ldap on
sudo setsebool -P allow_ypbind on
Secure OpenLDAP Server with TLS
For TLS communication we don't need any additional config on the OpenLDAP server. Simply adding the certificates is enough.
Configure your client to use the CA certificate for any LDAP
communication. Add the following for client configuration
(/etc/ldap/ldap.conf):
TLS_CACERT /etc/ldap/certs/ca.crtTest the LDAP client connection with TLS/SSL:
ldapsearch -H ldaps://ldap-server -b "dc=glc,dc=example,dc=com" -D "cn=admin,dc=glc,dc=example,dc=com" -WSecure OpenLDAP with Optional MTLS
On OpenLDAP server, create an LDIF file (e.g., optional_mtls.ldif)
with the following content:
dn: cn=config
changetype: modify
replace: olcTLSVerifyClient
olcTLSVerifyClient: try
The try option here with olcTLSVerifyClient is a more flexible
setting that allows the server to request a client certificate but does
not require it.
Apply the LDIF file:
sudo ldapmodify -Y EXTERNAL -H ldapi:/// -f optional_mtls.ldif
Restart the OpenLDAP service:
sudo systemctl restart slapdUpdate the client configuration points to the correct CA and client
certificate. Edit /etc/ldap/ldap.conf and ensure it has the correct
paths:
TLS_CACERT /etc/ldap/certs/ca.crt
TLS_CERT /etc/ldap/certs/client.crt
TLS_KEY /etc/ldap/certs/client.key
Test the LDAP client connection with TLS/SSL:
ldapsearch -H ldaps://ldap-server -b "dc=glc,dc=example,dc=com" -D "cn=admin,dc=glc,dc=example,dc=com" -WSecure OpenLDAP with Mandatory MTLS
Update the client configuration points to the correct CA certificate.
Edit /etc/ldap/ldap.conf and ensure it has the correct paths:
TLS_CACERT /etc/ldap/certs/ca.crt
TLS_CERT /etc/ldap/certs/client.crt
TLS_KEY /etc/ldap/certs/client.key
On OpenLDAP server, create an LDIF file (e.g., mandatory_mtls.ldif)
with the following content:
dn: cn=config
changetype: modify
replace: olcTLSVerifyClient
olcTLSVerifyClient: demand
This configuration mandates that the server will request a client certificate and fail the connection if the client does not provide one. This is used to enforce mutual TLS (mTLS).
Apply the LDIF file:
sudo ldapmodify -Y EXTERNAL -H ldapi:/// -f mandatory_mtls.ldif
Test the LDAP client connection for mandatory MTLS, the client must present a valid certificate:
ldapsearch -H ldaps://ldap-server -b "dc=glc,dc=example,dc=com" -D "cn=admin,dc=glc,dc=example,dc=com" -WIn some cases I have observed that it is required to decalte these
variables, otherwise I was getting
ldap_result: Can't contact LDAP server (-1)
export LDAPTLS_CACERT=/etc/ldap/certs/ca.crt
export LDAPTLS_CERT=/etc/ldap/certs/client.crt
export LDAPTLS_KEY=/etc/ldap/certs/client.key
Otherwise you can pass the certificates as input file:
ldapsearch -H ldaps://ldap-server -b "dc=glc,dc=example,dc=com" -D "cn=admin,dc=glc,dc=example,dc=com" -W -o TLS_CERT=/etc/ldap/certs/client.crt -o TLS_KEY=/etc/ldap/certs/client.key -o TLS_CACERT=/etc/ldap/certs/ca.crtThe query is successful which would mean that we are successfully able to establish communication with LDAP server over MTLS.
Secure OpenLDAP with STARTTLS
Configure OpenLDAP server to enable TLS for all communication. Create a
file named enable_tls_security.ldif with the following content:
dn: cn=config
changetype: modify
replace: olcSecurity
olcSecurity: tls=1
Use the ldapmodify command to apply the changes:
sudo ldapmodify -Y EXTERNAL -H ldapi:/// -f enable_tls_security.ldif
The only difference here is that with STARTTLS we will perform the LDAP
communication on a non-secure port i.e. port 389 unlike MTLS where we
were using ldaps with port 636. For STARTLS you need not enable
ldaps:/// in the server configuration because as explained earlier, It
starts with a non-secure connection and upgrades to a secure connection
using the STARTTLS command.
You can test STARTTLS using the ldapsearch command, which attempts to
start TLS on an LDAP connection:
ldapsearch -H ldap://ldap-server -b "dc=glc,dc=example,dc=com" -D "cn=admin,dc=glc,dc=example,dc=com" -W -x -ZZHere if you notice I am using default LDAP port number with additional
argument -ZZ to enable STARTTLS.
To verify if encryption is working, I have collected tcpdump using
Save packets to a .pcap with tcpdump -w for Wireshark analysis; the tcpdump command documents capture size limits and rotating files.
tcpdump -i any -w /home/deepak/ldap_starttls.pcap port 389. Here is
the snippet from Wireshark:

- The
extendedReqwithLDAP_START_TLS_OIDis the client requesting to start TLS on the existing LDAP connection. Client Hello: The client initiates the TLS handshake.Server Hello: The server responds to the client's handshake request.
This sequence shows that the STARTTLS operation is initiated, and the TLS handshake process is starting as expected.
Troubleshooting OpenLDAP TLS related issues
With ldap's native commands we don't have too many options to debug any TLS related failures. So we can rely on openssl command to debug any TLS related issues.
For MTLS communication, pass the client certificate and key and observe the output:
openssl s_client -connect ldap-server:636 -CAfile /etc/ldap/certs/ca.crt -cert /etc/ldap/certs/client.crt -key /etc/ldap/certs/client.keyCheck if the TLS handshake is completed successfully. Look for the following in the debug output:
SSL handshake has read xxx bytes and written xxx bytesVerification: OK
Ensure the server is requesting and correctly validating the client
certificate. Look for the Acceptable client certificate CA names and
Verify return code: 0 (ok).
The tls_write: want=24 error=Broken pipe error indicates the
connection was terminated unexpectedly. This could be due to the server
rejecting the client certificate or an issue with the client
configuration.
With Optional MTLS or TLS you only need to pass CA certificate:
openssl s_client -connect ldap-server:636 -CAfile /etc/ldap/certs/ca.crtYou can also refer official OpenLDAP troubleshooting manual to cover more scenarios.
In this tutorial we learned to create our own Certificate Authority certificate, and then used this CA certificate to create ldap client certificate. This CA and client certificate will be used across all the ldap clients for encrypted and secure communication. I have created SAN certificate here but you can choose to create individual client certificates for all your ldap client nodes.
Refer official OpenLDAP Administration document and setting up OpenLDAP with TLS/SSL mutual authentication for more information.
Next you can read How to decrypt HTTPS & LDAPS Traffic using WireShark
Lastly I hope the steps from the article to Configure OpenLDAP with TLS certificates on Linux was helpful. So, let me know your suggestions and feedback using the comment section
