Git HEAD is one of the most important concepts in Git that helps you understand your current position in the commit history, especially when dealing with detached HEAD explained. Many users get confused with HEAD~, HEAD^, and HEAD@{}, but these references are essential for navigating commits efficiently. In this guide, you will learn what HEAD means in Git and how to use tilde (~) and caret (^) with practical examples.
Git HEAD, ~, ^ and @{} Cheat Sheet
| Reference | Meaning | Example | Use Case |
|---|---|---|---|
HEAD |
Current commit | git show HEAD |
View latest commit |
HEAD^ or HEAD^1 |
First parent of current commit | git show HEAD^ |
View previous commit |
HEAD^2 |
Second parent (merge commit) | git show HEAD^2 |
Inspect merged branch |
HEAD~1 |
Same as HEAD^ |
git show HEAD~1 |
Move 1 commit back |
HEAD~2 |
Two commits before HEAD | git log HEAD~2 |
Navigate history |
HEAD~n |
N commits before HEAD | git diff HEAD~3 HEAD |
Compare commits |
HEAD^n |
Nth parent of merge commit | git show HEAD^2 |
Analyze merge parents |
HEAD^0 |
Current commit (dereference tag) | git show HEAD^0 |
Ensure commit object |
HEAD@{1} |
Previous HEAD position | git checkout HEAD@{1} |
Undo last move |
HEAD@{n} |
Nth previous state from reflog | git reset --hard HEAD@{2} |
Recover state |
branch@{1} |
Previous state of a branch | git checkout main@{1} |
Restore branch state |
HEAD^@ |
All parents of commit | git log HEAD^@ |
List all parents |
HEAD^! |
Only the commit itself (exclude parents) | git log HEAD^! |
Isolate commit |
What is HEAD in Git (Simple Explanation)
What does HEAD mean in Git
In Git, HEAD is a pointer to your current commit.
- It usually points to the latest commit of your current branch
- When you switch branches, HEAD moves to that branch, which is covered in detail in git branch basics.
- When you make a new commit, HEAD automatically updates
Example:
HEAD -> main -> commit DHere:
HEADpoints to branchmainmainpoints to the latest commit (D)
You can verify HEAD using git show command:
git log --onelineor use the git show command to inspect the current commit
git show HEADHEAD~ vs HEAD^ (Quick Difference)
HEAD~ vs HEAD^ in one line
- HEAD^ → immediate parent of current commit
- HEAD~n → nth ancestor in a straight line
Shortcut:
HEAD~1 = HEAD^
HEAD~2 = parent of parent
When to use ~ vs ^
Use HEAD^ when dealing with parent commits, especially in merge scenarios:
git show HEAD^- Refers to the first parent
- In merge commits:
HEAD^1→ main branch parentHEAD^2→ merged branch parent
Use HEAD~ when navigating commit history linearly:
git log HEAD~3This command moves back multiple commits
Simple Example (for clarity)
Assume commit history:
A → B → C → D (HEAD)Then:
HEAD    = D
HEAD^   = C
HEAD~1  = C
HEAD~2  = B
HEAD~3  = A
Key takeaway
- Use HEAD^ → when working with parent relationships (especially merges)
- Use HEAD~ → when moving back in commit history step-by-step
How HEAD~ Works in Git
HEAD~1, HEAD~2 explained
The tilde (~) operator is used to move backward in commit history along a single line.
HEAD~1→ one commit before HEAD (same asHEAD^)HEAD~2→ two commits before HEADHEAD~3→ three commits before HEAD
Example:
A → B → C → D (HEAD)Mapping:
HEAD    = D
HEAD~1  = C
HEAD~2  = B
HEAD~3  = A
Commands:
git show HEAD~1
git log HEAD~2
git diff HEAD~1 HEAD
Traversing commit history using ~
You can use ~ to move across commits for different operations, including recovery scenarios explained in git reset examples, similar to how navigation works in git checkout command.
git checkout HEAD~2
git reset --hard HEAD~1
git diff HEAD~3 HEAD
How HEAD^ Works in Git
HEAD^ vs HEAD^2 (merge commits explained)
The caret (^) operator refers to parent commits.
HEAD^orHEAD^1→ first parentHEAD^2→ second parent (used in merge commits)
Example of a merge commit, which is explained in detail in git merge examples:
E---F (feature)
     /
A---B---C---D (main, HEAD)
If D is a merge commit:
HEAD^1 = C   (main branch)
HEAD^2 = F   (merged branch)
Commands:
git show HEAD^1
git show HEAD^2
Understanding HEAD~ vs HEAD^ with Diagram
The image shows how HEAD~ and HEAD^ behave differently when navigating Git commit history.
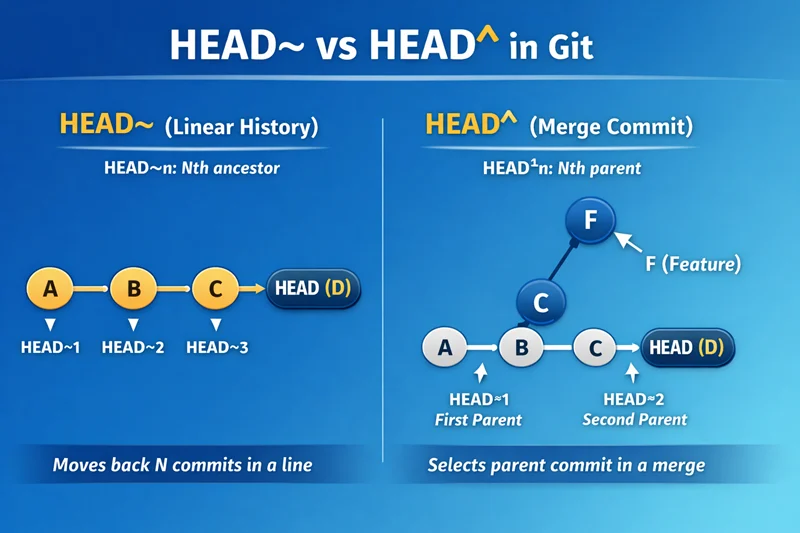
Left Side: HEAD~ (Linear History)
On the left, commits follow a straight line:
A → B → C → D (HEAD)HEAD~1→ moves to commit CHEAD~2→ moves to commit BHEAD~3→ moves to commit A
Key idea:
HEAD~nmoves backward step-by-step in a single line- It always follows the first-parent chain
Right Side: HEAD^ (Merge Commit)
On the right, a merge scenario is shown:
F (feature)
       \
A → B → C → D (HEAD)
Here, D is a merge commit with two parents.
HEAD^1→ points to C (main branch)HEAD^2→ points to F (feature branch)
Key idea:
HEAD^selects a specific parent^1= first parent (current branch)^2= second parent (merged branch)
Key Difference Highlighted
-
HEAD~
- Moves back in history linearly
- Ignores merge structure
-
HEAD^
- Selects parent commits
- Useful for understanding merges
Frequently Asked Questions
1. What is HEAD in Git?
2. What is the difference between HEAD~ and HEAD^?
3. Is HEAD~ same as HEAD^?
4. What is HEAD^2 in Git?
5. What is HEAD@{1} in Git?
6. How to use HEAD~ in Git?
7. When should I use HEAD^ vs HEAD~?
8. What is git reflog and how is it related to HEAD@{}?
Summary
-
HEAD points to the current commit in your working branch
-
HEAD~n is used to move backward in commit history step-by-step
-
HEAD^n is used to access specific parent commits, especially in merge scenarios
-
HEAD@{n} helps you recover previous states using git reflog tutorial
-
Use HEAD~ for navigating history
-
Use HEAD^ for understanding parent relationships in merges
-
Use HEAD@{} for recovery and tracking past positions, often combined with concepts explained in git reset (soft vs hard vs mixed)
