
In this section, we will build a foundational understanding of the Kubernetes API server and the various ways of interacting with it. We will learn how kubectl and other HTTP clients communicate with the Kubernetes API server. We will use some practical demonstrations to trace these communications and see the details of HTTP requests. Then, we will also see how we can look up the API details so that you can write your own API request from scratch.
The Kubernetes API Server
In Kubernetes, all communications and operations between the control plane components and external clients, such as kubectl, are translated into RESTful API calls that are handled by the API server. Effectively, the API server is a RESTful web application that processes RESTful API calls over HTTP to store and update API objects in the etcd datastore.
Kubernetes is made up of a bunch of nodes (machines in the cluster) with different roles as shown in the following figure:
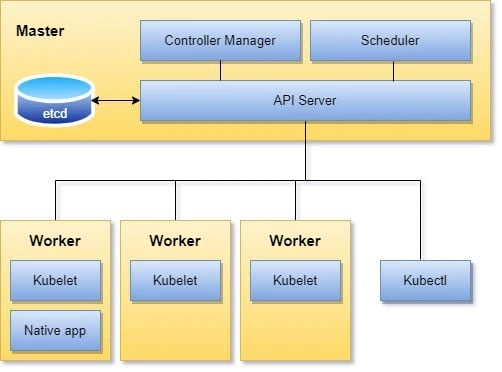
The control plane on the master/controller node(s) consists of the API server, controller manager, and scheduler. The API server is the central management entity and the only component that talks directly with the distributed storage component etcd.
The API server has the following core responsibilities:
- To serve the Kubernetes API. This API is used cluster-internally by the master components, the worker nodes, and your Kubernetes-native apps, as well as externally by clients such as kubectl.
- To proxy cluster components, such as the Kubernetes dashboard, or to stream logs, service ports, or serve kubectl exec sessions.
Serving the API means:
- Reading state: getting single objects, listing them, and streaming changes
- Manipulating state: creating, updating, and deleting objects
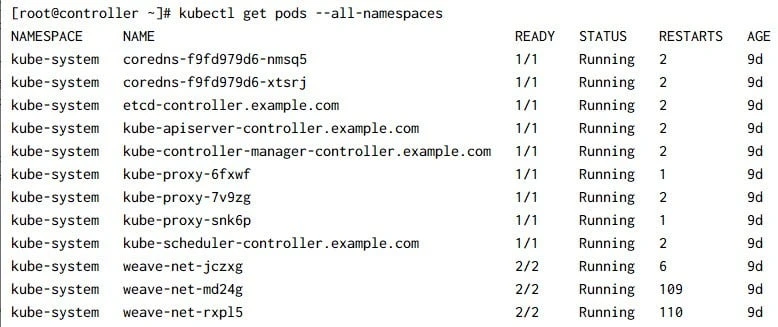
To check your API server on the controller, execute
kubectl get pods -n kube-system where kube-system is our namespace:

So you can see, currently we have a single instance of the API server
i.e. kube-apiserver-controller.example.com. The API server is
stateless (that is, its behavior will be consistent regardless of the
state of the cluster) and is designed to scale horizontally. Usually,
for the high availability of clusters, it is recommended to have at
least three instances to handle the load and fault tolerance better.
Kubernetes HTTP Request Flow
The kubectl command is translated into an HTTP API request in JSON
format and is sent to the API server. Then, the API server returns a
response to the client, along with any requested information.
The following diagram shows the API request life cycle and what happens inside the API server when it receives a request:

Authentication
- In Kubernetes, every API call needs to authenticate with the API server, regardless of whether it comes from outside the cluster, such as those made by kubectl, or a process inside the cluster, such as those made by kubelet.
- When an HTTP request is sent to the API server, the API server needs to authenticate the client sending this request.
- The HTTP request will contain the information required for authentication, such as the username, user ID, and group.
- The authentication method will be determined by either the header or the certificate of the request.
- To deal with these different methods, the API server has different authentication plugins, such as ServiceAccount tokens, which are used to authenticate ServiceAccounts, and at least one other method to authenticate users, such as X.509 client certificates.
Authorization
After authentication is successful, the attributes from the HTTP request are sent to the authorization plugin to determine whether the user is permitted to perform the requested action. To demonstrate this I will create a new Read Only Service Account. You can ignore the steps and commands for now as I will explain these in later tutorials.
Now, we're going to create three YAML files for our RBAC resources
- Create a Service Account using service-account.yml file with following content:
[root@controller ~]# cat service-account.yml
apiVersion: v1
kind: ServiceAccount
metadata:
  name: read-only-user
  namespace: default
- Next, we are going to create a ClusterRole object and assign it
some permissions. Create a file called
cluster-role.ymlwith the following content:
[root@controller ~]# cat cluster-role.yml
apiVersion: rbac.authorization.k8s.io/v1
kind: ClusterRole
metadata:
  namespace: default
  name: read-only-user-cluster-role
rules:
  - verbs:
      - "list"
    apiGroups:
      - ""
    resources:
      - "pods"
We are defining a ClusterRole with the ability to list all the Pods in any namespace, but nothing else.
- Next, we are going to create a ClusterRoleBinding object that will
bind the created ServiceAccount and ClusterRole. Create a file
called
cluster-role-binding.ymlwith the following content:
[root@controller ~]# cat cluster-role-binding.yml
apiVersion: rbac.authorization.k8s.io/v1
kind: ClusterRoleBinding
metadata:
  name: read-only-user-cluster-role-binding
  namespace: default
roleRef:
  name: read-only-user-cluster-role
  kind: ClusterRole
  apiGroup: rbac.authorization.k8s.io
subjects:
  - kind: ServiceAccount
    name: read-only-user
    namespace: default
Run the following command to create this RBAC policy, as well as our ServiceAccount:

Now I am will use my root user which has Cluster Admin privilege to list the pods:
Next let's describe any one of the pods (output is trimmed):

Both the commands are successful as we were executing the command as admin.
Now, we will run the same commands we used previously, but this time pretending to be the user using the ServiceAccount that is currently bound to the ClusterRole and ClusterRoleBinding that we created.
[root@controller ~]# kubectl --as=system:serviceaccount:default:read-only-user get pods --all-namespaces
NAMESPACE     NAME                                             READY   STATUS    RESTARTS   AGE
kube-system   coredns-f9fd979d6-nmsq5                          1/1     Running   2          9d
kube-system   coredns-f9fd979d6-xtsrj                          1/1     Running   2          9d
kube-system   etcd-controller.example.com                      1/1     Running   2          9d
kube-system   kube-apiserver-controller.example.com            1/1     Running   2          9d
kube-system   kube-controller-manager-controller.example.com   1/1     Running   2          9d
kube-system   kube-proxy-6fxwf                                 1/1     Running   1          9d
kube-system   kube-proxy-7v9zg                                 1/1     Running   2          9d
kube-system   kube-proxy-snk6p                                 1/1     Running   1          9d
kube-system   kube-scheduler-controller.example.com            1/1     Running   2          9d
So this command was successfully executed, now let's try to describe a pod:
[root@controller ~]# kubectl --as=system:serviceaccount:default:read-only-user describe pod -n kube-system weave-net-md24g
Error from server (Forbidden): pods "weave-net-md24g" is forbidden: User "system:serviceaccount:default:read-only-user" cannot get resource "pods" in API group "" in the namespace "kube-system"
The kubectl describe command uses the get verb which is not
allowed from the read-only service account user. Hence the user will
get a Forbidden error. This Forbidden error is returned by the
authorization plugin.
kubectl provides a tool that you can call by using
kubectl auth can-i to check whether an action is allowed for the
current user.
[root@controller ~]# kubectl auth can-i get pods --all-namespaces
yes
Trying the same command as read-only service account user
[root@controller ~]# kubectl --as=system:serviceaccount:default:read-only-user auth can-i get pods --all-namespaces
no
Admission Control
- After the request is authenticated and authorized, it goes to the admission control modules. These modules can modify or reject requests.
- If the request is only trying to perform a READ operation, it bypasses this stage; but if it is trying to create, modify, or delete, it will be sent to the admission controller plugins.
- Kubernetes comes with a set of predefined admission controllers, although you can define custom admission controllers as well.
The HTTP Interface of the API Server
The Kubernetes API uses JSON over HTTP for its requests and responses. The API server HTTP interface handles HTTP requests to query and manipulate Kubernetes resources using the following HTTP verbs (or HTTP methods):
| HTTP Method | Usage | Example |
|---|---|---|
| POST | Creates a new resource, such as a service, deployment, pod etc | kubectl create -f <filename.yaml> |
| PUT | Replaces or updates an existing resource | kubectl apply -f <filename.yaml> |
| GET | Retrieves the details of a resource | kubectl get pod<br />kubectl describe pod <pod-name><br />kubectl get pod -w |
| PATCH | Partially updates existing resource | kubectl set image deployment/kubeserve nginx=nginx:1.9.1 |
| DELETE | Deletes resource such as deleting a pod | kubectl delete pod <pod-name> |
Kubernetes API Terminology
You can get a full list of API resources by using the following command:
~]# kubectl api-resources
You should see a response similar to this:
NAME                              SHORTNAMES   APIGROUP                       NAMESPACED   KIND
bindings                                                                      true         Binding
componentstatuses                 cs                                          false        ComponentStatus
configmaps                        cm                                          true         ConfigMap
endpoints                         ep                                          true         Endpoints
events                            ev                                          true         Event
limitranges                       limits                                      true         LimitRange
namespaces                        ns                                          false        Namespace
nodes                             no                                          false        Node
persistentvolumeclaims            pvc                                         true         PersistentVolumeClaim
persistentvolumes                 pv                                          false        PersistentVolume
pods                              po                                          true         Pod
..
Here the list of API resources are grouped under 5 different columns. Let us understand individual columns separately:
- NAME and SHORTNAMES are quite self explanatory which are name and short names of the API resources.
- KIND: The type of an entity. Each object has a field Kind (lowercase kind in JSON, capitalized Kind in Golang), which tells a client such as kubectl that it represents, for example, a pod
- APIGROUP: A collection of Kinds that are logically related. For example, all batch objects like Job or ScheduledJob are in the batch API group.
API version
In the Kubernetes API, there is the concept of API versioning; that is,
the Kubernetes API supports multiple versions of a type of resource
Each API group can exist in multiple versions, and most of them do. For
example, a group first appears as v1alpha1 and is then promoted to
v1beta1 and finally graduates to v1.
The different API versions differ in terms of stability and support:
- Alpha: This version is indicated by alpha in the apiVersion
field—for example,
/apis/batch/v1alpha1. The alpha version of resources is disabled by default as it is not intended for production clusters but can be used by early adopters and developers who are willing to provide feedback and suggestions and report bugs. - Beta: This version is indicated by beta in the apiVersion
field—for example,
/apis/certificates.k8s.io/v1beta1. The beta version of resources is enabled by default, and the code behind it is well tested. - Stable: For these versions, the apiVersion field just contains the
version number without any mention of alpha or beta—for example,
/apis/networking.k8s.io/v1.
You can get a complete list of the API versions enabled in your cluster by using the following command:
~]# kubectl api-versions
...
authentication.k8s.io/v1
authentication.k8s.io/v1beta1
authorization.k8s.io/v1
authorization.k8s.io/v1beta1
autoscaling/v1
autoscaling/v2beta1
autoscaling/v2beta2
batch/v1
batch/v1beta1
...
An interesting thing that you may observe in this screenshot is that some API resources, such as autoscaling, have multiple versions; for example, for autoscaling, there is v1beta1, v1beta2, and v1.
In this case, the difference in the versions is that of feature support. The Stable release for autoscaling is autoscaling/v1, which only supports scaling the number of pods based on the average CPU metric. The beta release for autoscaling, which is autoscaling/v2beta1, supports scaling based on CPU and memory utilization. The newer version in the beta release, which is autoscaling/v2beta2, supports scaling the number of pods based on custom metrics in addition to CPU and memory.
To get more information about individual API resource:

Kubernetes API via Command Line
There are two possible ways to directly access the API server via the
REST API
— by using kubectl in proxy mode or by providing the location and
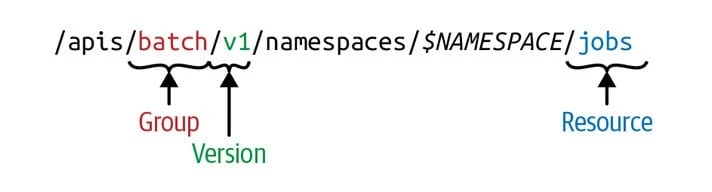
authentication credentials directly to the HTTP client. A concrete path,
for example, in the default namespace would be
/apis/batch/v1/namespaces/default/jobs.
Access API using kubectl
In this section we’ll be using kubectl and curl to demonstrate the
use of the Kubernetes API. To get all the API resources yoi can use
following command:
[root@controller ~]# kubectl get --raw /
{
  "paths": [
    "/api",
    "/api/v1",
    "/apis",
    "/apis/",
    "/apis/admissionregistration.k8s.io",
    "/apis/admissionregistration.k8s.io/v1",
    "/apis/admissionregistration.k8s.io/v1beta1",
    "/apis/apiextensions.k8s.io",
    "/apis/apiextensions.k8s.io/v1",
    "/apis/apiextensions.k8s.io/v1beta1",
    "/apis/apiregistration.k8s.io",
    "/apis/apiregistration.k8s.io/v1",
    "/apis/apiregistration.k8s.io/v1beta1",
    "/apis/apps",
    "/apis/apps/v1",
    "/apis/authentication.k8s.io",
...
At the top of this list is v1 and under that is namespaces, so to
request the namespaces:
~]# kubectl get --raw /api/v1/namespaces
{"kind":"NamespaceList","apiVersion":"v1","metadata":{"selfLink":"/api/v1/namespaces","resourceVersion":"171597"},"items":[{"metadata":{"name":"default","selfLink":"/api/v1/namespaces/default","uid":"e45242f9-2f0e-4bcb-a385-6058044f20ce","resourceVersion":"155","creationTimestamp":"2020-11-11T05:46:42Z","managedFields":[{"manager":"kube-apiserver","operation":"Update","apiVersion":"v1","time":"2020-11-11T05:46:42Z","fieldsType":"FieldsV1","fieldsV1":{"f:status":{"f:phase":{}}}}]},"spec":{"finalizers":["kubernetes"]},"status":{"phase":"Active"}},{"metadata":{"name":"kube-node-lease","selfLink":"/api/v1/namespaces/kube-node-lease","uid":"7e5ec941-3999-4a21-8659-e52ca5684a8c","resourceVersion":"42","creationTimestamp":"2020-11-11T05:46:40Z","managedFields":[{"manager":"kube-apiserver","operation":"Update","apiVersion":"v1","time":"2020-11-11T05:46:40Z","fieldsType":"FieldsV1","fieldsV1":{"f:status":{"f:phase":{}}}}]},"spec":{"finalizers":["kubernetes"]},"status":{"phase":"Active"}},{"metadata":{"name":"kube-public","selfLink":"/api/v1/namespaces/kube-public","uid":"1d1e4e3e-12f0-44a4-8233-e021d20998b3","resourceVersion":"41","creationTimestamp":"2020-11-11T05:46:40Z","managedFields":[{"manager":"kube-apiserver","operation":"Update","apiVersion":"v1","time":"2020-11-11T05:46:40Z","fieldsType":"FieldsV1","fieldsV1":{"f:status":{"f:phase":{}}}}]},"spec":{"finalizers":["kubernetes"]},"status":{"phase":"Active"}},{"metadata":{"name":"kube-system","selfLink":"/api/v1/namespaces/kube-system","uid":"23bd63e4-0035-4395-936d-120ba384ecaa","resourceVersion":"21","creationTimestamp":"2020-11-11T05:46:40Z","managedFields":[{"manager":"kube-apiserver","operation":"Update","apiVersion":"v1","time":"2020-11-11T05:46:40Z","fieldsType":"FieldsV1","fieldsV1":{"f:status":{"f:phase":{}}}}]},"spec":{"finalizers":["kubernetes"]},"status":{"phase":"Active"}}]}
One of the namespaces is called default, so request details on the default namespace:
~]# kubectl get --raw /api/v1/namespaces/default
{"kind":"Namespace","apiVersion":"v1","metadata":{"name":"default","selfLink":"/api/v1/namespaces/default","uid":"e45242f9-2f0e-4bcb-a385-6058044f20ce","resourceVersion":"155","creationTimestamp":"2020-11-11T05:46:42Z","managedFields":[{"manager":"kube-apiserver","operation":"Update","apiVersion":"v1","time":"2020-11-11T05:46:42Z","fieldsType":"FieldsV1","fieldsV1":{"f:status":{"f:phase":{}}}}]},"spec":{"finalizers":["kubernetes"]},"status":{"phase":"Active"}}
There is a common Linux tool called jq available as part of jq rpm.
jq is like sed for JSON data. Using jq can make the JSON output from
kubectl much easier to read with syntax highlighting:
 ~]# kubectl get --raw /api/v1/namespaces/default | jq .
{
  "kind": "Namespace",
  "apiVersion": "v1",
  "metadata": {
    "name": "default",
    "selfLink": "/api/v1/namespaces/default",
    "uid": "e45242f9-2f0e-4bcb-a385-6058044f20ce",
    "resourceVersion": "155",
    "creationTimestamp": "2020-11-11T05:46:42Z",
    "managedFields": [
      {
        "manager": "kube-apiserver",
        "operation": "Update",
        "apiVersion": "v1",
        "time": "2020-11-11T05:46:42Z",
        "fieldsType": "FieldsV1",
        "fieldsV1": {
          "f:status": {
            "f:phase": {}
          }
        }
      }
    ]
  },
  "spec": {
    "finalizers": [
      "kubernetes"
    ]
  },
  "status": {
    "phase": "Active"
  }
}
Alternatively you can also use Python3 tool to get the JSON output:
~]# kubectl get -v=9 --raw /api/v1/namespaces/default | python3 -m json.tool
Access API using curl
kubectl has a great feature called kubectl proxy, which is the recommended approach for interacting with the API server. This is recommended because it is easier to use and provides a more secure way of doing so because it verifies the identity of the API server by using a self-signed certificate, which prevents man-in-the-middle (MITM) attacks.
Let’s start by executing the following command in a terminal to start a proxy to the API server:
[root@controller ~]# kubectl proxy --port=8080 &
[1] 3810
Starting to serve on 127.0.0.1:8080
The default port used is 8001, but in our example we have defined a custom port number 8080 while adding an & (ampersand) sign at the end of our command to allow the proxy to run in the terminal background so that we can continue working in the same terminal window.
We can now start exploring the API using curl, this command proxies the Kubernetes API to our local machine and also takes care of the authentication and authorization bits. It allows us to directly issue requests via HTTP and receive JSON payloads in return.
~]# curl http://127.0.0.1:8080/apis | less
{
  "kind": "APIGroupList",
  "apiVersion": "v1",
  "groups": [
    {
      "name": "apiregistration.k8s.io",
      "versions": [
        {
          "groupVersion": "apiregistration.k8s.io/v1",
          "version": "v1"
        },
        {
          "groupVersion": "apiregistration.k8s.io/v1beta1",
          "version": "v1beta1"
        }
      ],
      "preferredVersion": {
...
Now similar to kubectl, we will access the default namespace using
curl, this will return a large output with the JSON data that is
stored on this path.
 ~]# curl http://127.0.0.1:8080/apis/apps/v1/namespaces/default/deployments
{
  "kind": "DeploymentList",
  "apiVersion": "apps/v1",
  "metadata": {
    "selfLink": "/apis/apps/v1/namespaces/default/deployments",
    "resourceVersion": "173808"
  },
  "items": []
}
Conclusion
In this Kubernetes tutorial we learned about API server, the way that Kubernetes uses the RESTful API, and how API resources are defined. We learned that API calls go through multiple stages, including authentication, authorization, and admission control. We also applied what we learned by making an API call directly to the API server, using the curl HTTP client to interact with objects by using different authentication methods, such as ServiceAccount.
By now you should know how the API server works internally, and how to interact with it using the CLI tool kubectl for resource exploration and manipulation.
