
We have already covered the steps to install single node and multi-Kubernetes Cluster using different Container Network Interface plugin. Now in this tutorial we will setup Kubernetes Cluster on AWS Cloud using EC2 instances.
We assume that you will have an AWS account, or else you can create a free tier account with AWS which is free of cost but you will have to share your credit card details. I have tried to use the free tier without any additional cost but the config spec of the instances would be very less and may not be enough to perform production grade testing. In such scenario you can opt for instance with higher spec but that may cost you.
If you run the bastion or admin workstation on Ubuntu, install the AWS CLI and configure it with aws configure before you create IAM users and EC2 resources from the shell.
Once you are done with the cluster, terminate the instances and make sure that EBS volumes are deleted because you will pay for these storage volumes even if the instances are in stopped state.
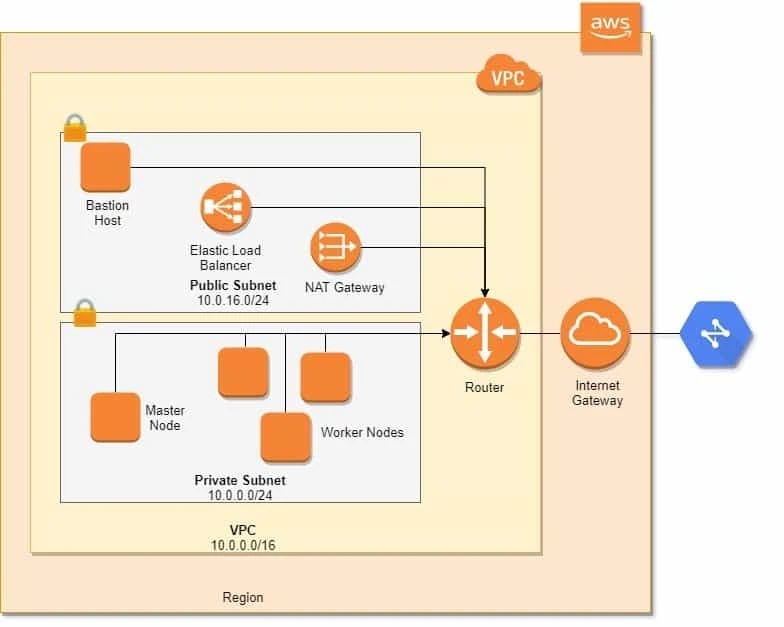
Our Cluster Architecture
We are going to setup Kubernetes cluster on two AWS EC2 instances where one will act as a controller and the other would be a worker node. We will cover different areas of security to isolate our Kubernetes cluster in private network while allowing the operator to access the machines from the workstation.
To achieve this we will use an additional instance as a bastion host that will allow incoming SSH connections from the outside world.
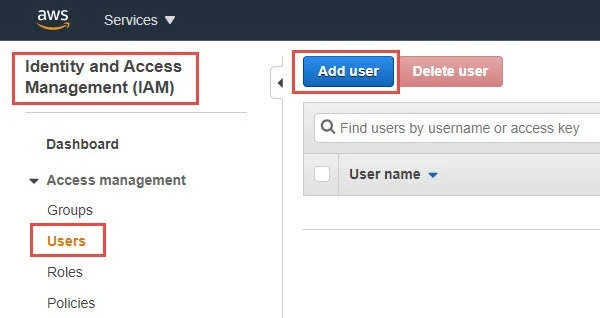
1. Create IAM User
Login to the AWS Dashboard and under AWS Management Console , look out for IAM under All Services -> Security, Identity & Compliance
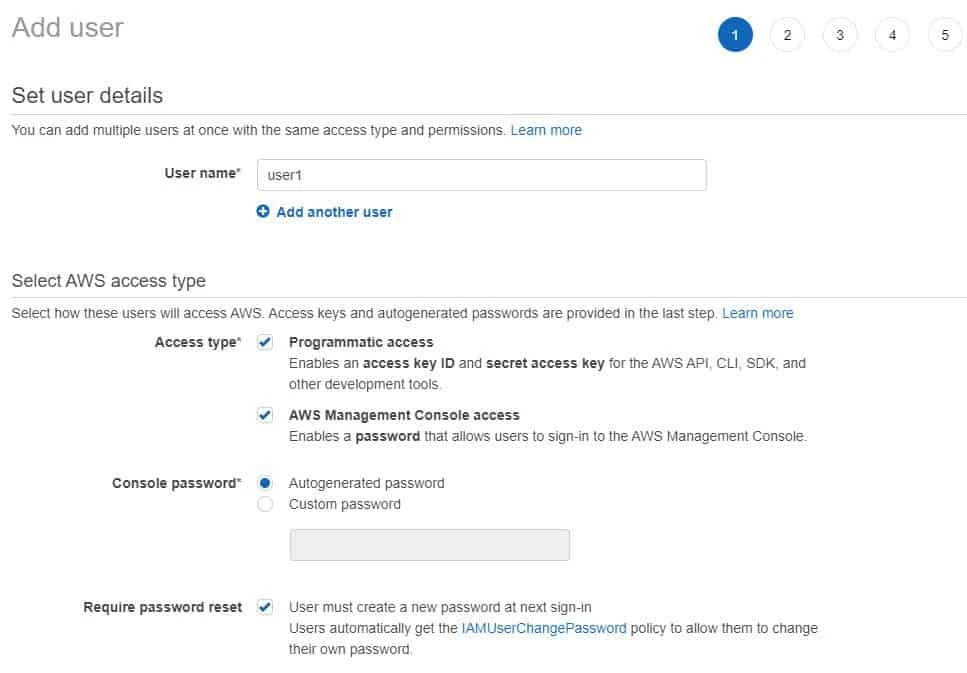
Start by choosing a username for your user. Check both boxes to enable Programmatic access (so you can use the command-line client) and AWS Management Console access so you can log into the web console, as shown in the preceding screenshot. Click on "Next: Permissions" to go to the next step:
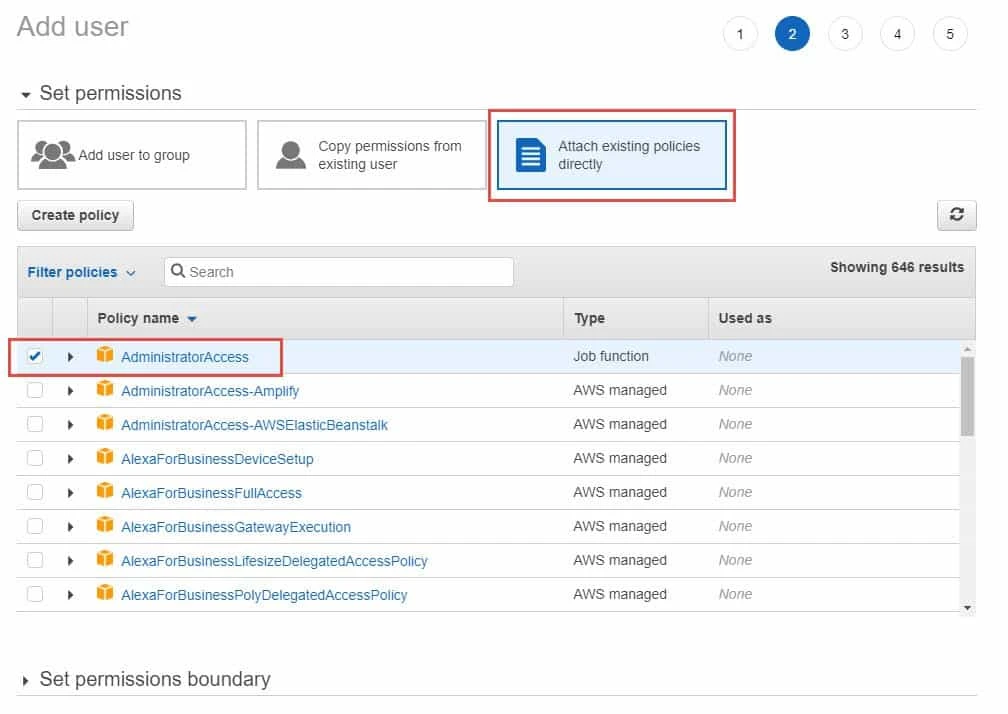
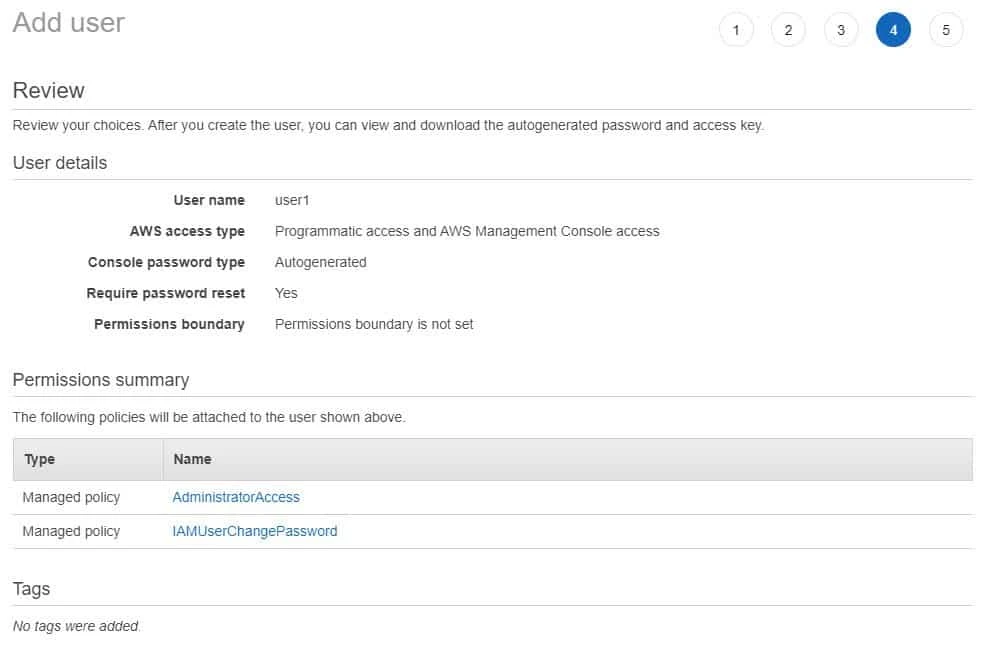
On the next screen, you can configure the permissions for your user. Choose Attach existing policies directly, then choose the AdministratorAccess policy, as shown in the following screenshot:
We will skip the Tags and click on "Next: Review". Review your settings, then click Create user:
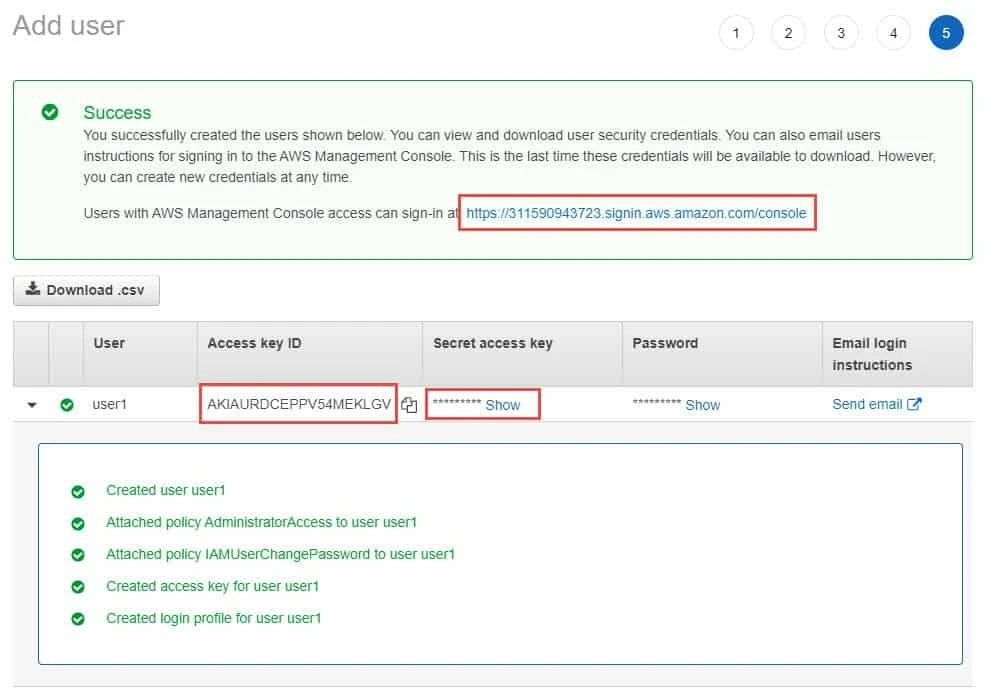
Once your user has been created, take a note of the credentials. You will need the Access key ID and Secret access key shortly to configure the AWS command-line client. Also take a note of the console sign-in link, as this is unique to your AWS account, shown as follows:
2. Installing AWS CLI
We can create our cluster using the AWS WEB GUI but the control would be more precise if we use the AWS CLI. You can follow the instructions to install the AWS client on any of your Linux or Windows node. I have a Linux VM installed on Oracle VirtualBox on my laptop which I will be using as my AWS command line client.
Download and install the AWS CLI client file:
Download the file with curl; the curl command compares -O, -L, -fsSL, and -o output options.
[root@client ~]# curl "https://awscli.amazonaws.com/awscli-exe-linux-x86_64.zip" -o "awscliv2.zip"

[root@client ~]# unzip awscliv2.zip

[root@client ~]# ./aws/install
You can now run: /usr/local/bin/aws --version
Check the version of AWS CLI:
[root@client ~]# aws --version
aws-cli/2.1.31 Python/3.8.8 Linux/4.18.0-80.el8.x86_64 exe/x86_64.centos.8 prompt/off
Once you have installed the command-line client, run the aws configure
command to configure the CLI with your credentials.
This command will update the aws config files in your home directory. You can get the list of AWS regions and choose the one which may be nearest to your location for better latency. In my case I had already been using US East Ohio Region which is mapped to my account so I will continue to use the same.
[root@client ~]# aws configure
AWS Access Key ID [None]: AKIAURDCEXEV54MEKRGV
AWS Secret Access Key [None]: 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
Default region name [None]: us-east-2
Default output format [None]:
3. Setting up Key pair
We would ne a SSH Private Public key pair to access our EC2 instance.
You can use any existing key pairs (if you have any) or we will create
one explicitly to be used for AWS. We will use
ssh-keygen to generate our private and public key pair. I have defined an empty
password using -P "" and the key name would be aws-ec2
[root@client ~]# ssh-keygen -t rsa -P "" -f aws-ec2
Generating public/private rsa key pair.
Your identification has been saved in aws-ec2.
Your public key has been saved in aws-ec2.pub.
The key fingerprint is:
SHA256:2DlI7EVsbnojsrKL9DVscDCnL0l1EM5jUgX99m84dIE [email protected]
The key's randomart image is:
+---[RSA 2048]----+
|     ==o.        |
|    +..oo        |
|   + Bo+o   .    |
|    Ooo=o+ E .   |
|   + .+oS .   .  |
|  . B o o. o .   |
| . o O o .. +    |
|..o = .    o o   |
|. o=        o    |
+----[SHA256]-----+
The keys would be generated in the current folder:
[root@client ~]# ls -l aws-ec2*
-rw------- 1 root root 1831 Mar 24 16:03 aws-ec2
-rw-r--r-- 1 root root  405 Mar 24 16:03 aws-ec2.pub
To add this key pair to AWS, login to the AWS Dashboard and under AWS Management Console , click on EC2 under All Services -> Compute. From the left TAB select Key Pairs under Network & Security.
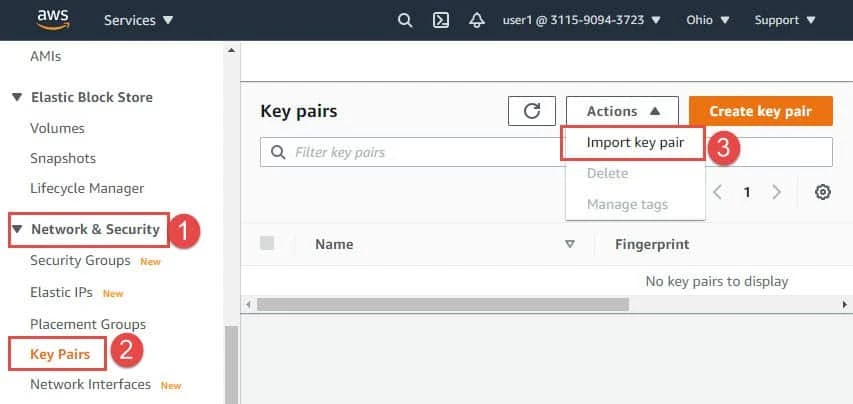
Choose a name that will identify your key pair within AWS . Then, either navigate to your key's location or just paste its text into the large text box, and then click Import. Once you have imported your key, you should see it listed on the Key Pairs page.

4. Configure Network on AWS
Next we will prepare the network to be used by the pods and the cluster.
4.1 Create Virtual private Cloud (VPC)
We will set up a new VPC in your AWS account. A VPC, or Virtual Private Cloud that allows us to have a private network which is isolated from all the other users of EC2 and the internet that we can launch instances onto. It provides a secure foundation that we can use to build a secure network for our cluster, as shown in the following command:
[root@client ~]# VPC_ID=$(aws ec2 create-vpc --cidr-block 10.0.0.0/16 --query "Vpc.VpcId" --output text)
The VpcId will be unique to your account, so I am going to set a shell
variable that I can use to refer to it whenever we need.
[root@client ~]# echo $VPC_ID
vpc-0f13fdd748798c149
4.2 Enable DNS Support
Kubernetes names your instances based on the internal DNS hostnames that AWS assigns to them. If we enable DNS support in the VPC, then we will be able to resolve these hostnames when using the DNS server provided inside the VPC, as follows:
[root@client ~]# aws ec2 modify-vpc-attribute --enable-dns-support --vpc-id $VPC_ID
[root@client ~]# aws ec2 modify-vpc-attribute --enable-dns-hostnames --vpc-id $VPC_ID
4.3 Add tags to the VPC and subnet
Kubernetes relies on special tags on the VPC and subnets to know which
VPC resources to use for deploying infrastructure. The key for these
tags is kubernetes.io/cluster/<cluster_name>. For resources that might
be shared between several distinct clusters, we use the shared value.
This means that Kubernetes can make use of them, but won't ever remove
them from your account.
We would use this for resources such as VPCs. Resources where the life cycle is fully managed by Kubernetes have a tag value of owned and may be deleted by Kubernetes if they are no longer required. Kubernetes typically creates these tags automatically when it creates resources such as instances in an autoscaling group, EBS volumes, or load balancers.
[root@client ~]# aws ec2 create-tags --resources $VPC_ID --tags Key=Name,Value=golinuxcloud Key=kubernetes.io/cluster/golinuxcloud,Value=shared
When we created our VPC, a main route table was automatically created. We will use this for routing in our private subnet. Let's grab the ID to use later, as shown in the following command:
[root@client ~]# PRIVATE_ROUTE_TABLE_ID=$(aws ec2 describe-route-tables --filters Name=vpc-id,Values=$VPC_ID --query "RouteTables[0].RouteTableId" --output=text)

[root@client ~]# echo $PRIVATE_ROUTE_TABLE_ID
rtb-0027af99433929578
Now we will add a second route table to manage routing for the public subnets in our VPC, as follows:
[root@client ~]# PUBLIC_ROUTE_TABLE_ID=$(aws ec2 create-route-table --vpc-id $VPC_ID --query "RouteTable.RouteTableId" --output text)

[root@client ~]# echo $PUBLIC_ROUTE_TABLE_ID
rtb-0cf752bd6a8174062
Now we will give the route tables names so we can keep track of them later:
[root@client ~]# aws ec2 create-tags --resources $PUBLIC_ROUTE_TABLE_ID --tags Key=Name,Value=golinuxcloud-public
[root@client ~]# aws ec2 create-tags --resources $PRIVATE_ROUTE_TABLE_ID --tags Key=Name,Value=golinuxcloud-private
4.4 Create private and public subnets for cluster
Next, we are going to create two subnets for our cluster to use. You
should choose an availability zone for your cluster from the region you
are using by running aws ec2 describe-availability-zones.
[root@client ~]# aws ec2 describe-availability-zones
...
        {
            "State": "available",
            "OptInStatus": "opt-in-not-required",
            "Messages": [],
            "RegionName": "us-east-2",
            "ZoneName": "us-east-2c",
            "ZoneId": "use2-az3",
            "GroupName": "us-east-2",
            "NetworkBorderGroup": "us-east-2",
            "ZoneType": "availability-zone"
        }
...
Because I am creating my cluster in the us-east-2 region, I am going
to create these subnets in the us-east-2c zone.
We will create a private subnet for instances that will only be
accessible from within our private network. We are going to use a /24
netmask on the CIDR block, as shown in the following command; with this,
AWS will give us 256 IP addresses that will be available to be assigned
to our EC2 instances and to pods launched by Kubernetes
[root@client ~]# PRIVATE_SUBNET_ID=$(aws ec2 create-subnet --vpc-id $VPC_ID --availability-zone us-east-2c --cidr-block 10.0.0.0/24 --query "Subnet.SubnetId" --output text)

[root@client ~]# echo $PRIVATE_SUBNET_ID
subnet-096e2d0c20be8d483

[root@client ~]# aws ec2 create-tags --resources $PRIVATE_SUBNET_ID --tags Key=Name,Value=golinuxcloud-private-1a Key=kubernetes.io/cluster/golinuxcloud,Value=owned Key=kubernetes.io/role/internal-elb,Value=1
Similarly we will create public network in the same availability zone. We will use this subnet for instances that need to be accessible from the internet, such as public load balancers and bastion host.
[root@client ~]# PUBLIC_SUBNET_ID=$(aws ec2 create-subnet --vpc-id $VPC_ID --availability-zone us-east-2c --cidr-block 10.0.16.0/24 --query "Subnet.SubnetId" --output text)

[root@client ~]# echo $PUBLIC_SUBNET_ID
subnet-09d11bc91c34aec80

[root@client ~]# aws ec2 create-tags --resources $PUBLIC_SUBNET_ID --tags Key=Name,Value=golinuxcloud-public-1a Key=kubernetes.io/cluster/golinuxcloud,Value=owned Key=kubernetes.io/role/elb,Value=1
Next, we should associate this subnet with the public route table, as follows:
[root@client ~]# aws ec2 associate-route-table --subnet-id $PUBLIC_SUBNET_ID --route-table-id $PUBLIC_ROUTE_TABLE_ID
{
    "AssociationId": "rtbassoc-0cc0cc6e747c71c60",
    "AssociationState": {
        "State": "associated"
    }
}
4.5 Create Internet Gateway
In order for the instances in our public subnet to communicate with the internet, we will create an internet gateway, attach it to our VPC, and then add a route to the route table, routing traffic bound for the internet to the gateway, as shown in the following command:
[root@client ~]# INTERNET_GATEWAY_ID=$(aws ec2 create-internet-gateway --query "InternetGateway.InternetGatewayId" --output text)

[root@client ~]# echo $INTERNET_GATEWAY_ID
igw-0825867bc46e6c478

[root@client ~]# aws ec2 attach-internet-gateway --internet-gateway-id $INTERNET_GATEWAY_ID --vpc-id $VPC_ID

[root@client ~]# aws ec2 create-route --route-table-id $PUBLIC_ROUTE_TABLE_ID --destination-cidr-block 0.0.0.0/0 --gateway-id $INTERNET_GATEWAY_ID
{
    "Return": true
}
4.6 Create NAT Gateway
In order to configure the instances in the private subnet, we will need them to be able to make outbound connections to the internet in order to install software packages and so on.
To make this possible, we will add a NAT gateway to the public subnet and then add a route to the private route table for internet-bound traffic, as follows:
[root@client ~]# NAT_GATEWAY_ALLOCATION_ID=$(aws ec2 allocate-address --domain vpc --query AllocationId --output text)
[root@client ~]# echo $NAT_GATEWAY_ALLOCATION_ID
eipalloc-0377b876190fc1d05

[root@client ~]# NAT_GATEWAY_ID=$(aws ec2 create-nat-gateway --subnet-id $PUBLIC_SUBNET_ID --allocation-id $NAT_GATEWAY_ALLOCATION_ID --query NatGateway.NatGatewayId --output text)
[root@client ~]# echo $NAT_GATEWAY_ID
nat-0acf23bed801c3a1e
4.7 Create Route
At this stage, you may have to wait a few moments for the NAT gateway to be created before creating the route, as shown in the following command:
[root@client ~]# aws ec2 create-route --route-table-id $PRIVATE_ROUTE_TABLE_ID --destination-cidr-block 0.0.0.0/0 --nat-gateway-id $NAT_GATEWAY_ID

{
    "Return": true
}
5. Setting up a bastion host
We will use the first host we are going to launch as a bastion host that will allow us to connect to other servers that are only accessible from within the private side of our VPC network.
5.1 Create Security Group
We will be creating a security group to allow SSH traffic to this
instance using aws ec2 create-security-group command.
[root@client ~]# BASTION_SG_ID=$(aws ec2 create-security-group --group-name ssh-bastion --description "SSH Bastion Hosts" --vpc-id $VPC_ID --query GroupId --output text)

[root@client ~]# echo $BASTION_SG_ID
sg-07253974259c2b225
Once we have created a security group, we can attach a rule to it to allow SSH ingress on port 22, as shown in the following command. This will allow you to access your host with an SSH client.
Here, I am allowing ingress from the CIDR range 0.0.0.0/0, but if your
internet connection has a stable IP address, you might want to limit
access to just your own IP:
[root@client ~]# aws ec2 authorize-security-group-ingress --group-id $BASTION_SG_ID --protocol tcp --port 22 --cidr 0.0.0.0/0
5.2 Create EC2 Compute Instance for bastion host
We will use Ubuntu-16 to create our EC2 Instance. Now to create an instance via command line, we would need the AMI ID of the image. You can use AWS CLI commands for Amazon EC2 to list only the Linux AMIs that meet your needs. Here are some command examples to locate Linux AMI on AWS.
[root@client ~]# UBUNTU_AMI_ID=$(aws ec2 describe-images --owners 099720109477 --filters Name=root-device-type,Values=ebs Name=architecture,Values=x86_64 Name=name,Values='*hvm-ssd/ubuntu-xenial-16.04*' --query "sort_by(Images, &Name)[-1].ImageId" --output text)

[root@client ~]# echo $UBUNTU_AMI_ID
ami-0a4b51dd47f678ba3
We are going to use a t2.micro instance for the bastion host (as shown
in the following command), as the usage for this instance type is
included in the AWS free tier, so you won't have to pay for it for the
first 12 months after you set up your AWS account.
In this command we have passed the KEY NAME and security ID, subnet ID Variable which we created earlier.
[root@client ~]# BASTION_ID=$(aws ec2 run-instances --image-id $UBUNTU_AMI_ID --instance-type t2.micro --key-name aws-ec2 --security-group-ids $BASTION_SG_ID  --subnet-id $PUBLIC_SUBNET_ID --associate-public-ip-address --query "Instances[0].InstanceId" --output text)

[root@client ~]# echo $BASTION_ID
i-0fec1c24185806866
Next, let's update the instance with a Name tag so we can recognize it
when looking at the EC2 console, as shown in the following command:
[root@client ~]# aws ec2 create-tags --resources $BASTION_ID --tags Key=Name,Value=ssh-bastion
5.3 Access bastion host
Once the instance has launched, you should be able to run the
aws ec2 describe-instances command to discover the public IP address
of your new instance, as follows:
[root@client ~]# BASTION_IP=$(aws ec2 describe-instances --instance-ids $BASTION_ID --query "Reservations[0].Instances[0].PublicIpAddress" --output text)

[root@client ~]# echo $BASTION_IP
3.141.105.241
You should now be able to access the instance using the private key from the same key pair as used to create the instane:
Connect with an identity file using ssh -i; the ssh command shows key permissions, usernames, and EC2-style logins.
[root@client ~]# ssh -i aws-ec2 ubuntu@$BASTION_IP
You may get similar login message:
Welcome to Ubuntu 16.04.7 LTS (GNU/Linux 4.4.0-1123-aws x86_64)

 * Documentation:  https://help.ubuntu.com
 * Management:     https://landscape.canonical.com
 * Support:        https://ubuntu.com/advantage

0 packages can be updated.
0 of these updates are security updates.

The programs included with the Ubuntu system are free software;
the exact distribution terms for each program are described in the
individual files in /usr/share/doc/*/copyright.

Ubuntu comes with ABSOLUTELY NO WARRANTY, to the extent permitted by
applicable law.

To run a command as administrator (user "root"), use "sudo ".
See "man sudo_root" for details.
6. Install sshutle to configure proxy
It is possible to forward traffic from your workstation to the private
network by just using
SSH port forwarding. However, we can make accessing servers via the
bastion instance much more convenient by using the sshuttle tool.
[root@client ~]# yum install sshuttle
You can also install it using pip (if you have Python installed), as
follows:
$ pip install sshuttle
To transparently proxy traffic to the instances inside the private network, we can run the following command:
[root@client ~]# sshuttle -r ubuntu@$BASTION_IP 10.0.0.0/16 --dns  --ssh-cmd 'ssh -i /root/aws-ec2'
client: Connected.
On another terminal, we can validate that this setup is working correctly by trying to log in to our instance through its private DNS name, as follows:
[root@client ~]# aws ec2 describe-instances --instance-ids $BASTION_ID --query "Reservations[0].Instances[0].PrivateDnsName"
"ip-10-0-16-157.us-east-2.compute.internal"
Now that we have the DNS name, try to connect to the instance using the DNS name:
[root@client ~]# ssh -i aws-ec2 [email protected]
This tests whether you can resolve a DNS entry from the private DNS provided by AWS to instances running within your VPC, and whether the private IP address now returned by that query is reachable.
7. Create Instance Profiles
In order for Kubernetes to make use of its integrations with the AWS cloud APIs, we need to set up IAM instance profiles. An instance profile is a way for the Kubernetes software to authenticate with the AWS API, and for us to assign fine-grained permissions on the actions that Kubernetes can take.
It can be confusing to learn all of the permissions that Kubernetes requires to function correctly. You could just set up instance profiles that allow full access to AWS, but this would be at the expense of security best practice.
[root@client ~]# curl https://raw.githubusercontent.com/errm/k8s-iam-policies/master/setup.sh -o setup.sh
Execute this script:
[root@client ~]# sh -e setup.sh
{
    "InstanceProfile": {
        "Path": "/",
        "InstanceProfileName": "K8sMaster",
        "InstanceProfileId": "AIPAURDCEPPV4A5667HKK",
        "Arn": "arn:aws:iam::311590943723:instance-profile/K8sMaster",
        "CreateDate": "2021-03-24T12:27:19+00:00",
        "Roles": []
    }
}
{
    "InstanceProfile": {
        "Path": "/",
        "InstanceProfileName": "K8sNode",
        "InstanceProfileId": "AIPAURDCEPPV3X226ERWA",
        "Arn": "arn:aws:iam::311590943723:instance-profile/K8sNode",
        "CreateDate": "2021-03-24T12:27:37+00:00",
        "Roles": []
    }
}
8. Create AMI - Install Kubernetes Software
Now we will create one EC2 instance to setup our Kubernetes Cluster. We will use this as a AMI to create EC2 instances for our Kubernetes Cluster on AWS.
8.1 Create security group
First, we create a security group for this instance, as follows:
[root@client ~]# K8S_AMI_SG_ID=$(aws ec2 create-security-group --group-name k8s-ami --description "Kubernetes AMI Instances" --vpc-id $VPC_ID --query GroupId --output text)
We will need to be able to access this instance from our bastion host in
order to log in and install software, so let's add a rule to allow SSH
traffic on port 22 from instances in the ssh-bastion security group,
as follows:
[root@client ~]# aws ec2 authorize-security-group-ingress --group-id $K8S_AMI_SG_ID --protocol tcp --port 22 --source-group $BASTION_SG_ID
8.2 Create EC2 instance
We are just using a t2.micro instance available in the free tier here
since we don't need a very powerful instance just to install packages,
as shown in the following command:
[root@client ~]# K8S_AMI_INSTANCE_ID=$(aws ec2 run-instances --subnet-id $PRIVATE_SUBNET_ID --image-id $UBUNTU_AMI_ID --instance-type t2.micro --key-name aws-ec2 --security-group-ids $K8S_AMI_SG_ID  --query "Instances[0].InstanceId" --output text)

[root@client ~]# echo $K8S_AMI_INSTANCE_ID
i-016285d491a4adcfa
We add a Name tag so we can identify the instance later if we need, as
follows:
[root@client ~]# aws ec2 create-tags --resources $K8S_AMI_INSTANCE_ID --tags Key=Name,Value=kubernetes-node-ami
Grab the IP address of the instance, as follows:
[root@client ~]# K8S_AMI_IP=$(aws ec2 describe-instances --instance-ids $K8S_AMI_INSTANCE_ID --query "Reservations[0].Instances[0].PrivateIpAddress" --output text)

[root@client ~]# echo $K8S_AMI_IP
10.0.0.10
Then log in with ssh, as follows:
[root@client ~]# ssh -i aws-ec2 ubuntu@$K8S_AMI_IP
Now we are ready to start configuring the instance with the software and configuration that all of the nodes in our cluster will need. Start by synchronizing the apt repositories, as follows:
ubuntu@ip-10-0-0-10:~$ sudo apt-get update
8.3 Install Container Runtime (Docker)
Kubernetes can work with a number of container runtimes, but Docker is still the most widely used.
In order for our Kubernetes pods to be accessible to other instances in the cluster, we need to set the default policy for the iptables FORWARD chain as shown in the following command; otherwise, Docker will set this to DROP and traffic for Kubernetes services will be dropped:
ubuntu@ip-10-0-0-10:~$ sudo su -
root@ip-10-0-0-10:~#

root@ip-10-0-0-10:~# printf "[Service]\nExecStartPost=/sbin/iptables -P FORWARD ACCEPT" |   sudo tee /etc/systemd/system/docker.service.d/10-iptables.conf
[Service]
ExecStartPost=/sbin/iptables -P FORWARD ACCEPT

root@ip-10-0-0-10:~# cat /etc/systemd/system/docker.service.d/10-iptables.conf
[Service]
ExecStartPost=/sbin/iptables -P FORWARD ACCEPT
Kubernetes will work well with the version of Docker that is included in
the Ubuntu repositories, so we can install it simply by installing the
docker.io package, as follows:
root@ip-10-0-0-10:~# apt-get install -y docker.io
Check that Docker is installed by running the following:
root@ip-10-0-0-10:~# docker version
Client:
 Version:           18.09.7
 API version:       1.39
 Go version:        go1.10.4
 Git commit:        2d0083d
 Built:             Fri Dec 18 12:33:04 2020
 OS/Arch:           linux/amd64
 Experimental:      false

Server:
 Engine:
  Version:          18.09.7
  API version:      1.39 (minimum version 1.12)
  Go version:       go1.10.4
  Git commit:       2d0083d
  Built:            Fri Dec  4 23:02:49 2020
  OS/Arch:          linux/amd64
  Experimental:     false
8.4 Install Kubernetes packages
Next, we will install the packages that we need to set up a Kubernetes control plane on this host. These packages are described in the following list:
- kubelet: The node agent that Kubernetes uses to control the container runtime. This is used to run all the other components of the control plane within Docker containers.
- kubeadm: This utility is responsible for bootstrapping a Kubernetes cluster.
- kubectl: The Kubernetes command-line client, which will allow us to interact with the Kubernetes API server.
First, add the signing key for the apt repository that hosts the Kubernetes packages (install cURL on Ubuntu on minimal worker images if needed), as follows:
root@ip-10-0-0-10:~# curl -s https://packages.cloud.google.com/apt/doc/apt-key.gpg | sudo apt-key add -
OK
Next add the Kubernetes apt repository, as follows:
root@ip-10-0-0-10:~# apt-add-repository 'deb http://apt.kubernetes.io/ kubernetes-xenial main'
Then, resynchronize the package indexes, as follows:
root@ip-10-0-0-10:~# apt-get update
Next install the required packages:
root@ip-10-0-0-10:~# apt-get install -y kubelet kubeadm kubectl
8.5 Create an AMI
Now We can use the create-image command to instruct AWS to snapshot
the root volume of our instance and use it to produce an AMI. But before
that we must shutdown the instance:
root@ip-10-0-0-10:~# shutdown -h now
Connection to 10.0.0.10 closed by remote host.
Connection to 10.0.0.10 closed.
Let's create an AMI snapshot:
[root@client ~]# K8S_AMI_ID=$(aws ec2 create-image --name k8s-1.10.3-001 --instance-id $K8S_AMI_INSTANCE_ID --description "Kubernetes v1.10.3" --query ImageId --output text)
It can take a few minutes for the image to become available for you to use, but you can check on its status with the describe-images command, as follows:
[root@client ~]# aws ec2 describe-images --image-ids $K8S_AMI_ID --query "Images[0].State"
"pending"
While the image is being built, you will see pending, but once it is
ready to use the state will have changed to available. Checking again
in few minutes:
[root@client ~]# aws ec2 describe-images --image-ids $K8S_AMI_ID --query "Images[0].State"
"available"
9. Setup Kubernetes Cluster on AWS
Now we can launch an instance for Kubernetes control plane components.
9.1 Create security group
First, we will create a security group for this new instance, as follows:
[root@client ~]# K8S_MASTER_SG_ID=$(aws ec2 create-security-group --group-name k8s-master --description "Kubernetes Master Hosts" --vpc-id $VPC_ID --query GroupId --output text)

[root@client ~]# echo $K8S_MASTER_SG_ID
sg-03079adcaadc32a68
We will need to be able to access this instance from our bastion host in
order to log in and configure the cluster. We will add a rule to allow
SSH traffic on port 22 from instances in the ssh-bastion security
group, as follows:
[root@client ~]# aws ec2 authorize-security-group-ingress --group-id $K8S_MASTER_SG_ID --protocol tcp --port 22 --source-group $BASTION_SG_ID
9.2 Launch EC2 instance using AMI
Now we can launch the instance using the AMI image we created earlier
Confirm the client binary location with which before scripting; see the which command when snap or manual installs alter PATH.
which contains all the Kubernetes packages and docker as container runtime:
[root@client ~]# K8S_MASTER_INSTANCE_ID=$(aws ec2 run-instances --private-ip-address 10.0.0.11 --subnet-id $PRIVATE_SUBNET_ID --image-id $K8S_AMI_ID --instance-type t2.micro --key-name aws-ec2 --security-group-ids $K8S_MASTER_SG_ID --credit-specification CpuCredits=unlimited --iam-instance-profile Name=K8sMaster --query "Instances[0].InstanceId" --output text)

[root@client ~]# echo $K8S_MASTER_INSTANCE_ID
i-069e68c7a0a774b21
We should give the instance a name, and to ensure that Kubernetes can
associate all of the resources with our cluster, we will also add the
KubernetesCluster tag with a name for this cluster, as follows:
[root@client ~]# aws ec2 create-tags --resources $K8S_MASTER_INSTANCE_ID --tags Key=Name,Value=golinuxcloud-k8s-master Key=kubernetes.io/cluster/golinuxcloud,Value=owned
Now you can try to connect to this instance
[root@client ~]# ssh -i aws-ec2 [email protected]
9.3 Pre-requisite configuration of controller node
To ensure that all the Kubernetes components use the same name, we should set the hostname to match the name given by the AWS metadata service, as shown in the following command. This is because the name from the metadata service is used by components that have the AWS cloud provider enabled:
Match the EC2 metadata hostname with hostnamectl set-hostname; the
hostnamectl command covers
reading and setting names on systemd hosts.
ubuntu@ip-10-0-0-11:~$ sudo hostnamectl set-hostname $(curl http://169.254.169.254/latest/meta-data/hostname)

ubuntu@ip-10-0-0-11:~$ hostname
ip-10-0-0-11.us-east-2.compute.internal
To correctly configure the kubelet to use the AWS cloud provider, we create a systemd drop-in file to pass some extra arguments to the kubelet, as follows:
ubuntu@ip-10-0-0-11:~$ printf '[Service]\nEnvironment="KUBELET_EXTRA_ARGS=--node-ip=10.0.0.11"' | sudo tee /etc/systemd/system/kubelet.service.d/20-aws.conf
[Service]
Environment="KUBELET_EXTRA_ARGS=--node-ip=10.0.0.11"

ubuntu@ip-10-0-0-11:~$ cat /etc/systemd/system/kubelet.service.d/20-aws.conf
[Service]
Environment="KUBELET_EXTRA_ARGS=--node-ip=10.0.0.11"
Reload the configuration file and restart kubelet service:
After editing unit files, run systemctl daemon-reload before enable or restart; the systemctl command covers reload order and failed-unit checks.
ubuntu@ip-10-0-0-11:~$ sudo systemctl daemon-reload
ubuntu@ip-10-0-0-11:~$ sudo systemctl restart kubelet
9.4 Initialize controller node
We need to provide kubeadm with --token-ttl 0, this means that the
token that is issued to allow worker nodes to join the cluster won't
expire. Now initialize the controller node:
kubeadm init stage will throw
ERROR for less CPU and memory which is why I have added
--ignore-preflight-errors for CPU and Memory.
Ownership changes in this section use chown command syntax.
  sudo chown $(id -u):$(id -g) $HOME/.kube/config

Alternatively, if you are the root user, you can run:

  export KUBECONFIG=/etc/kubernetes/admin.conf

You should now deploy a pod network to the cluster.
Run "kubectl apply -f [podnetwork].yaml" with one of the options listed at:
  https://kubernetes.io/docs/concepts/cluster-administration/addons/

Then you can join any number of worker nodes by running the following on each as root:

kubeadm join 10.0.0.11:6443 --token xxyquy.oggc5jef8pqers07 \
    --discovery-token-ca-cert-hash sha256:6438a355cd656d4237a2e3972a29c90f4b8f7e96912c36f850937ffe6829befa
kubeadm join command as highlighted above as we will
use this to join worker node to our controller node.
We can check that the API server is functioning correctly by following
the instructions given by kubeadm to set up kubectl on the host, as
shown in the following command (using ubuntu user):
ubuntu@ip-10-0-0-11:~$ mkdir -p $HOME/.kube
ubuntu@ip-10-0-0-11:~$ sudo cp -i /etc/kubernetes/admin.conf $HOME/.kube/config
ubuntu@ip-10-0-0-11:~$ sudo chown $(id -u):$(id -g) $HOME/.kube/config
If you are planning to use root user then you can following these steps:
ubuntu@ip-10-0-0-11:~$ sudo su -
root@ip-10-0-0-11:~# export KUBECONFIG=/etc/kubernetes/admin.conf
root@ip-10-0-0-11:~# echo "export KUBECONFIG=/etc/kubernetes/admin.conf" >> ~/.bash_profile
Check the version of kubectl
root@ip-10-0-0-11:~# kubectl version --short
Client Version: v1.20.5
Server Version: v1.20.5
Check the status of cluster nodes:
root@ip-10-0-0-11:~# kubectl get nodes
NAME                                      STATUS   ROLES                  AGE     VERSION
ip-10-0-0-11.us-east-2.compute.internal   NotReady control-plane,master   9m19s   v1.20.5
Currently the status of the controller node is NotReady because the
network plugin is still not installed.
10. Install Container Network Interface (CNI) Plugin
We will be deploying a CNI plugin called amazon-vpc-cni-k8s that
integrates Kubernetes with the native networking capabilities of the AWS
VPC network.
This plugin works by attaching secondary private IP addresses to the elastic network interfaces of the EC2 instances that form the nodes of our cluster, and then assigning them to pods as they are scheduled by Kubernetes to go into each node. Traffic is then routed directly to the correct node by the AWS VPC network fabric.
root@ip-10-0-0-11:~# kubectl apply -f https://raw.githubusercontent.com/aws/amazon-vpc-cni-k8s/master/config/master/aws-k8s-cni.yaml
clusterrole.rbac.authorization.k8s.io/aws-node created
serviceaccount/aws-node created
clusterrolebinding.rbac.authorization.k8s.io/aws-node created
daemonset.apps/aws-node created
Warning: apiextensions.k8s.io/v1beta1 CustomResourceDefinition is deprecated in v1.16+, unavailable in v1.22+; use apiextensions.k8s.io/v1 CustomResourceDefinition
customresourcedefinition.apiextensions.k8s.io/eniconfigs.crd.k8s.amazonaws.com created
You can monitor the networking plugin that is being installed and started by running the following:
root@ip-10-0-0-11:~# kubectl -n kube-system get pods
NAME                                                              READY   STATUS              RESTARTS   AGE
aws-node-mh58b                                                    0/1     ContainerCreating   0          22s
coredns-74ff55c5b-cjtxb                                           0/1     Pending             0          7m52s
coredns-74ff55c5b-ds762                                           0/1     Pending             0          7m52s
etcd-ip-10-0-0-11.us-east-2.compute.internal                      1/1     Running             0          8m
kube-apiserver-ip-10-0-0-11.us-east-2.compute.internal            1/1     Running             0          8m
kube-controller-manager-ip-10-0-0-11.us-east-2.compute.internal   1/1     Running             0          8m
kube-proxy-rm6kr                                                  1/1     Running             0          7m52s
kube-scheduler-ip-10-0-0-11.us-east-2.compute.internal            1/1     Running             0          8m
Now you can check the status of your controller node and it should be in
Ready state:
root@ip-10-0-0-11:~# kubectl get nodes
NAME                                      STATUS   ROLES                  AGE     VERSION
ip-10-0-0-11.us-east-2.compute.internal   Ready    control-plane,master   9m19s   v1.20.5
11. Create worker node(s)
11.1 Create security group
We are now going to create a new security group for the worker nodes, as follows:
[root@client ~]# K8S_NODES_SG_ID=$(aws ec2 create-security-group --group-name k8s-nodes --description "Kubernetes Nodes" --vpc-id $VPC_ID --query GroupId --output text)

[root@client ~]# echo $K8S_NODES_SG_ID
sg-04f248bfd9a7efc74
We will allow access to the worker nodes via the bastion host in order for us to log in for debugging purposes, as follows:
[root@client ~]# aws ec2 authorize-security-group-ingress --group-id $K8S_NODES_SG_ID --protocol tcp --port 22 --source-group $BASTION_SG_ID
We want to allow the kubelet and other processes running on the worker
nodes to be able to connect to the API server on the master node. We do
this using the following command:
[root@client ~]# aws ec2 authorize-security-group-ingress --group-id $K8S_MASTER_SG_ID --protocol tcp --port 6443 --source-group $K8S_NODES_SG_ID
Since the kube-dns add-on may run on the master node, let's allow this
traffic from the nodes security group, as follows:
[root@client ~]# aws ec2 authorize-security-group-ingress --group-id $K8S_MASTER_SG_ID --protocol all --port 53 --source-group $K8S_NODES_SG_ID
We also need the master node to be able to connect to the APIs that are exposed by the kubelet in order to stream logs and other metrics. We enable this by entering the following command:
[root@client ~]# aws ec2 authorize-security-group-ingress --group-id $K8S_NODES_SG_ID --protocol tcp --port 10250 --source-group $K8S_MASTER_SG_ID

[root@client ~]# aws ec2 authorize-security-group-ingress --group-id $K8S_NODES_SG_ID --protocol tcp --port 10255 --source-group $K8S_MASTER_SG_ID
Finally, we need to allow any pod on any node to be able to connect to any other pod. We do this using the following command:
[root@client ~]# aws ec2 authorize-security-group-ingress --group-id $K8S_NODES_SG_ID --protocol all --port -1 --source-group $K8S_NODES_SG_ID
11.2 Create user-data script
In order to have the worker node(s) register themselves with the master
when they start up, we will create a startup script. These are the user-data
script which are executed immediately after an instance is started.
I have enabled logging for troubleshooting, systemd configuration to
update hostname and connect master node. Lastly the script contains
kubeadm join command which will be used to join the worker node to the
cluster. This command was printed at the end of kubeadm init stage
which we executed earlier.
[root@client ~]# cat startup.sh
#!/bin/bash
exec > >(tee /var/log/user-data.log|logger -t user-data -s 2>/dev/console) 2>&1
echo BEGIN
date '+%Y-%m-%d %H:%M:%S'
echo END

sudo hostnamectl set-hostname $(curl http://169.254.169.254/latest/meta-data/hostname)
sudo mkdir -p /etc/systemd/system/kubelet.service.d
cat << EOF >/etc/systemd/system/kubelet.service.d/20-aws.conf
[Service]
Environment="KUBELET_EXTRA_ARGS=--node-ip=$(curl http://169.254.169.254/latest/meta-data/local-ipv4) --node-labels=node.kubernetes.io/node="
EOF

sudo systemctl daemon-reload
sudo systemctl restart kubelet

sudo kubeadm join 10.0.0.11:6443 --token xxyquy.oggc5jef8pqers07 --discovery-token-ca-cert-hash sha256:6438a355cd656d4237a2e3972a29c90f4b8f7e96912c36f850937ffe6829befa
11.3 Create AWS::AutoScaling::LaunchConfiguration
TheAWS::AutoScaling::LaunchConfigurationresource specifies the
launch configuration that can be used by an Auto Scaling group to
configure Amazon EC2 instances.
First, we create a launch configuration using the following command. This is like a template of the configuration that the autoscaling group will use to launch our worker nodes. Many of the arguments are similar to those that we would have passed to the EC2 run-instances command:
[root@client ~]# aws autoscaling create-launch-configuration --launch-configuration-name k8s-node-1.10.3-t2-micro-001 --image-id $K8S_AMI_ID --key-name aws-ec2 --security-groups $K8S_NODES_SG_ID --user-data file:///root/startup.sh --instance-type t2.micro --iam-instance-profile K8sNode --no-associate-public-ip-address
11.4 Create AWS::AutoScaling::AutoScalingGroup
The AWS::AutoScaling::AutoScalingGroup resource defines an Amazon EC2
Auto Scaling group, which is a collection of Amazon EC2 instances that
are treated as a logical grouping for the purposes of automatic scaling
and management.
Once we have created the launch configuration, we can create an autoscaling group, as follows:
[root@client ~]# aws autoscaling create-auto-scaling-group --auto-scaling-group-name golinuxcloud-t2-medium-nodes --launch-configuration-name k8s-node-1.10.3-t2-micro-001 --min-size 1 --max-size 1 --vpc-zone-identifier $PRIVATE_SUBNET_ID --tags Key=Name,Value=golinuxcloud-k8s-node Key=kubernetes.io/cluster/golinuxcloud,Value=owned Key=k8s.io/cluster-autoscaler/enabled,Value=1
This step will automatically create a new AWS EC2 instance which will act as our worker node. Since we have defined a user data script, so that script will be executed immediately after the launch of the instance and join it to the controller node.
11.5 Verify worker node status
Next you can connect to your master node and check the status of
available nodes. You should see your worker node in a few minutes once
kubeadm is initialized:
root@ip-10-0-0-11:~# kubectl get nodes
NAME                                       STATUS   ROLES                  AGE   VERSION
ip-10-0-0-11.us-east-2.compute.internal    Ready    control-plane,master   83m   v1.20.5
ip-10-0-0-137.us-east-2.compute.internal   Ready    <none>                 40s   v1.20.5
You can also see we have more number of pods in kube-system namespace:
root@ip-10-0-0-11:~# kubectl get pods -n kube-system
NAME                                                              READY   STATUS    RESTARTS   AGE
aws-node-5fks5                                                    1/1     Running   1          6m3s
aws-node-mh58b                                                    1/1     Running   0          81m
coredns-74ff55c5b-clls9                                           1/1     Running   0          19s
coredns-74ff55c5b-ds762                                           1/1     Running   0          88m
etcd-ip-10-0-0-11.us-east-2.compute.internal                      1/1     Running   0          89m
kube-apiserver-ip-10-0-0-11.us-east-2.compute.internal            1/1     Running   0          89m
kube-controller-manager-ip-10-0-0-11.us-east-2.compute.internal   1/1     Running   0          89m
kube-proxy-h8rjx                                                  1/1     Running   0          6m3s
kube-proxy-rm6kr                                                  1/1     Running   0          88m
kube-scheduler-ip-10-0-0-11.us-east-2.compute.internal            1/1     Running   0          89m
If you face any issues then you can connect to the worker node and check
/var/log/user-data.log and /var/log/cloud-init-output.log
12. Create a Pod (Verify Cluster)
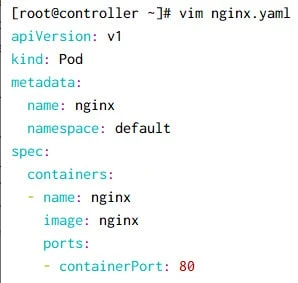
Now we will create a small pod using nginx to make sure the applications are getting deployed on the worker node. Here is my YAML file to create a pod with nginx image.
Use kubectl create to create the pod using the provided manifest file:
root@ip-10-0-0-11:~# kubectl create -f nginx.yaml
pod/nginx created
Check the status of the pod, it should be in Running state:
root@ip-10-0-0-11:~# kubectl get pods
NAME    READY   STATUS    RESTARTS   AGE
nginx   1/1     Running   0          21s
You can connect to your nginx container and check the nginx version to make sure the daemon has successfully started and working.
root@ip-10-0-0-11:~# kubectl exec -it nginx -- nginx -v
nginx version: nginx/1.19.8
So out steps to setup Kubernetes cluster on AWS EC2 is successfully completed.
Summary
In this tutorial we learned to setup a basic kubernetes cluster using very little resources. So this may not be able to handle complex production environment so you can use EC2 instances with higher resources and create more worker nodes. We have created different network groups, interfaces and security groups to minimize the security risk and protect our cluster for unwanted to external access. For POC purpose you may choose to avoid such strict security rules and allow all the communication but in production environment, you must be cautious.
Related Searches: cluster on aws ec2, setup kubernetes cluster on aws ec2, kubernetes cluster setup on aws, install kubernetes on aws, install kubernetes on amazon linux, how to create kubernetes, , cluster in aws, kubernetes kops aws, cluster on aws ec2, setup kubernetes cluster on aws ec2, kubernetes cluster setup on aws, install kubernetes on aws, install kubernetes on amazon linux, how to create kubernetes cluster in aws, kubernetes kops aws, kubernetes in amazon
