
In this tutorial we will explore Kubernetes Ingress with examples.
1. Overview on Kubernetes Ingress
Kubernetes offers an ingress resource and controller that is designed to expose Kubernetes services to the outside world. It can do the following:
- Provide an externally visible URL to your service
- Load balance traffic
- Terminate SSL
- Provide name-based virtual hosting
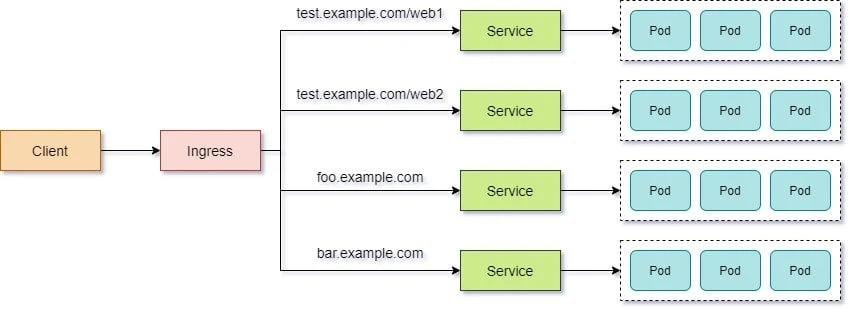
Multiple services can be exposed through a single Ingress
Ingresses do not work like other Services in Kubernetes. Just creating the Ingress itself will do nothing. You need two additional components:
- An Ingress controller: you can choose from many implementations, built on tools such as Nginx or HAProxy.
- ClusterIP or NodePort Services for the intended routes.
2. Pre-requisites
Generally, clusters will not come configured with any pre-existing Ingress controllers. You must have an Ingress controller to satisfy an Ingress. Only creating an Ingress resource has no effect. You'll need to select and deploy one to your cluster. ingress-nginx is likely the most popular choice, but there are several others, you can get the complete list on Kubernetes official page
Since we are using our minikube cluster to demonstrate this tutorial, I will enable the nginx-ingress controller add-on in minikube.
3. Start the minikube cluster
First let's start the minikube cluster:
$ minikube start --wait=false
* minikube v1.6.2 on Ubuntu 18.04
* Selecting 'none' driver from user configuration (alternates: [])
* Running on localhost (CPUs=2, Memory=2461MB, Disk=47990MB) ...
* OS release is Ubuntu 18.04.3 LTS
* Preparing Kubernetes v1.17.0 on Docker '18.09.7' ...
  - kubelet.resolv-conf=/run/systemd/resolve/resolv.conf
* Pulling images ...
* Launching Kubernetes ...
* Configuring local host environment ...
* Done! kubectl is now configured to use "minikube"
You can check the minikube version running in your environment:
$ minikube version
minikube version: v1.6.2
commit: 54f28ac5d3a815d1196cd5d57d707439ee4bb392
To view the nodes in the cluster using kubectl get nodes. If the node is marked as NotReady then it is still starting the components.
$ kubectl get nodes
NAME       STATUS   ROLES    AGE   VERSION
minikube   Ready    master   30m   v1.17.0
4. Enable ingress controller add-on
Now we need to enable the ingress-controller add-on available with minikube. This is a very important step or else the ingress itself won't work.
$ minikube addons enable ingress
* ingress was successfully enabled
Depending upon your cluster type, you can choose your controller and the steps of installation.
Once the add-on is enabled, you can verify the status of the Pod:
$ kubectl get pods -n kube-system
NAME                                        READY   STATUS    RESTARTS   AGE
coredns-6955765f44-gsr7p                    1/1     Running   0          32m
coredns-6955765f44-hswzz                    1/1     Running   0          32m
etcd-minikube                               1/1     Running   0          33m
kube-addon-manager-minikube                 1/1     Running   0          33m
kube-apiserver-minikube                     1/1     Running   0          33m
kube-controller-manager-minikube            1/1     Running   0          33m
kube-proxy-tgh66                            1/1     Running   0          32m
kube-scheduler-minikube                     1/1     Running   0          33m
nginx-ingress-controller-6fc5bcc8c9-wnkfs   1/1     Running   0          111s
storage-provisioner                         1/1     Running   0          32m
So our nginx-ingress-controller pod is up and running properly.
5. Configure Kubernetes Ingress using Host
In this section we will configure Ingress to access our nginx webserver using a particular hostname instead of some IP Address and Port number:
5.1 Create a deployment
Next to demonstrate the working of Kubernetes ingress I will create a new deployment using kubectl command:
$ kubectl create deployment nginx --image=nginx
deployment.apps/nginx created
Here by default the above command will only create a single replica, let us go ahead and scale up our deployment with 3 replicas:
$ kubectl scale deployment nginx --replicas=3
deployment.apps/nginx scaled
We have successfully scaled up our deployment, let's verify the same:
$ kubectl get deployments
NAME    READY   UP-TO-DATE   AVAILABLE   AGE
nginx   3/3     3            3           68s
So we have 3 out of 3 pods in READY and AVAILABLE state. Verify the list of pods:
$ kubectl get pods
NAME                     READY   STATUS    RESTARTS   AGE
nginx-86c57db685-jbvq2   1/1     Running   0          8s
nginx-86c57db685-lzlgx   1/1     Running   0          16s
nginx-86c57db685-x28kp   1/1     Running   0          8s
5.2 Expose the deployment (Create a service)
Next we will expose our deployment (which is same as creating a service) so that the service is accessible to the external world. We will expose the deployment using NodePort.
$ kubectl expose deployment nginx --type=NodePort --port=80
service/nginx exposed
Since our web server i.e. nginx is running on Port 80, I have specified the same in the above command. Now that our deployment is exposed, we should have a new service:
$ kubectl get service
NAME         TYPE        CLUSTER-IP      EXTERNAL-IP   PORT(S)        AGE
kubernetes   ClusterIP   10.96.0.1               443/TCP        88s
nginx        NodePort    10.96.176.114           80:30745/TCP   15s
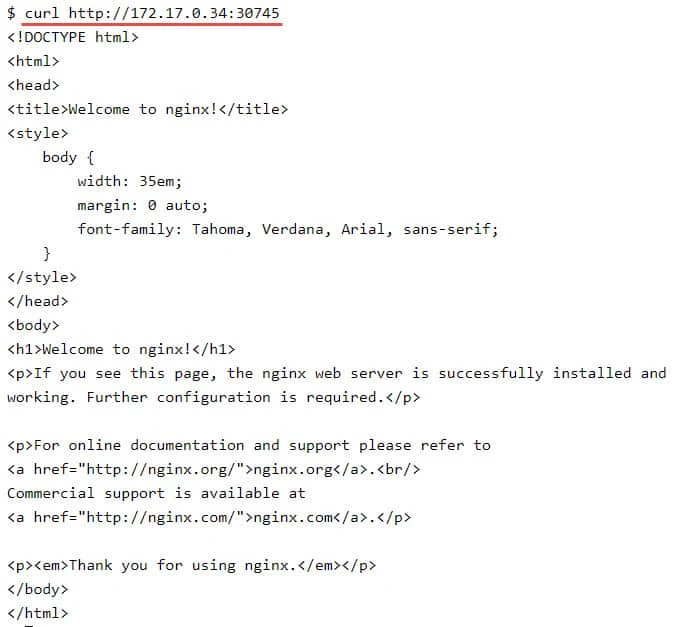
5.3 Access the container using external network
We can use the port 30745 as shown in the above command to access our nginx server from external network. TO be able to do this we need the IP address of the node on which the nginx container is running, now since this is a single node cluster, I will take the IP address of the localhost where the minikube cluster is running:
$ ip a
....
2: ens3: <BROADCAST,MULTICAST,UP,LOWER_UP> mtu 1500 qdisc fq_codel state UP group default qlen 100
0
    link/ether 02:42:ac:11:00:22 brd ff:ff:ff:ff:ff:ff    inet 172.17.0.34/16 brd 172.17.255.255 scope global ens3
       valid_lft forever preferred_lft forever
    inet6 fe80::42:acff:fe11:22/64 scope link
       valid_lft forever preferred_lft forever
....
So my interface IP is 172.17.0.34 which means I can access my nginx
server at http://172.17.0.34:30745.
Alternatively I could have also used following command to get the URL:
$ minikube service nginx --url
http://172.17.0.34:30745
5.4 Update DNS
To make Ingress work well, you need to configure DNS entries to the external address for your load balancer.You can map multiple hostnames to a single external endpoint and the Ingress controller will play traffic cop and direct incoming requests to the appropriate upstream service based on that hostname.
For this tutorial, we assume that you have a domain called example.com.
You need to configure single DNS entry: host.example.com using a CNAME
record.
If you don’t have a domain or if you are using a local solution such
asminikube, you can set up a local configuration by editing
your/etc/hosts file to add an IP address. Here 172.17.0.34 is the
IP address of my minikube node
$ echo "172.17.0.34 host.example.com" >> /etc/hosts
5.5 Create Ingress Rule
Now that our service is accessible from external network, do we still need an ingress?
You may because, it is still not a good idea to share this port number to all your customers. As a customer I just want the hostname/IP address on which I can access the nginx web server and I don't want to remember all these additional Port no. So we use Kubernetes ingress.
We will use following YAML file to create an Ingress resource that sends
traffic to your Service via host.example.com
$ cat nginx-ingress-rule.yml
apiVersion: networking.k8s.io/v1beta1kind: Ingress
metadata:
   name: nginx-ingress
   annotations:
      nginx.ingress.kubernetes.io/rewrite-target: /
spec:
   rules:
   - host: host.example.com
     http:
       paths:
       - path: /
         backend:
            serviceName: nginx
            servicePort: 80
The extensions/v1beta1 Ingress is deprecated in v1.14+, unavailable in
v1.22+; use networking.k8s.io/v1. So for newer Kubernetes release, the
above resource file would look like:
kind: Ingress
apiVersion: networking.k8s.io/v1
metadata:
  name: nginx-ingress
spec:
  rules:
  - host: host.example.com
    http:
      paths:
      - pathType: Prefix
        path: "/"
        backend:
          service:
             name: nginx
             port:
               number: 80
Let's create this resource:
$ kubectl create -f nginx-ingress-rule.yml
ingress.networking.k8s.io/nginx-ingress created
Check the status of the ingress rule:
$ kubectl get ingress
NAME            HOSTS              ADDRESS       PORTS   AGE
nginx-ingress   host.example.com   172.17.0.34   80      107s
Make sure that the IP address is set. It make take couple of minutes in some cases.
You can print the output of the ingress rule in YAML format for more information
$ kubectl get ing nginx-ingress -o yaml
apiVersion: extensions/v1beta1
kind: Ingress
metadata:
  annotations:
    nginx.ingress.kubernetes.io/rewrite-target: /
  creationTimestamp: "2021-01-27T12:39:43Z"
  generation: 1
  name: nginx-ingress
  namespace: default
  resourceVersion: "4737"
  selfLink: /apis/extensions/v1beta1/namespaces/default/ingresses/nginx-ingress
  uid: 93367dba-8a8f-47e8-a230-2a5981cae2c3
spec:
  rules:
  - host: host.example.com
    http:
      paths:
      - backend:
          serviceName: nginx
          servicePort: 80
        path: /
status:
  loadBalancer:
    ingress:
    - ip: 172.17.0.34
5.6 Verify the Kubernetes Ingress rule
Now that the ingress rule is successfully created and an IP address is
assigned to the LoadBalancer, you can use the hostname which you
provided with host: along with the provided path: to access your web
server:

As you see, now I don't need to worry about any IP address or port number and I can directly access my nginx web server using Kubernetes Ingress Controller and resource.
6. Configure Kubernetes Ingress using Path
In this section we will create one more deployment, and use the
Kubernetes ingress to access this deployment via a different path on the
same hostname i.e. host.example.com
6.1 Create a Deployment
We will create one more deployment using nginx image:
$ kubectl create deployment web2 --image=nginx
deployment.apps/web2 created
Next we will scale up the number of pods in the web2 deployment:
$ kubectl scale deployment web2 --replicas=3
Check the status of the newly created pods:
$ kubectl get pods
NAME                     READY   STATUS    RESTARTS   AGE
nginx-86c57db685-jbvq2   1/1     Running   0          37m
nginx-86c57db685-lzlgx   1/1     Running   0          37m
nginx-86c57db685-x28kp   1/1     Running   0          37m
web2-6884cc5665-dv8d9    1/1     Running   0          9m27s
web2-6884cc5665-wnd4m    1/1     Running   0          9m27s
web2-6884cc5665-wrgbs    1/1     Running   0          9m40s
6.2 Expose the deployment pods to external network (Create a service)
We must expose the deployment to external network using NodePort as we did earlier.
$ kubectl expose deployment web2 --type=NodePort --port=80
service/web2 exposed
Check the list of available services, now we have a new service with the
same name as our deployment i.e. web2
$ kubectl get svc
NAME         TYPE        CLUSTER-IP      EXTERNAL-IP   PORT(S)        AGE
kubernetes   ClusterIP   10.96.0.1               443/TCP        36m
nginx        NodePort    10.96.176.114           80:30745/TCP   35m
web2         NodePort    10.96.131.186           80:30879/TCP   7m40s
Now you should be able to access your web2 server using the following
URL
$ minikube service web2 --url
http://172.17.0.34:30879
6.3 Configure ingress rule
We will modify the existing ingress rule and add one more path section as shown below:
$ cat nginx-ingress-rule.yml
apiVersion: networking.k8s.io/v1beta1
kind: Ingress
metadata:
   name: nginx-ingress
   annotations:
      nginx.ingress.kubernetes.io/rewrite-target: /
spec:
   rules:
   - host: host.example.com
     http:
       paths:
       - path: /
         backend:
            serviceName: nginx
            servicePort: 80
       - path: /v2
         backend:
            serviceName: web2
            servicePort: 80
So here we want to access the new web2 server using the same
hostname i.e. host.example.com but at a different path i.e. /v2
Let us update our nginx-ingress rule:
$ kubectl apply -f nginx-ingress-rule.yml
Next you can verify your ingress rule to make sure the changes are updated:
$ kubectl get ing nginx-ingress -o yaml
apiVersion: extensions/v1beta1
kind: Ingress
metadata:
  annotations:
    kubectl.kubernetes.io/last-applied-configuration: |
      {"apiVersion":"networking.k8s.io/v1beta1","kind":"Ingress","metadata":{"annotations":{"nginx
.ingress.kubernetes.io/rewrite-target":"/"},"name":"nginx-ingress","namespace":"default"},"spec":{
"rules":[{"host":"host.example.com","http":{"paths":[{"backend":{"serviceName":"nginx","servicePor
t":80},"path":"/"},{"backend":{"serviceName":"web2","servicePort":80},"path":"/v2"}]}}]}}
    nginx.ingress.kubernetes.io/rewrite-target: /
  creationTimestamp: "2021-01-27T18:18:53Z"
  generation: 2
  name: nginx-ingress
  namespace: default
  resourceVersion: "4737"
  selfLink: /apis/extensions/v1beta1/namespaces/default/ingresses/nginx-ingress
  uid: 93367dba-8a8f-47e8-a230-2a5981cae2c3
spec:
  rules:
  - host: host.example.com
    http:
      paths:
      - backend:
          serviceName: nginx
          servicePort: 80
        path: /
      - backend:
          serviceName: web2
          servicePort: 80
        path: /v2
status:
  loadBalancer:
    ingress:
    - ip: 172.17.0.34
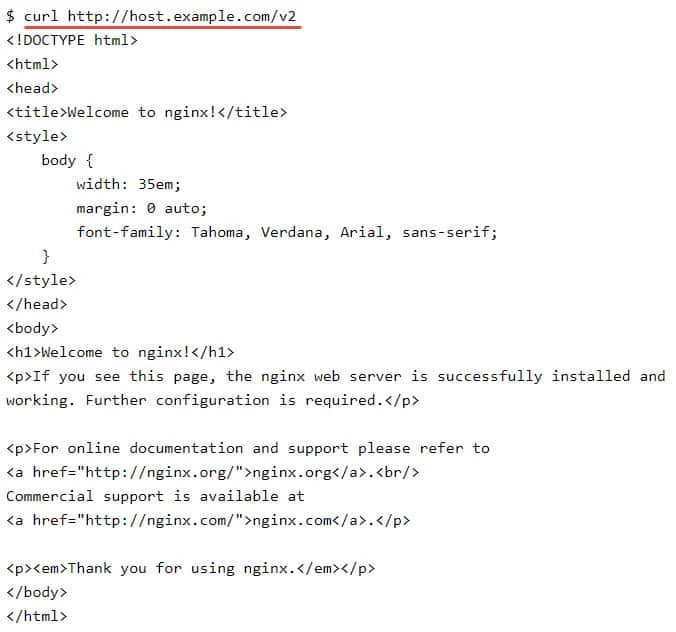
6.4 Verify the Kubernetes Ingress rule
Now we can try to access our web2 nginx server using
host.example.com/v2 path:
Conclusion
In this Kubernetes Tutorial, we have learned how to create Kubernetes Service resources to expose the services available in your application, regardless of how many pod instances are providing each service. We have learned how Kubernetes
- Exposes multiple pods that match a certain label selector under a single, stable IP address and port
- Makes services accessible from inside the cluster by default, but allows you to make the service accessible from outside the cluster by setting its type to either NodePort or LoadBalancer
- Allows discovery of and communication with services residing outside the cluster by creating a Service resource without specifying a selector, by creating an associated Endpoints resource instead
- Exposes multiple HTTP services through a single Ingress (consuming a single IP)
