Welcome to this guide where we discuss how to deploy a multi-node Kubernetes cluster on Rocky Linux 8. We shall be deploying our cluster using kubeadm tool.
The kubeadm tool is a command-line tool that is to bootstrap a Kubernetes cluster and can also be used to manage the cluster in its lifecycle.
Lab Environment and Prerequisites
Before we can set up our cluster, we need to have a cluster with the following minimal requirements.
| Server Type | IP/Hostname | Specs |
|---|---|---|
| Master | 192.168.100.234 - master | Rocky Linux 8.4, 4GB Ram, 2vcpus |
| Worker | 192.168.100.235 - worker01 | Rocky Linux 8.4, 4GB Ram, 2vcpus |
| Worker | 192.168.100.236 - worker02 | Rocky Linux 8.4, 4GB Ram, 2vcpus |
Step 1. Prepare the Kubernetes Cluster
Configure Hostnames
If you do not have aDNS server to resolve the hostname then you must update your /etc/hosts file with the hostname and IP information of all the cluster nodes on all the nodes.
Add the hostnames for the hosts to /etc/hosts.
Set the static hostname on each node with hostnamectl before editing
/etc/hosts — see the hostnamectl command
for static versus transient names.
sudo hostnamectl set-hostname master
sudo cat <<EOF>> /etc/hosts
192.168.100.234 master
192.168.100.235 worker01
192.168.100.236 worker02
EOF
Make sure the above is configured on all the three nodes, replacing the correct hostname for each node.
Update system
Update all the nodes you intend to use in the cluster, to have the latest packages and latest kernel patches. You are advised to reboot your nodes for some changes to take effect. Package updates use dnf command.
sudo dnf -y update && sudo systemctl reboot
Step 2. Configure Firewall
We need to allow some ports through the firewall for the following reasons:
| Port range | Purpose |
|---|---|
| 6443 | These ports are used for Kubernetes API access. |
| 2379-2380 | These ports are used for etcd server client API. |
| 10250 | This port is used for Kubelet API |
| 10251 | This port is used for kube-scheduler |
| 10252 | This port is used for kube-controller-manager |
Allow the following ports through the firewall, for all nodes:
Open the listener port with firewall-cmd --add-port and reload; the firewalld shows --permanent pairs and zone selection.
sudo firewall-cmd --permanent --add-port=6443/tcp

sudo firewall-cmd --permanent --add-port=2379-2380/tcp
sudo firewall-cmd --permanent --add-port=10250/tcp
sudo firewall-cmd --permanent --add-port=10251/tcp
sudo firewall-cmd --permanent --add-port=10252/tcp
sudo firewall-cmd --permanent --add-port=10255/tcp
sudo firewall-cmd --reload
Step 3. Configure Linux Components (SELinux, SWAP and sysctl)
You
mustdisable selinux or change it to Permissive modeon all the cluster nodes. This is
required to allow containers to access the host filesystem, which is
needed by pod networks. You have to do this until SELinux support is
improved in thekubelet.
sudo setenforce 0
sudo sed -i 's/^SELINUX=.*/SELINUX=permissive/g' /etc/selinux/config
Configure sysctl:
sudo modprobe overlay
sudo modprobe br_netfilter

sudo tee /etc/sysctl.d/kubernetes.conf<<EOF
net.bridge.bridge-nf-call-ip6tables = 1
net.bridge.bridge-nf-call-iptables = 1
net.ipv4.ip_forward = 1
EOF
sudo sysctl --system
Also disable SWAP for all nodes. It ismandatoryto disable swap
memory forkubeletto work properly. Follow these steps on all the
cluster nodes.
sudo sed -i '/ swap / s/^\(.*\)$/#\1/g' /etc/fstab
sudo swapoff -a
Step 4. Install Kubernetes components:
You will install these packages on all of your machines:
- **kubeadm:**the command to bootstrap the cluster.
- **kubelet:**the component that runs on all of the machines in your cluster and does things like starting pods and containers.
- **kubectl:**the command line util to talk to your cluster.
Add the Kubernetes repo:
sudo tee /etc/yum.repos.d/kubernetes.repo<<EOF
[kubernetes]
name=Kubernetes
baseurl=https://packages.cloud.google.com/yum/repos/kubernetes-el7-x86_64
enabled=1
gpgcheck=1
repo_gpgcheck=1
gpgkey=https://packages.cloud.google.com/yum/doc/yum-key.gpg https://packages.cloud.google.com/yum/doc/rpm-package-key.gpg
EOF
Install the packages
sudo dnf -y install epel-release vim git curl wget kubelet kubeadm kubectl --disableexcludes=kubernetes
Verify the version of kubectl installed:
$ kubectl version --client
Client Version: version.Info{Major:"1", Minor:"22", GitVersion:"v1.22.2", GitCommit:"8b5a19147530eaac9476b0ab82980b4088bbc1b2", GitTreeState:"clean", BuildDate:"2021-09-15T21:38:50Z", GoVersion:"go1.16.8", Compiler:"gc", Platform:"linux/amd64"}
Step 5. Install Container Runtime
Container runtime is the container infrastructure that runs on each Kubernetes node and is where the containers and pods are deployed to. The default container runtime for Kubernetes was Docker until when it's support was discontinued. In this guide, we shall deploy our Kubernetes cluster using Containerd runtime.
To install Containerd on Rocky Linux 8, use the following steps:
Configure persistent modules
sudo tee /etc/modules-load.d/containerd.conf <<EOF
overlay
br_netfilter
EOF
Load the modules
sudo modprobe overlay
sudo modprobe br_netfilter
Verify that you have the correct sysctl configurations
sudo tee /etc/sysctl.d/kubernetes.conf<<EOF
net.bridge.bridge-nf-call-ip6tables = 1
net.bridge.bridge-nf-call-iptables = 1
net.ipv4.ip_forward = 1
EOF
Reload sysctl
sudo sysctl --system
Install dependencies
sudo yum install -y yum-utils device-mapper-persistent-data lvm2
Add ContainerD repo
sudo yum-config-manager --add-repo https://download.docker.com/linux/centos/docker-ce.repo
Install ContainerD
sudo yum update -y && yum install -y containerd.io
After a successful installation, create a configuration directory for cotainerd
sudo mkdir -p /etc/containerd
sudo containerd config default > /etc/containerd/config.toml
Restart the Containerd service
Control the running service with systemctl start, stop, or restart; see the systemctl command for try-restart and dependency behavior.
sudo systemctl restart containerd
sudo systemctl enable containerd
Verify the service status:
$ sudo systemctl status containerd
● containerd.service - containerd container runtime
   Loaded: loaded (/usr/lib/systemd/system/containerd.service; enabled; vendor preset: disabled)
   Active: active (running) since Thu 2021-09-16 15:22:33 EDT; 31s ago
     Docs: https://containerd.io
  Process: 8770 ExecStartPre=/sbin/modprobe overlay (code=exited, status=0/SUCCESS)
 Main PID: 8771 (containerd)
    Tasks: 9
   Memory: 24.7M
   CGroup: /system.slice/containerd.service
           └─8771 /usr/bin/containerd

Sep 16 15:22:33 master containerd[8771]: time="2021-09-16T15:22:33.783901112-04:00" level=info msg=serving... address=/run/containerd/containerd.sock.ttrpc
Sep 16 15:22:33 master containerd[8771]: time="2021-09-16T15:22:33.783941646-04:00" level=info msg=serving... address=/run/containerd/containerd.sock
Sep 16 15:22:33 master containerd[8771]: time="2021-09-16T15:22:33.784221266-04:00" level=info msg="containerd successfully booted in 0.034015s"
Sep 16 15:22:33 master systemd[1]: Started containerd container runtime.
Sep 16 15:22:33 master containerd[8771]: time="2021-09-16T15:22:33.796141320-04:00" level=info msg="Start subscribing containerd event"
Sep 16 15:22:33 master containerd[8771]: time="2021-09-16T15:22:33.796200999-04:00" level=info msg="Start recovering state"
Sep 16 15:22:33 master containerd[8771]: time="2021-09-16T15:22:33.796273736-04:00" level=info msg="Start event monitor"
Sep 16 15:22:33 master containerd[8771]: time="2021-09-16T15:22:33.796285186-04:00" level=info msg="Start snapshots syncer"
Sep 16 15:22:33 master containerd[8771]: time="2021-09-16T15:22:33.796292818-04:00" level=info msg="Start cni network conf syncer"
Sep 16 15:22:33 master containerd[8771]: time="2021-09-16T15:22:33.796298326-04:00" level=info msg="Start streaming server"
Step 6. Initialize the Control Plane
To initialize the control plane, log in to the master node.
Check and verify that the br_netfilter module is loaded to the kernel:
$ lsmod | grep br_netfilter

br_netfilter 24576 0
bridge 192512 1 br_netfilter
Enable the kubelet service:
sudo systemctl enable kubelet
We need to initialize the master node to be configured such that it can hold the Kubernetes components required by the control planesuch as etcd for the database, API server and Kuber proxy.
First, we will need to pull the images for registry:
[root@master ~]# sudo kubeadm config images pull
[config/images] Pulled k8s.gcr.io/kube-apiserver:v1.22.2
[config/images] Pulled k8s.gcr.io/kube-controller-manager:v1.22.2
[config/images] Pulled k8s.gcr.io/kube-scheduler:v1.22.2
[config/images] Pulled k8s.gcr.io/kube-proxy:v1.22.2
[config/images] Pulled k8s.gcr.io/pause:3.5
[config/images] Pulled k8s.gcr.io/etcd:3.5.0-0
[config/images] Pulled k8s.gcr.io/coredns/coredns:v1.8.4
Bootstrap the cluster by running the kubeadm init command with the following flags:
- --control-plane-endpoint : set the shared endpoint for all control-plane nodes such as DNS/IP
- --pod-network-cidr : Used to set a Pod network add-on CIDR
- --cri-socket : Use this if you have more than one container runtime to set runtime socket path. In our case, we have installed only containerd runtime.
- --apiserver-advertise-address : Set advertise address for this particular control-plane node's API server
Run the command below to initialize your cluster. Replace master with
the hostname of your master node.
sudo kubeadm init \
  --pod-network-cidr=10.10.0.0/16 \
  --control-plane-endpoint=master
The above command bootstraps the cluster and provides the output such as below:
Your Kubernetes control-plane has initialized successfully!

To start using your cluster, you need to run the following as a regular user:

  mkdir -p $HOME/.kube
  sudo cp -i /etc/kubernetes/admin.conf $HOME/.kube/config
  sudo chown $(id -u):$(id -g) $HOME/.kube/config

Alternatively, if you are the root user, you can run:

  export KUBECONFIG=/etc/kubernetes/admin.conf

You should now deploy a pod network to the cluster.
Run "kubectl apply -f [podnetwork].yaml" with one of the options listed at:
  https://kubernetes.io/docs/concepts/cluster-administration/addons/

You can now join any number of control-plane nodes by copying certificate authorities
and service account keys on each node and then running the following as root:

  kubeadm join master:6443 --token acditd.rj574hgjcz6b3zas \
    --discovery-token-ca-cert-hash sha256:d59f319b17ae47a95d7c06ea1b9e13e7faee604ba1cf44be1abe983f0093ffa0 \
    --control-plane

Then you can join any number of worker nodes by running the following on each as root:

kubeadm join master:6443 --token acditd.rj574hgjcz6b3zas \
    --discovery-token-ca-cert-hash sha256:d59f319b17ae47a95d7c06ea1b9e13e7faee604ba1cf44be1abe983f0093ffa0
Configure Kubectl for kubernetes management. Ownership changes below use chown command syntax.
mkdir -p $HOME/.kube
sudo cp -i /etc/kubernetes/admin.conf $HOME/.kube/config
sudo chown $(id -u):$(id -g) $HOME/.kube/config
Check the cluster status:
[root@master ~]# kubectl cluster-info
Kubernetes control plane is running at https://master:6443
CoreDNS is running at https://master:6443/api/v1/namespaces/kube-system/services/kube-dns:dns/proxy

To further debug and diagnose cluster problems, use 'kubectl cluster-info dump'.
The command to join other nodes is given in the output after the bootstraping. In my case, it is:
Then you can join any number of worker nodes by running the following on each as root:

kubeadm join master:6443 --token acditd.rj574hgjcz6b3zas \
    --discovery-token-ca-cert-hash sha256:d59f319b17ae47a95d7c06ea1b9e13e7faee604ba1cf44be1abe983f0093ffa0
You can as well add more control nodes with the token provided:
You can now join any number of control-plane nodes by copying certificate authorities
and service account keys on each node and then running the following as root:

  kubeadm join master:6443 --token acditd.rj574hgjcz6b3zas \
    --discovery-token-ca-cert-hash sha256:d59f319b17ae47a95d7c06ea1b9e13e7faee604ba1cf44be1abe983f0093ffa0 \
    --control-plane
Step 7. Install Calico Network Plugin
Calico is one of the plugins that can be used for the Kubernetes cluster, for roles such as the pod-network and kube-proxy
[root@master ~]# kubectl apply -f https://docs.projectcalico.org/manifests/calico.yaml
configmap/calico-config created
customresourcedefinition.apiextensions.k8s.io/bgpconfigurations.crd.projectcalico.org created
customresourcedefinition.apiextensions.k8s.io/bgppeers.crd.projectcalico.org created
customresourcedefinition.apiextensions.k8s.io/blockaffinities.crd.projectcalico.org created
customresourcedefinition.apiextensions.k8s.io/clusterinformations.crd.projectcalico.org created
customresourcedefinition.apiextensions.k8s.io/felixconfigurations.crd.projectcalico.org created
customresourcedefinition.apiextensions.k8s.io/globalnetworkpolicies.crd.projectcalico.org created
customresourcedefinition.apiextensions.k8s.io/globalnetworksets.crd.projectcalico.org created
customresourcedefinition.apiextensions.k8s.io/hostendpoints.crd.projectcalico.org created
customresourcedefinition.apiextensions.k8s.io/ipamblocks.crd.projectcalico.org created
customresourcedefinition.apiextensions.k8s.io/ipamconfigs.crd.projectcalico.org created
customresourcedefinition.apiextensions.k8s.io/ipamhandles.crd.projectcalico.org created
customresourcedefinition.apiextensions.k8s.io/ippools.crd.projectcalico.org created
customresourcedefinition.apiextensions.k8s.io/kubecontrollersconfigurations.crd.projectcalico.org created
customresourcedefinition.apiextensions.k8s.io/networkpolicies.crd.projectcalico.org created
customresourcedefinition.apiextensions.k8s.io/networksets.crd.projectcalico.org created
clusterrole.rbac.authorization.k8s.io/calico-kube-controllers created
clusterrolebinding.rbac.authorization.k8s.io/calico-kube-controllers created
clusterrole.rbac.authorization.k8s.io/calico-node created
clusterrolebinding.rbac.authorization.k8s.io/calico-node created
daemonset.apps/calico-node created
serviceaccount/calico-node created
deployment.apps/calico-kube-controllers created
serviceaccount/calico-kube-controllers created
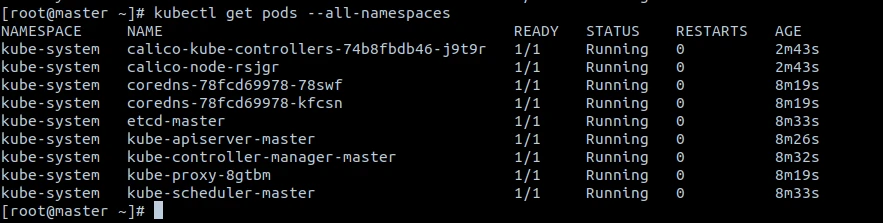
Ensure that the Calico network plugin has started successfully, check the state of the pods running on the cluster:
[root@master ~]# kubectl get pods --all-namespaces
NAMESPACE     NAME                                       READY   STATUS              RESTARTS   AGE
kube-system   calico-kube-controllers-74b8fbdb46-j9t9r   0/1     ContainerCreating   0          75s
kube-system   calico-node-rsjgr                          0/1     PodInitializing     0          75s
kube-system   coredns-78fcd69978-78swf                   0/1     ContainerCreating   0          6m51s
kube-system   coredns-78fcd69978-kfcsn                   0/1     ContainerCreating   0          6m51s
kube-system   etcd-master                                1/1     Running             0          7m5s
kube-system   kube-apiserver-master                      1/1     Running             0          6m58s
kube-system   kube-controller-manager-master             1/1     Running             0          7m4s
kube-system   kube-proxy-8gtbm                           1/1     Running             0          6m51s
kube-system   kube-scheduler-master                      1/1     Running             0          7m5s
In the above output, the Calico pods are still in the initialization state. You can check the status after a few minutes to verify of the status has changed to "Running"
Step 8. Join Worker nodes to Kubernetes Cluster
The next step is to add the worker nodes to the cluster. To achieve this, we shall use the join token obtained from the master node during bootstraping.
Run the command on each of the worker nodes to join them:
[root@worker01 ~]# kubeadm join master:6443 --token acditd.rj574hgjcz6b3zas \
> --discovery-token-ca-cert-hash sha256:d59f319b17ae47a95d7c06ea1b9e13e7faee604ba1cf44be1abe983f0093ffa0
[preflight] Running pre-flight checks
    [WARNING FileExisting-tc]: tc not found in system path
[preflight] Reading configuration from the cluster...
[preflight] FYI: You can look at this config file with 'kubectl -n kube-system get cm kubeadm-config -o yaml'
[kubelet-start] Writing kubelet configuration to file "/var/lib/kubelet/config.yaml"
[kubelet-start] Writing kubelet environment file with flags to file "/var/lib/kubelet/kubeadm-flags.env"
[kubelet-start] Starting the kubelet
[kubelet-start] Waiting for the kubelet to perform the TLS Bootstrap...

This node has joined the cluster:
* Certificate signing request was sent to apiserver and a response was received.
* The Kubelet was informed of the new secure connection details.

Run 'kubectl get nodes' on the control-plane to see this node join the cluster.
The above output shows that the worker node has joined the cluster successfully.
Verify the available nodes from the master node by running the following command:
[root@master ~]# kubectl get nodes -o wide
NAME       STATUS   ROLES                  AGE    VERSION   INTERNAL-IP       EXTERNAL-IP   OS-IMAGE                           KERNEL-VERSION                 CONTAINER-RUNTIME
master     Ready    control-plane,master   17m    v1.22.2   192.168.100.234   <none>        Rocky Linux 8.4 (Green Obsidian)   4.18.0-305.19.1.el8_4.x86_64   containerd://1.4.9
worker01   Ready    <none>                 112s   v1.22.2   192.168.100.235   <none>        Rocky Linux 8.4 (Green Obsidian)   4.18.0-305.19.1.el8_4.x86_64   containerd://1.4.9
worker02   Ready    <none>                 77s    v1.22.2   192.168.100.236   <none>        Rocky Linux 8.4 (Green Obsidian)   4.18.0-305.19.1.el8_4.x86_64   containerd://1.4.9
You can now start deploying your applications on your Kubernetes cluster running on Rocky Linux 8 nodes.
Summary
The above guide has highlighted how to set up a Kubernetes cluster on Rocky Linux 8 nodes. We have used ContainerD as the Container Runtime instead of Docker which is depreciated. We have also used Calico as the network plugin. There are several other network plugins available such as Flannel, you however can choose whichever plugin you wish to use depending on your requirements. Thanks for following through with this guide and hope it was well documented.
