Upgrading the Kubernetes cluster is done in two phases. You first upgrade the control plane nodes and then the worker nodes. It is possible to upgrade to the next minor release or to any other next patch release of the same minor release.
For example, when your cluster is using the version 1.18.6, you could upgrade to 1.18.p where p >= 7 and to 1.19.x (whatever the value of x), but not to 1.20.x. If you plan to upgrade from 1.18.x to 1.20.x directly then the kubeadm upgrade plan command would fail so to overcome that you would first have to upgrade from 1.18.x to 1.19.x and from 1.19.x to 1.20.x.
As the control plane and workers are running on host systems, you will also need to upgrade these systems. You will see how to prepare the cluster to make these operations without interrupting your applications.
Steps to perform Kubernetes upgrade cluster
The brief steps involved (in the provided order) to perform Kubernetes upgrade are:
Controller node
- Update kubeadm
- Drain the controller node (Evict any Kubernetes resources and disable scheduling)
- Generate upgrade plan
- Perform Kubernetes upgrade
- Update kubectl and kubelet
- Un-cordon the controller node (Enable scheduling)
- Verify
Worker node(s) - Complete these steps on one worker node at a time, don't execute these steps in-parallel on multiple worker nodes)
- Update kubeadm
- Drain the respective node (Evict any Kubernetes resources and disable scheduling)
- Perform Kubernetes upgrade
- Update kubectl and kubelet
- Un-cordon the respective worker node (Enable scheduling)
- Verify
Now that we are familiar with the brief steps to perform the Kubernetes upgrade, let's perform an actual upgrade for the demonstration.
Lab Environment
I will be using my existing Kubernetes Cluster with Calico network. These nodes are individual VMs created using Oracle VirtualBox.
Following are the specs of each VM:
| Resources | controller | worker-1 | worker-2 |
|---|---|---|---|
| OS | CentOS 8 | CentOS 8 | CentOS 8 |
| hostname | controller | worker-1 | worker-2 |
| FQDN | controller.example.com | worker-1.example.com | worker-2.example.com |
| Storage | 20GB | 20GB | 20GB |
| vCPU | 2 | 2 | 2 |
| RAM | 6GB | 6GB | 6GB |
| Adapter-1 (Bridged) | 192.168.0.150 | 192.168.0.151 | 192.168.0.152 |
Following are the rpm version for installed Kubernetes components on my setup:
List installed packages with rpm -qa; the rpm command explains query filters and piping into grep.
[root@controller ~]# rpm -qa | grep -E 'kubeadm|kubelet|kubectl'
kubectl-1.18.0-0.x86_64
kubelet-1.18.0-0.x86_64
kubeadm-1.18.0-0.x86_64
1. Upgrade Controller node
First we will perform the Kubernetes upgrade on the controller node followed by the worker node:
Step 1.1: Update kubeadm
The first step is to update the kubeadm tool on the controller node.
Since we are using CentOS variant of Linux, we will use YUM/DNF package
manager. If you are on Ubuntu, Debian or related OS then you can use
apt-get package manager. Although the exact command would vary.
I assume you have the repository added to your environment to update
kubeadm node:
Package installs and updates in this section use dnf command.
~]# cat <<EOF | sudo tee /etc/yum.repos.d/kubernetes.repo
[kubernetes]
name=Kubernetes
baseurl=https://packages.cloud.google.com/yum/repos/kubernetes-el7-\$basearch
enabled=1
gpgcheck=1
repo_gpgcheck=1
gpgkey=https://packages.cloud.google.com/yum/doc/yum-key.gpg https://packages.cloud.google.com/yum/doc/rpm-package-key.gpg
exclude=kubelet kubeadm kubectl
EOF
To list the available kubeadm version in the official repository:
[root@controller ~]# yum list --showduplicates kubeadm --disableexcludes=kubernetes
Here you can see the list of available and current kubeadm version:
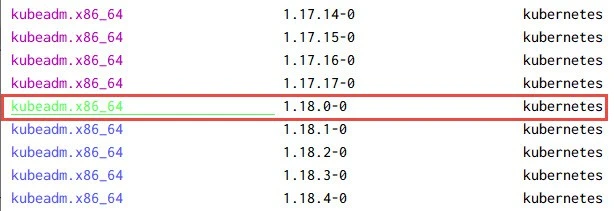
Since we plan to upgrade Kubernetes Cluster to kubeadm 1.19 version,
we will specify that version and install the same:
[root@controller ~]# yum install -y kubeadm-1.19.0-0 --disableexcludes=kubernetes
As you see, my list of nodes still show the VERSION as 1.18, that's
because we are not done yet:
[root@controller ~]# kubectl get nodes
NAME                     STATUS   ROLES    AGE   VERSION
controller.example.com   Ready    master   9h    v1.18.0
worker-1.example.com     Ready    <none>   8h    v1.18.0
worker-2.example.com     Ready    <none>   8h    v1.18.0
Next, let's drain the controller node to evict and Kubernetes resources
which might be running on the controller node. It is strongly
recommended to use --ignore-daemonsets while performing the drain
operation. This make sure that the daemon pods such as kube-proxy,
networking plugin pods are not drained out.
[root@controller ~]# kubectl drain controller.example.com --ignore-daemonsets
node/controller.example.com cordoned
WARNING: ignoring DaemonSet-managed Pods: kube-system/calico-node-8g6zc, kube-system/kube-proxy-rvqwv
evicting pod kube-system/coredns-66bff467f8-z2bdb
evicting pod kube-system/calico-kube-controllers-65d7476764-5t522
evicting pod kube-system/coredns-66bff467f8-t9pf5
pod/coredns-66bff467f8-t9pf5 evicted
pod/calico-kube-controllers-65d7476764-5t522 evicted
pod/coredns-66bff467f8-z2bdb evicted
node/controller.example.com evicted
Next verity the controller node status, scheduling should be disabled at this stage:
[root@controller ~]# kubectl get nodes
NAME                     STATUS                     ROLES    AGE   VERSION
controller.example.com   Ready,SchedulingDisabled   master   9h    v1.18.0
worker-1.example.com     Ready                      <none>   9h    v1.18.0
worker-2.example.com     Ready                      <none>   9h    v1.18.0
Step 1.2: Create upgrade plan
Next we check the possible upgrade plans. Here kubeadm will analyse
the Kubernetes Cluster and the available packages and suggest the best
suitable upgrade plan for the environment using the latest available
stable release of kubeadm.
[root@controller ~]# kubeadm upgrade plan
[upgrade/config] Making sure the configuration is correct:
[upgrade/config] Reading configuration from the cluster...
[upgrade/config] FYI: You can look at this config file with 'kubectl -n kube-system get cm kubeadm-config -o yaml'
[preflight] Running pre-flight checks.
[upgrade] Running cluster health checks
[upgrade] Fetching available versions to upgrade to
[upgrade/versions] Cluster version: v1.18.17
[upgrade/versions] kubeadm version: v1.19.0
[upgrade/versions] Latest stable version: v1.19.9
[upgrade/versions] Latest stable version: v1.19.9
[upgrade/versions] Latest version in the v1.18 series: v1.18.17
[upgrade/versions] Latest version in the v1.18 series: v1.18.17

Components that must be upgraded manually after you have upgraded the control plane with 'kubeadm upgrade apply':
COMPONENT   CURRENT       AVAILABLE
kubelet     3 x v1.18.0   v1.19.9

Upgrade to the latest stable version:

COMPONENT                 CURRENT    AVAILABLE
kube-apiserver            v1.18.17   v1.19.9
kube-controller-manager   v1.18.17   v1.19.9
kube-scheduler            v1.18.17   v1.19.9
kube-proxy                v1.18.17   v1.19.9
CoreDNS                   1.6.7      1.7.0
etcd                      3.4.3-0    3.4.9-1

You can now apply the upgrade by executing the following command:

        kubeadm upgrade apply v1.19.9

Note: Before you can perform this upgrade, you have to update kubeadm to v1.19.9.

_____________________________________________________________________

The table below shows the current state of component configs as understood by this version of kubeadm.
Configs that have a "yes" mark in the "MANUAL UPGRADE REQUIRED" column require manual config upgrade or
resetting to kubeadm defaults before a successful upgrade can be performed. The version to manually
upgrade to is denoted in the "PREFERRED VERSION" column.

API GROUP                 CURRENT VERSION   PREFERRED VERSION   MANUAL UPGRADE REQUIRED
kubeproxy.config.k8s.io   v1alpha1          v1alpha1            no
kubelet.config.k8s.io     v1beta1           v1beta1             no
_____________________________________________________________________
So we have a long output with he details of the upgrade plan. As you can
see, the plan suggests us to use kubeadm version 1.19.9 which seems to
be the Latest Stable version while we had installed 1.19.0.
So we will abide by the upgrade plan and update our kubeadm version to 1.19.9 using YUM.
[root@controller ~]# yum install -y kubeadm-1.19.9-0 --disableexcludes=kubernetes
Next we will re-execute the kubeadm upgrade plan command to get the
updated plan:
[root@controller ~]# kubeadm upgrade plan
[upgrade/config] Making sure the configuration is correct:
[upgrade/config] Reading configuration from the cluster...
[upgrade/config] FYI: You can look at this config file with 'kubectl -n kube-system get cm kubeadm-config -oyaml'
[preflight] Running pre-flight checks.
[upgrade] Running cluster health checks
[upgrade] Fetching available versions to upgrade to
[upgrade/versions] Cluster version: v1.18.17
[upgrade/versions] kubeadm version: v1.19.9
[upgrade/versions] Latest stable version: v1.19.9

...

API GROUP                 CURRENT VERSION   PREFERRED VERSION   MANUAL UPGRADE REQUIRED
kubeproxy.config.k8s.io   v1alpha1          v1alpha1            no
kubelet.config.k8s.io     v1beta1           v1beta1             no
_____________________________________________________________________
So everything looks GREEN and we are good to initiate Kubernetes upgrade. The above output also contains the command to be used to perform the upgrade.
Step 1.3: Upgrade Kubernetes on Controller node
We will execute the kubeadm upgrade apply command to initiate the
upgrade:
[root@controller ~]# kubeadm upgrade apply v1.19.9
[upgrade/config] Making sure the configuration is correct:
[upgrade/config] Reading configuration from the cluster...
[upgrade/config] FYI: You can look at this config file with 'kubectl -n kube-system get cm kubeadm-config -oyaml'
[preflight] Running pre-flight checks.
[upgrade] Running cluster health checks
[upgrade/version] You have chosen to change the cluster version to "v1.19.9"
[upgrade/versions] Cluster version: v1.18.17
[upgrade/versions] kubeadm version: v1.19.9
[upgrade/confirm] Are you sure you want to proceed with the upgrade? [y/N]: y  <-- Press y to proceed
[upgrade/prepull] Pulling images required for setting up a Kubernetes cluster
[upgrade/prepull] This might take a minute or two, depending on the speed of your internet connection
[upgrade/prepull] You can also perform this action in beforehand using 'kubeadm config images pull'

...

[upgrade/staticpods] Component "kube-scheduler" upgraded successfully!
[upload-config] Storing the configuration used in ConfigMap "kubeadm-config" in the "kube-system" Namespace
[kubelet] Creating a ConfigMap "kubelet-config-1.19" in namespace kube-system with the configuration for the kubelets in the cluster
[kubelet-start] Writing kubelet configuration to file "/var/lib/kubelet/config.yaml"
[bootstrap-token] configured RBAC rules to allow Node Bootstrap tokens to get nodes
[bootstrap-token] configured RBAC rules to allow Node Bootstrap tokens to post CSRs in order for nodes to get long term certificate credentials
[bootstrap-token] configured RBAC rules to allow the csrapprover controller automatically approve CSRs from a Node Bootstrap Token
[bootstrap-token] configured RBAC rules to allow certificate rotation for all node client certificates in the cluster
[addons] Applied essential addon: CoreDNS
[addons] Applied essential addon: kube-proxy

[upgrade/successful] SUCCESS! Your cluster was upgraded to "v1.19.9". Enjoy!

[upgrade/kubelet] Now that your control plane is upgraded, please proceed with upgrading your kubelets if you haven't already done so.
After waiting for a couple of minutes, we can see that the Kubernetes upgrade was successful. Verify the active kubeadm version:
[root@controller ~]# kubeadm version -o short
v1.19.9
Step 1.4: Update kubelet and kubectl
The kubeadm upgrade apply command doesn't upgrade the kubelet and
kubectl tool, so this must be manually updated to the same version as
of kubeadm using YUM or your preferred package manager.
[root@controller ~]# yum install -y kubelet-1.19.9-0 kubectl-1.19.9-0 --disableexcludes=kubernetes
Updating these tools, may also change the systemd configuration file
used by kubelet service so it is also a good idea to restart the
kubelet service
After editing unit files, run systemctl daemon-reload before enable or restart; the systemctl command covers reload order and failed-unit checks.
[root@controller ~]# systemctl daemon-reload
[root@controller ~]# systemctl restart kubelet
Step 1.5: Re-enable scheduling
Now since the Kubernetes upgrade is complete on the controller node, we
can re-enable the scheduling. To enable the scheduling we will use
kubectl uncordon command:
[root@controller ~]# kubectl uncordon controller.example.com
node/controller.example.com uncordoned
Step 1.6: Verify
Now verify the status of the controller node and the VERSION:
[root@controller ~]# kubectl get nodes
NAME                     STATUS   ROLES    AGE   VERSION
controller.example.com   Ready    master   9h    v1.19.9
worker-1.example.com     Ready    <none>   9h    v1.18.0
worker-2.example.com     Ready    <none>   9h    v1.18.0
As you can see, the controller node is successfully upgrade to 1.19.9.
Let's proceed with the worker nodes. We will start with
worker-1.example.com.
2. Upgrade worker node
In this section we will upgrade worker-1.example.com from our Cluster.
Step 2.1: Update kubeadm
Since we already know the list of available kubeadm version and the
last stable version is 1.19.9 so we will update the same on the
respective worker node:
[root@worker-1 ~]# yum install -y kubeadm-1.19.9-0 --disableexcludes=kubernetes
Step 2.2: Disable scheduling on worker node
We will use kubectl drain command to drain all the pods which could be
possible running on worker-1.example.com. This command will also
disable the scheduling on the respective worker node so no other pods
can be created on this node untill we re-enable the scheduling.
Here we have used some additional parameters with kubectl drain
command:
      --delete-local-data: Continue even if there are pods using emptyDir (local data that will be deleted when
the node is drained).
      --force: Continue even if there are pods not managed by a ReplicationController, ReplicaSet, Job, DaemonSet
or StatefulSet.
      --ignore-daemonsets: Ignore DaemonSet-managed pods.
Let us execute this command on the controller node:
[root@controller ~]# kubectl drain worker-1.example.com --ignore-daemonsets --force --delete-local-data
node/worker-1.example.com cordoned
WARNING: ignoring DaemonSet-managed Pods: kube-system/calico-node-vnw7n, kube-system/kube-proxy-btzsp
evicting pod kube-system/coredns-f9fd979d6-sn86s
evicting pod default/nginx-deploy-db4675c97-mvgmd
pod/nginx-deploy-db4675c97-mvgmd evicted
pod/coredns-f9fd979d6-sn86s evicted
node/worker-1.example.com evicted
You can check the status of the respective worker node to make sure the scheduling is disabled:
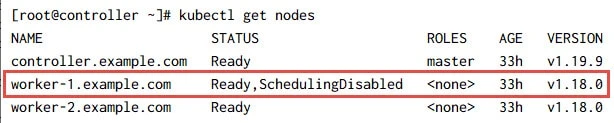
Also make sure there are no active running pods on the respective worker
node as after the drain step, all the pods should have moved to
alternate worker nodes. As you can see here, all my pods from worker-1
have moved to worker-2 node.
[root@controller ~]# kubectl get pods -o wide
NAME                           READY   STATUS    RESTARTS   AGE   IP            NODE                   NOMINATED NODE   READINESS GATES
nginx-deploy-db4675c97-bxwz8   1/1     Running   1          33h   10.0.142.9    worker-2.example.com   <none>           <none>
nginx-deploy-db4675c97-lt5z8   1/1     Running   1          33h   10.0.142.6    worker-2.example.com   <none>           <none>
nginx-deploy-db4675c97-ssmrx   1/1     Running   0          67s   10.0.142.10   worker-2.example.com   <none>           <none>
Step 2.3: Perform Kubernetes upgrade
We don't need to generate a plan any more and we can directly initiate
the kubeadm upgrade on the respective worker node.
[root@worker-1 ~]# kubeadm upgrade node
[upgrade] Reading configuration from the cluster...
[upgrade] FYI: You can look at this config file with 'kubectl -n kube-system get cm kubeadm-config -oyaml'
[upgrade] Skipping phase. Not a control plane node.
[kubelet-start] Downloading configuration for the kubelet from the "kubelet-config-1.19" ConfigMap in the kube-system namespace
[kubelet-start] Writing kubelet configuration to file "/var/lib/kubelet/config.yaml"
[upgrade] The configuration for this node was successfully updated!
[upgrade] Now you should go ahead and upgrade the kubelet package using your package manager.
This step won't take much time on the worker node unlike the controller node.
Step 2.4: Update kubelet and kubectl
Similar to the controller node, the kubeadm upgrade command will not
update kubelet and kubectl. So we will manually upgrade these tools
to the same version as of kubeadm using YUM:
[root@worker-1 ~]# yum install -y kubelet-1.19.9-0 kubectl-1.19.9-0 --disableexcludes=kubernetes
Since the new kubelet rpm may have brought changes to the systemd unit
file, we will refresh the changes and restart the service:
[root@worker-1 ~]# systemctl daemon-reload
[root@worker-1 ~]# systemctl restart kubelet
Step 2.5: Re-enable scheduling
Currently as you can see, scheduling is disabled for worker-1 node:
Now we can safely re-enable the scheduling on worker-1 node using
kubectl uncordon command.
[root@controller ~]# kubectl uncordon worker-1.example.com
node/worker-1.example.com uncordoned
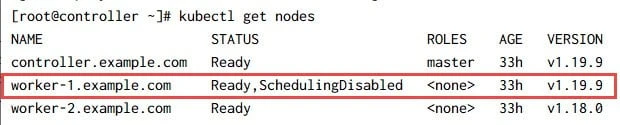
Step 2.6: Verify
Now that we are done with the Kubernetes upgrade on worker-1, we can
verify the status. Check the kubeadm version:
[root@worker-1 ~]# kubeadm version -o short
v1.19.9
Verify the status should be Ready and the VERSION would be
1.19.9:

3. Upgrade remaining worker node(s)
You can now repeat the steps from Step-2 on all the worker nodes
(one at a time) in sequential order. I will not share all the output
snippets again from worker-2, but after completing all the steps now
my Kubernetes Cluster is with 1.19.9 version.

Summary
In this tutorial we learned the steps required to perform Kubernetes upgrade in a cluster. The brief steps requires controller node to be upgraded first followed by individual worker nodes. You would need enough resources on the worker nodes as after the drain operation, all the pods will be relocated to other nodes which can use resource outage. So in production environment you must be careful with the available resources. The steps on the worker nodes must be performed in sequential order i.e. once one worker node is upgraded then start with the next one.
References
Upgrading kubeadm clusters | Kubernetes
Related Searches: upgrade kubernetes cluster without downtime, upgrade kubernetes version, kubernetes latest version, how to check kubernetes version, kubernetes upgrade procedure, kubectl upgrade, k8 update
