You can manage EC2 from a Linux control node the same way you manage on-prem hosts—with playbooks that call AWS APIs. This optional chapter walks you through launching instances, attaching tags and security groups, changing power state, and targeting VMs by tag so you are not clicking through the console for every change.
You need playbook basics from your first Ansible playbook and Ansible tags for the combined playbook at the end. Cloud provisioning is not on the RHCE EX294 exam.
Tested on: Rocky Linux 10.2 (Red Quartz); ansible-core 2.16.16; amazon.aws 8.2.0; boto3 1.35+; AWS region us-east-2.
lab inventory used in earlier lessons.
What You Will Automate
By the end you will have:
amazon.aws8.2.0 pinned incollections/requirements.ymlandboto3on the control nodevars/aws_lab.ymlfor region, AMI, subnet, security group, key pair, and profile- Playbooks that launch instances, set tags, start and stop them, terminate them, and discover instances by tag
Ansible talks to EC2 through the amazon.aws collection—modules ec2_instance and ec2_instance_info. Older tutorials used a top-level ec2 module built on the unmaintained boto library; that module was removed in amazon.aws 4.0.0. Use FQCN names such as amazon.aws.ec2_instance—see the module documentation.
Before You Start
| Prerequisite | Why it matters |
|---|---|
| AWS account with EC2 access | Playbooks call the EC2 API in your chosen region |
| AWS credentials on the control host | IAM role, SSO profile, or lab IAM user keys—modules authenticate through boto3; see AWS security credentials |
| VPC subnet ID and security group ID in that region | Launch tasks need vpc_subnet_id and a security group in the same VPC—do not rely on a default VPC |
| EC2 key pair in that region | Launch tasks reference key_name |
| Ansible on the control node | Same baseline as install Ansible |
| Optional: AWS CLI v2 | aws configure, SSO login, and quick checks—on Ubuntu see install AWS CLI |
Pick one region (for example us-east-2) and stay consistent in playbooks and aws configure. A region is not the same as an availability zone—us-east-2a is a zone inside region us-east-2.
Install the amazon.aws Collection and boto3
Ansible-core does not ship AWS modules. Pin the collection version so a future amazon.aws release does not break your tested ansible-core pair—newer collection releases may require a newer ansible-core than you run locally.
Create collections/requirements.yml:
---
collections:
  - name: amazon.aws
    version: "8.2.0"
Install from that file:
ansible-galaxy collection install -r collections/requirements.ymlConfirm the pinned version is on the search path:
ansible-galaxy collection list amazon.awsThe installed version should appear on the next line:
Collection  Version
----------  -------
amazon.aws  8.2.0
Install boto3 and botocore (required by the collection—see module requirements):
pip3 install --user 'boto3>=1.35.0' 'botocore>=1.35.0'Configure AWS Credentials on the Control Node
Ansible reads the same credential chain as boto3: IAM instance profile on the control host, environment variables, named profiles in ~/.aws/credentials, or SSO-based profiles after aws sso login. Do not embed access keys in playbooks or commit them to Git.
Pick one approach:
| Approach | When to use |
|---|---|
| IAM role on the control host (EC2 instance profile, EKS/IRSA, etc.) | Production automation—temporary credentials rotated by AWS |
AWS SSO profile (aws sso login --profile lab) |
Human or CI access to multiple accounts without long-lived keys |
| IAM user access key in a named profile | Personal lab only, with least-privilege EC2 policy and key rotation |
For production, prefer temporary credentials. IAM access keys are long-term credentials—use them only in a controlled lab when SSO or a role is not practical. Never create root account access keys.
Lab option: IAM user access key
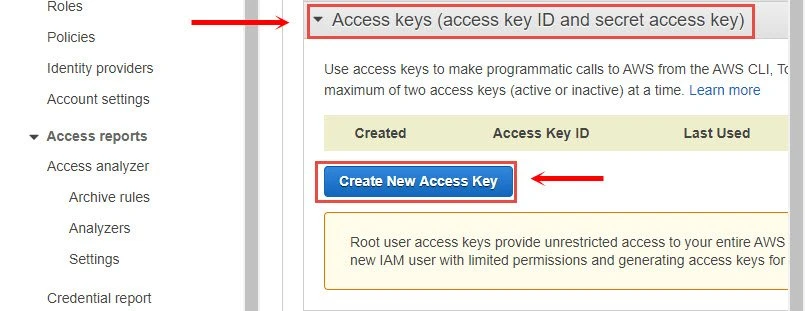
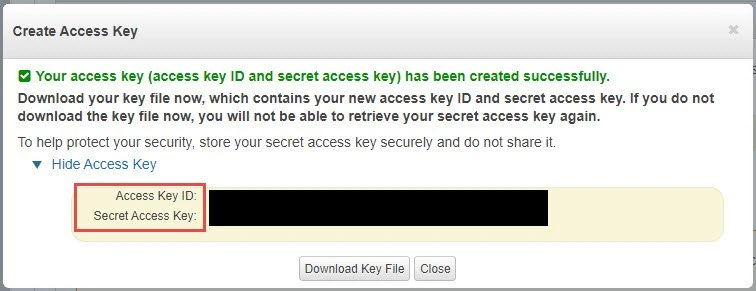
If you are learning on a personal account, create a dedicated IAM user—not the root user—with a scoped EC2 policy. In the IAM console, open Users → your automation user → Security credentials → Create access key. Download or copy the access key ID and secret when prompted—you cannot view the secret again after you close that screen.
You can also reach access keys from the account menu → Security credentials, as shown below:

Attach a policy that allows only the EC2 actions you need (for example ec2:RunInstances, ec2:DescribeInstances, ec2:StartInstances, ec2:StopInstances, ec2:TerminateInstances) on the resources you own.
Store credentials with the AWS CLI
Install AWS CLI v2 on your control host. For a lab IAM user:
aws configure --profile labEnter your access key ID, secret key, default region (for example us-east-2), and optional output format. Ansible and boto3 pick up ~/.aws/credentials and ~/.aws/config automatically.
If you use multiple accounts, pass the profile in playbooks (profile: lab on module tasks) or export it for the shell session:
export AWS_PROFILE=labVerify the profile:
aws sts get-caller-identity --profile labWhen credentials are valid, you get your account and IAM user ARN:
{
    "UserId": "AIDAXXXXXXXXXXXXXXXXX",
    "Account": "123456789012",
    "Arn": "arn:aws:iam::123456789012:user/ansible-automation"
}
If that succeeds, boto3 can authenticate the same way.
Set EC2 Lab Variables Once
Region, AMI, subnet, security group, and key pair repeat in every playbook. Define them once in vars/aws_lab.yml (or group_vars/aws_lab.yml if you wire that group into inventory) and load the file with vars_files in each play.
Create vars/aws_lab.yml and replace every REPLACE value with IDs from your account:
---
# AWS profile (optional—omit if you use the default profile or AWS_PROFILE)
ec2_profile: lab
ec2_region: us-east-2
ec2_ami_id: ami-REPLACE_WITH_CURRENT_AMI
ec2_instance_type: t2.micro
ec2_key_name: ssh-1
ec2_subnet_id: subnet-REPLACE_WITH_SUBNET_ID
ec2_security_group_id: sg-REPLACE_WITH_SECURITY_GROUP_ID
# Launch defaults
ec2_name: ansible-demo-1
ec2_env: db
# Lifecycle-by-ID playbooks—set after your first launch
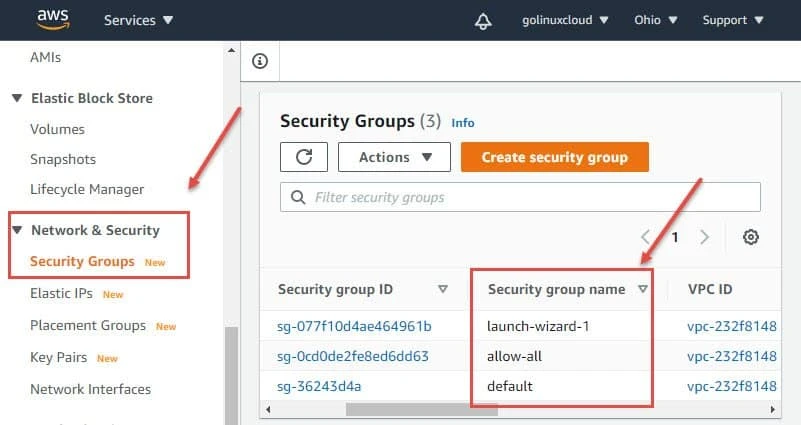
ec2_instance_id: i-REPLACE_WITH_INSTANCE_IDvpc_subnet_id and security_group must belong to the same VPC. Many accounts no longer have a default VPC; even when one exists, a security group name such as allow-all can be ambiguous across VPCs—prefer the security group ID (sg-…) from EC2 → Security Groups.
Find a subnet under VPC → Subnets (or EC2 → Subnets). Copy the subnet ID for the AZ where you want the instance. Match the security group to that VPC—the screenshot below shows where to read the group name; use the ID in your vars file:
Choose an AMI ID
An AMI is the template image for a new instance. In the EC2 console, Launch instance lists Amazon-owned and community images:
Filter Community AMIs (or use your own golden AMI under Images → AMIs):
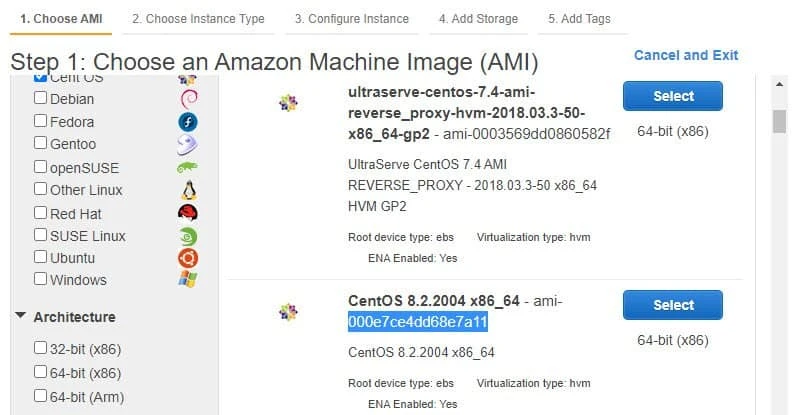
Copy the AMI ID from the details pane and paste it into ec2_ami_id in vars/aws_lab.yml. AMI IDs are region-specific and Amazon retires images over time—a community AMI that worked in one account may be gone in yours. Confirm the ID in the same region as ec2_region before you run a launch playbook. aws ec2 describe-images --region us-east-2 works if you prefer the CLI.
Launch an EC2 Instance
Create playbooks/launch_ec2.yml on the control node. It loads vars/aws_lab.yml and passes subnet and security group IDs explicitly so the launch works without a default VPC:
---
- name: Launch one EC2 instance
  hosts: localhost
  connection: local
  gather_facts: false
  vars_files:
    - ../vars/aws_lab.yml
  tasks:
    - name: Create EC2 instance
      amazon.aws.ec2_instance:
        profile: "{{ ec2_profile }}"
        name: "{{ ec2_name }}"
        instance_type: "{{ ec2_instance_type }}"
        image_id: "{{ ec2_ami_id }}"
        key_name: "{{ ec2_key_name }}"
        vpc_subnet_id: "{{ ec2_subnet_id }}"
        security_group: "{{ ec2_security_group_id }}"
        region: "{{ ec2_region }}"
        wait: true
name sets the Name tag. vpc_subnet_id places the instance in your chosen subnet. security_group accepts a group ID (sg-…) or name—IDs are safer when multiple VPCs exist. wait: true blocks until AWS finishes the launch workflow. Remove the profile line from the task if you use the default AWS profile instead of a named profile.
Syntax-check before you call AWS:
ansible-playbook playbooks/launch_ec2.yml --syntax-checkAnsible only validates YAML here—it does not call AWS yet:
playbook: playbooks/launch_ec2.ymlRun the playbook against your account—this creates a billable instance:
ansible-playbook playbooks/launch_ec2.ymlA successful first launch shows changed=1 on the create task:
PLAY [Launch one EC2 instance] ********************************************************
TASK [Create EC2 instance] ************************************************************
changed: [localhost]
PLAY RECAP ****************************************************************************
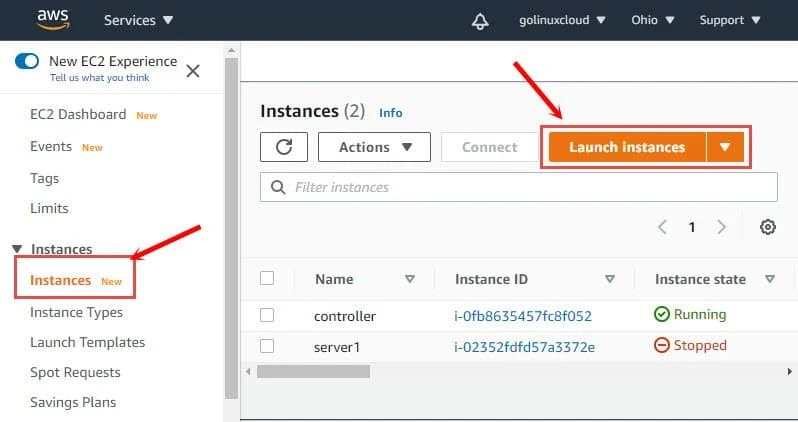
localhost : ok=1 changed=1 unreachable=0 failed=0 skipped=0 rescued=0 ignored=0Open EC2 → Instances in the AWS console—the new VM should match what you see here:
Copy the instance ID from the console into ec2_instance_id in vars/aws_lab.yml for the start, stop, and terminate playbooks below.
When the instance shows running, connect with the key pair you named in the vars file—the ssh command guide covers key permissions and usernames:
ssh -i /path/to/ssh-1.pem [email protected]Use the login user your AMI documents (ec2-user, ubuntu, centos, and so on).
Add Tags at Launch
Tags are key/value metadata—Name is the display name in the console. Extend the launch playbook (playbooks/launch_ec2_tags.yml):
---
- name: Launch EC2 instance with tags
  hosts: localhost
  connection: local
  gather_facts: false
  vars_files:
    - ../vars/aws_lab.yml
  tasks:
    - name: Create tagged EC2 instance
      amazon.aws.ec2_instance:
        profile: "{{ ec2_profile }}"
        instance_type: "{{ ec2_instance_type }}"
        image_id: "{{ ec2_ami_id }}"
        key_name: "{{ ec2_key_name }}"
        vpc_subnet_id: "{{ ec2_subnet_id }}"
        security_group: "{{ ec2_security_group_id }}"
        region: "{{ ec2_region }}"
        wait: true
        tags:
          Name: server4
          Env: "{{ ec2_env }}"
In amazon.aws.ec2_instance, the parameter is tags—not instance_tags from older ec2 module examples you may still see online.
Run the tagged launch:
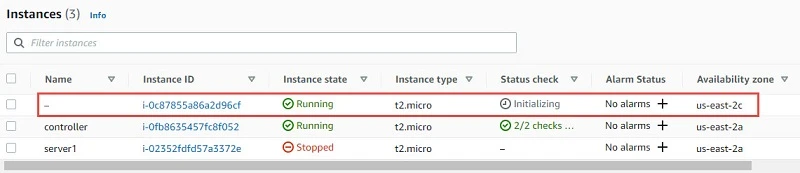
ansible-playbook playbooks/launch_ec2_tags.ymlA second instance appears while AWS finishes initialization:

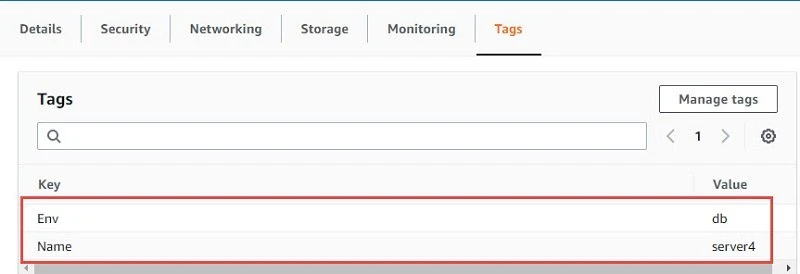
When it reaches running state, confirm the security group and tags on the instance details pane:
Start, Stop, and Terminate by Instance ID
After launch, you change power state with instance_ids and state—you do not need to recreate the VM. Use state: started or state: running to power on, state: stopped to stop, and state: terminated (or state: absent) to delete. See the module state parameter for the full list.
Set ec2_instance_id in vars/aws_lab.yml to the instance you want to manage.
Start (playbooks/start_instance.yml)
---
- name: Start EC2 instance by ID
  hosts: localhost
  connection: local
  gather_facts: false
  vars_files:
    - ../vars/aws_lab.yml
  tasks:
    - name: Start instance
      amazon.aws.ec2_instance:
        profile: "{{ ec2_profile }}"
        instance_ids:
          - "{{ ec2_instance_id }}"
        region: "{{ ec2_region }}"
        state: started
        wait: true
Run the start playbook:
ansible-playbook playbooks/start_instance.ymlIf the instance was already running, Ansible reports ok with changed=0—that is normal idempotent behavior.
Stop (playbooks/stop_instance.yml)
---
- name: Stop EC2 instance by ID
  hosts: localhost
  connection: local
  gather_facts: false
  vars_files:
    - ../vars/aws_lab.yml
  tasks:
    - name: Stop instance
      amazon.aws.ec2_instance:
        profile: "{{ ec2_profile }}"
        instance_ids:
          - "{{ ec2_instance_id }}"
        region: "{{ ec2_region }}"
        state: stopped
        wait: true
Run the stop playbook:
ansible-playbook playbooks/stop_instance.ymlWhen the instance was running, the stop task reports changed=1:
PLAY RECAP ****************************************************************************
localhost                  : ok=1    changed=1    unreachable=0    failed=0    skipped=0    rescued=0    ignored=0
Terminate (playbooks/terminate_instance.yml)
ec2_instance_info, confirm instance IDs, names, region, and tags, and be sure you are deleting the right hosts. Never terminate from a broad filter alone—such as only instance-state-name: running—without reviewing the matched set first. The module documentation includes an extreme-caution example that can remove every running instance in a region.
---
- name: Terminate EC2 instance by ID
  hosts: localhost
  connection: local
  gather_facts: false
  vars_files:
    - ../vars/aws_lab.yml
  tasks:
    - name: Terminate instance
      amazon.aws.ec2_instance:
        profile: "{{ ec2_profile }}"
        instance_ids:
          - "{{ ec2_instance_id }}"
        region: "{{ ec2_region }}"
        state: terminated
        wait: true
Termination is irreversible. Run:
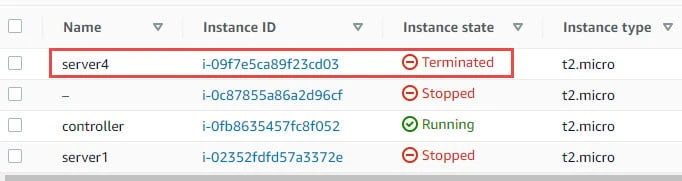
ansible-playbook playbooks/terminate_instance.ymlThe instance moves to terminated in the console:
Find Instances by Tag and Run Lifecycle Tasks
Hard-coding instance IDs breaks down when autoscaling or rebuilds replace VMs. Discover instances with amazon.aws.ec2_instance_info and filter on tags—the same filter syntax as the DescribeInstances API. Filter names and values are case-sensitive.
Always narrow by state as well as tag. A tag-only filter can return stopped instances and, briefly, recently terminated ones still visible to the API. For a general inventory before lifecycle work, match running and stopped hosts:
filters:
  "tag:Env": "{{ ec2_env }}"
  instance-state-name:
    - running
    - stopped
For a stop-only workflow, filter instance-state-name: running. For start-only, use instance-state-name: stopped.
---
- name: List instance IDs for Env tag
  hosts: localhost
  connection: local
  gather_facts: false
  vars_files:
    - ../vars/aws_lab.yml
  tasks:
    - name: Query instances by tag
      amazon.aws.ec2_instance_info:
        profile: "{{ ec2_profile }}"
        region: "{{ ec2_region }}"
        filters:
          "tag:Env": "{{ ec2_env }}"
          instance-state-name:
            - running
            - stopped
      register: ec2_info

    - name: Show instance IDs
      ansible.builtin.debug:
        msg: "{{ item.instance_id }}"
      loop: "{{ ec2_info.instances }}"
      loop_control:
        label: "{{ item.instance_id }}"
Run the query playbook:
ansible-playbook playbooks/list_by_tag.ymlEach matching instance prints its ID—confirm the list before you run stop or terminate tasks against the same filter:
ok: [localhost] => (item=i-0c87855a86a2d96cf) => {
    "msg": "i-0c87855a86a2d96cf"
}
ok: [localhost] => (item=i-02352fdfd57a3372e) => {
    "msg": "i-02352fdfd57a3372e"
}
Combine discovery with lifecycle tasks and playbook tags so one file can stop or start only the slice you select:
---
- name: Manage EC2 instances by Env tag
  hosts: localhost
  connection: local
  gather_facts: false
  vars_files:
    - ../vars/aws_lab.yml
  tasks:
    - name: Discover instances
      amazon.aws.ec2_instance_info:
        profile: "{{ ec2_profile }}"
        region: "{{ ec2_region }}"
        filters:
          "tag:Env": "{{ ec2_env }}"
          instance-state-name:
            - running
            - stopped
      register: ec2_info
      tags:
        - always

    - name: Start instances
      amazon.aws.ec2_instance:
        profile: "{{ ec2_profile }}"
        instance_ids:
          - "{{ item.instance_id }}"
        region: "{{ ec2_region }}"
        state: started
        wait: true
      loop: "{{ ec2_info.instances }}"
      loop_control:
        label: "{{ item.instance_id }}"
      tags:
        - start
        - never

    - name: Stop instances
      amazon.aws.ec2_instance:
        profile: "{{ ec2_profile }}"
        instance_ids:
          - "{{ item.instance_id }}"
        region: "{{ ec2_region }}"
        state: stopped
        wait: true
      loop: "{{ ec2_info.instances }}"
      loop_control:
        label: "{{ item.instance_id }}"
      tags:
        - stop
        - never

    - name: Terminate instances
      amazon.aws.ec2_instance:
        profile: "{{ ec2_profile }}"
        instance_ids:
          - "{{ item.instance_id }}"
        region: "{{ ec2_region }}"
        state: terminated
        wait: true
      loop: "{{ ec2_info.instances }}"
      loop_control:
        label: "{{ item.instance_id }}"
      tags:
        - terminate
        - never
Run the discovery task alone first and read the printed IDs. Only then run --tags stop, --tags start, or --tags terminate.
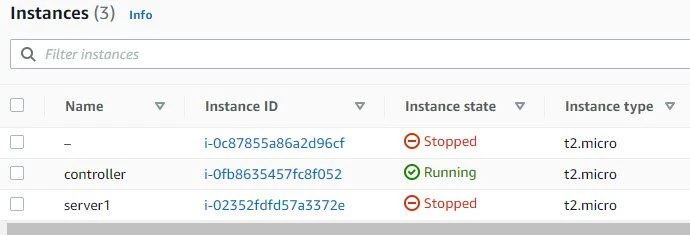
Run only the stop tasks—the discovery step still lists running and stopped hosts, but only running instances need stopping:
ansible-playbook playbooks/ec2_by_tag.yml --tags stopIf you split stop and start into separate playbooks, tighten the discovery filter to instance-state-name: running before stop and stopped before start so you do not act on hosts already in the target state.
Both instances move to stopped in the console:
Bring them back with:
ansible-playbook playbooks/ec2_by_tag.yml --tags start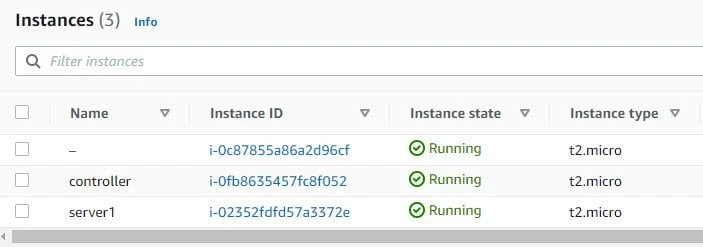
Use wait: true on stop, start, and terminate when the next task depends on the instance reaching a stable state. Run terminate only against hosts you are ready to delete.
block in loop in older Ansible versions—separate looped tasks (as above) are the usual pattern. See blocks, rescue, and always for error-handling around AWS API calls.
Common Mistakes
| Symptom | Likely cause | Fix |
|---|---|---|
Unable to locate credentials |
No profile or env vars on the control host | Run aws sts get-caller-identity --profile lab; set AWS_PROFILE or aws configure --profile lab |
Collection amazon.aws not found |
Collection not installed | ansible-galaxy collection install -r collections/requirements.yml |
Installed latest amazon.aws with old ansible-core |
Unpinned ansible-galaxy collection install amazon.aws pulled an incompatible release |
Pin "8.2.0" in collections/requirements.yml to match your tested ansible-core |
InvalidAMIID.NotFound |
AMI retired or wrong region | Set ec2_ami_id to a current AMI in the same region as ec2_region |
| Launch fails without default VPC | No default subnet for the account/region | Set ec2_subnet_id explicitly in vars/aws_lab.yml |
| Security group name is ambiguous | Same group name exists in multiple VPCs | Use security group ID sg-… in ec2_security_group_id |
| Copying an old AMI from a tutorial | Stale AMI ID in a playbook | Keep AMI IDs in vars/aws_lab.yml and query current images per region |
UnauthorizedOperation |
IAM policy too narrow | Grant required EC2 API actions for the resources you manage |
Playbook uses ec2: module |
Legacy syntax from pre-4.0 guides | Migrate to amazon.aws.ec2_instance |
changed=0 on start |
Instance already running | Expected idempotency—not an error |
| Terminate task does nothing | Termination protection enabled | Disable protection in the console or module before state: terminated |
| Running terminate against a broad filter | Tag filter matched more instances than you intended | Run list_by_tag.yml first; confirm IDs, names, and tags before --tags terminate |
For module and collection resolution errors on the control node, see collection, module, and variable errors.
References
- amazon.aws.ec2_instance module — create and manage instances
- amazon.aws.ec2_instance_info module — describe instances and tags
- AWS EC2 User Guide — regions, AMIs, security groups, key pairs
- Manage access keys for IAM users — create, rotate, and when to prefer temporary credentials
- Security best practices in IAM — roles and SSO over long-lived keys
- AWS CLI configuration —
credentials,config, and named profiles
Summary
Pin amazon.aws at 8.2.0 in collections/requirements.yml, install boto3, and keep account-specific values in vars/aws_lab.yml—region, current AMI, subnet ID, security group ID, key pair, and profile. Prefer temporary credentials for production; use a scoped IAM user profile only for a lab. Launch with vpc_subnet_id and amazon.aws.ec2_instance, discover hosts with amazon.aws.ec2_instance_info, and confirm matched IDs before any terminate task. This chapter is optional after the RHCE-focused lessons.
