![10+ swapon and swapoff command examples in Linux [Cheat Sheet]](/swapon-swapoff-command/swapon_command.jpg)
Linux uses swap space when the physical memory (RAM) reaches its maximum capacity. If the system requires more memory and the RAM is insufficient, inactive pages in memory are moved to the swap space.
Swap space is a part of virtual memory that stores inactive pages or processes. It can be a partition or file on a hard disk.
In this tutorial, we will discuss examples of using swapon and swapoff commands in Linux. The swapon command enables swapping and the swapoff command disables swapping on specified devices and files.
Syntax to use swapon and swapoff command
The syntax for using the swapon and swapoff command is as follows:
$ swapon <option>$ swapoff <option>You will require Sudo privileges to enable or disable swap devices and files.
How to create a swap file in Linux?
Before using the swapon and swapoff command, it would be a good idea to check whether the swap space is available in your system.
Run the following command to check for the swap space.
golinux@ubuntu-PC:~$ free -h
              total        used        free      shared  buff/cache   available
Mem:          1.9Gi       812Mi        84Mi        15Mi       1.1Gi       979Mi
Swap:         3.5Gi       1.0Mi       3.5Gi
If you do not find swap space, let's have a look at how you can create a new swap file.
The following command adds a new swapfile /testswap of 1GB in the
system.
$ sudo fallocate -l 1G /testswapNext, secure the swap file so only the root user can read and write the
swap file. Set the 600 permission as shown below.
$ sudo chmod 600 /testswapThen enable the swap area with the mkswap command on a file.
$ sudo mkswap /testswapLastly, you have to add the below entry in /etc/fstab file to make the
changes permanent.
/testswap swap swap defaults 0 01. Enable all swaps devices and files
The swapon command with -a or --all flag enables all swap devices
and files listed in the /etc/fstab file.
$ sudo swapon -aOR
$ sudo swapon -allSample Output:
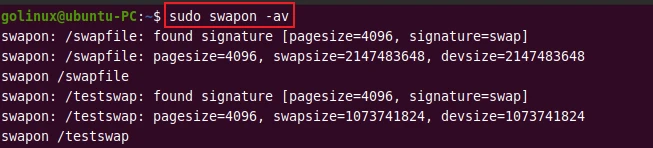
The -v option is used to display verbose information.
If you want to enable a particular device, you can specify its name to
the swapon command.
$ sudo swapon /testswapThe information about swap devices and files is stored in a
/proc/swaps file.

2. Display swap usage summary
The -s or --summary option displays the swap usage summary of all
enabled swap devices and files.
$ swapon -sOR
$ swapon --summarySample Output:

3. Disable all swap devices and files
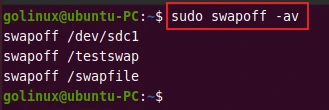
The swapoff command with -a or --all option disable swapping in
all devices and files from /proc/swaps.
$ sudo swapoff -aOR
$ sudo swapoff --allSample Output:
Use the following syntax to disable a specific swap file or device.
$ sudo swapoff swap_name4. Enable swap discards
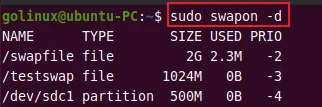
The -d or --discard option enables the swap discards if the device
supports the discard operation.
$ swapon -dOR
$ swapon --discardSample Output:
5. Skip devices that do not exist
You can silently skip devices that do not exist using the -e or
--ifexists option.
$ sudo swapon -eOR
$ sudo swapon --ifexistsSample Output:
golinux@ubuntu-PC:~$ sudo swapon -e
NAME      TYPE       SIZE USED PRIO
/swapfile file         2G 2.3M   -2
/testswap file      1024M   0B   -3
/dev/sdc1 partition  500M   0B   -4
6. Reinitialize the swap space
You can use swapon command with -f or --fixpgsz flag to reinitialize
the swap space.
$ swapon -fOR
$ swapon --fixpgszSample Output:
golinux@ubuntu-PC:~$ sudo swapon -f
NAME      TYPE       SIZE USED PRIO
/swapfile file         2G   0B   -2
/testswap file      1024M   0B   -3
/dev/sdc1 partition  500M   0B   -4
7. Display a summary table with selected columns
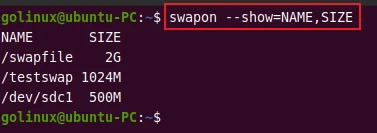
The --show option allows you to specify columns to display in the
summary table. For instance, you can run the following command to
display NAME and SIZE only.
$ swapon --show=NAME,SIZESample Output:
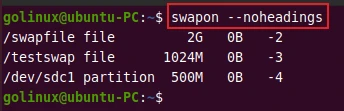
8. Don't print table heading
You can hide the table heading using the --noheadings option.
$ swapon --noheadingsSample Output:
9. Use the raw output format
The --raw option uses the raw format to display the summary table.
$ swapon --rawSample Output:

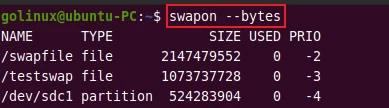
10. Display swap size in bytes
With the --bytes option, you can view the swap sizes in bytes in the
output.
$ swapon --bytesSample Output:
11. Display verbose output
You can print the verbose information using the -v or --verbose
option.
$ swapon -vOR
$ swapon --verboseConclusion
Now you know how to enable and disable swap devices and files using the swapon and swapoff command in Linux. You have also learned to display the swap usage summary. We hope you found this article useful. If you have any questions, please let us know in the comment section below.
What's Next
Solved Found a swap file by the name .XXX.swp
10 different methods to check disk space in Linux