lvrename — quick reference
Rename logical volumes
| When to use | Command |
|---|---|
| Rename LV (three-argument form) | sudo lvrename myvg oldname newname |
| Rename with full paths | sudo lvrename /dev/myvg/old /dev/myvg/new |
| Two-argument form (VG implied) | sudo lvrename /dev/myvg/old newname |
| Refresh active device after rename | sudo lvchange --refresh myvg/newname |
| Verify new name | sudo lvs myvg |
Post-rename updates on production systems
| When to use | Command |
|---|---|
| Get filesystem UUID (preferred in fstab) | sudo blkid /dev/myvg/newname |
| Show current mounts (may show old mapper until remount) | findmnt |
| Ubuntu initramfs rebuild after root rename | sudo update-initramfs -u |
| RHEL-family initramfs rebuild | sudo dracut -f |
Help and version
| When to use | Command |
|---|---|
| Show built-in usage | lvrename --help |
| Show LVM version | lvm version |
lvrename — command syntax
Synopsis from lvrename --help on Ubuntu 25.04 (LVM 2.03.27):
lvrename VG LV LV_new
lvrename LV LV_new
lvrename updates LVM metadata only — data blocks are untouched. Device paths become /dev/VG/newname and /dev/mapper/VG-newname (hyphens doubled when names contain hyphens). Needs sudo.
lvrename — command examples
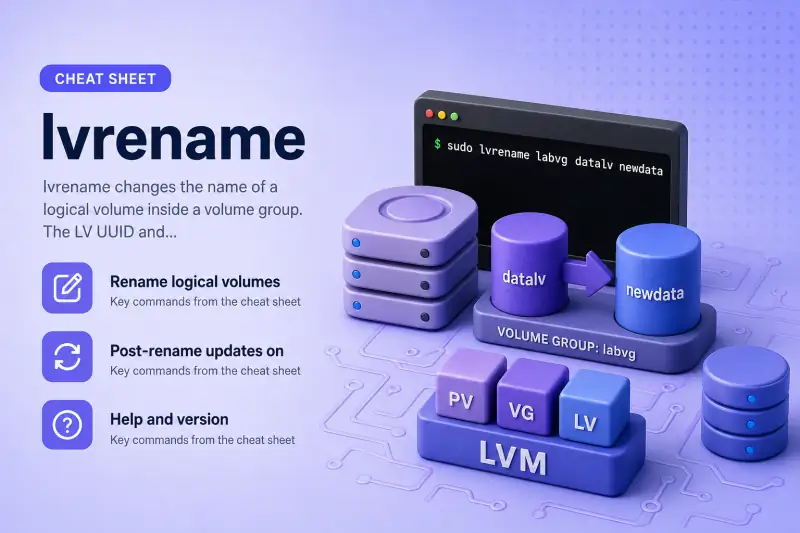
Essential Rename a lab LV and verify
Safe practice on loop-backed labvg — never rename ubuntu-lv on a live root disk without a full boot plan.
fallocate -l 256M /tmp/lvm-lab-a.img
LOOP_A=$(sudo losetup -fP --show /tmp/lvm-lab-a.img)
sudo pvcreate $LOOP_A && sudo vgcreate labvg $LOOP_A
sudo lvcreate -L 64M -n datalv labvg
sudo lvrename labvg datalv newdata
sudo lvs labvg
Sample output:
Renamed "datalv" to "newdata" in volume group "labvg"
  LV      VG    LSize
  newdata labvg 64.00m
The LV UUID stays the same — only the name and device path change.
Essential Refresh device-mapper after rename
On an active LV, reload metadata so udev and the kernel agree on the path.
sudo lvchange --refresh labvg/newdata
sudo lvdisplay labvg/newdata | grep 'LV Path'
Sample output:
LV Path /dev/labvg/newdataEssential Lab cleanup
sudo lvremove -f labvg 2>/dev/null; sudo vgremove -f labvg 2>/dev/null
sudo pvremove -f $LOOP_A 2>/dev/null; sudo losetup -d $LOOP_A 2>/dev/null
rm -f /tmp/lvm-lab-a.img
Common Use UUID in fstab after rename
Filesystem UUID does not change when you lvrename. Prefer UUID entries so fstab survives future renames.
sudo mkfs.ext4 -F /dev/labvg/newdata
sudo blkid /dev/labvg/newdata
Sample output:
/dev/labvg/newdata: UUID="a1b2c3d4-..." TYPE="ext4"/etc/fstab line (example):
UUID=a1b2c3d4-... /data ext4 defaults 0 2Replace path-based entries like /dev/mapper/labvg-datalv to avoid boot failures.
Common Rename a mounted data LV (non-root)
Rename is online, but /proc/mounts may show the old mapper name until remount.
sudo mkdir -p /data
sudo mount /dev/labvg/newdata /data
sudo lvrename labvg newdata datavol
sudo lvchange --refresh labvg/datavol
findmnt /data
df may still list the old device path until you umount and mount again. Data on disk is unchanged.
Common How hyphenated names appear in /dev/mapper
LV names with hyphens become double hyphens in mapper paths.
sudo lvrename labvg datavol app-data
ls -l /dev/mapper/labvg-app--data
A single hyphen in the LV name app-data maps to labvg-app--data under /dev/mapper/.
Advanced Root LV rename — full workflow
Renaming the root logical volume (ubuntu-vg/ubuntu-lv) requires updating fstab, initramfs, and GRUB so every boot path matches the new name. Typical sequence on Ubuntu:
lvrename ubuntu-vg ubuntu-lv new-root-name- Update
/etc/fstabto UUID or new/dev/mapper/...path for/ sudo lvchange --refresh ubuntu-vg/new-root-name- Rebuild initramfs:
sudo update-initramfs -u(Ubuntu) ordracut -f(RHEL) - Update kernel cmdline (
root=andrd.lvm.lv=in GRUB) — on Ubuntu:/etc/default/grubthensudo update-grub - Reboot and verify
findmnt /
Take a snapshot or backup before renaming root.
Advanced Renaming the volume group (vgrename)
LV and VG renames are separate commands. Renaming a VG requires the same fstab, initramfs, and GRUB updates for every LV in that VG.
sudo vgrename labvg prodvg
sudo lvchange -ay prodvg
lvrename — when to use / when not
| Use lvrename when | Use something else when |
|---|---|
|
|
lvrename vs creating a new LV
| lvrename | new LV + copy | |
|---|---|---|
| Data copy | None (instant) | Full copy time |
| UUID | LV UUID unchanged; FS UUID unchanged | New UUIDs |
| Downtime | Low for data LVs; root needs reboot | Higher |
Related commands
| Command | One line |
|---|---|
| lvrename | Rename an LV (this page) |
| lvchange | Refresh after rename |
| lvdisplay | Confirm path and UUID |
| vgrename | Rename a volume group |
Browse the full index in our Linux commands reference.
lvrename — interview corner
Does lvrename destroy data?
No. Only the LV name and device paths change; extents and filesystem UUID stay put.
A strong answer is:
"lvrename is metadata-only — data and filesystem UUID stay intact; I still fix fstab and boot config."
Must root be unmounted to rename the root LV?
The rename syscall is online, but / stays mounted under the old mapper until reboot/remount. You must update fstab, initramfs, and GRUB root= / rd.lvm.lv= before reboot.
A strong answer is:
"Rename can run live, but root still needs initramfs and GRUB updates plus reboot before the new name is used for /."
Should fstab use paths or UUID after rename?
UUID is safer — survives renames. LV UUID in LVM metadata also stays constant.
A strong answer is:
"I use filesystem UUID in fstab so renames don't break mounts."
Why lvchange --refresh after rename?
Reloads device-mapper tables for an active LV so kernel, udev, and LVM agree on the new name.
A strong answer is:
"--refresh applies the renamed metadata to the active device-mapper node without a reboot when possible."
How do hyphens in LV names affect /dev/mapper?
Each hyphen in the LV name becomes a double hyphen in the mapper device name (data-vol → vg-data--vol).
A strong answer is:
"Hyphens in LV names double in /dev/mapper paths — I prefer underscores in names to avoid confusion."
Troubleshooting
| Symptom | Likely cause | Fix |
|---|---|---|
| Boot fails after root rename | Old root= in GRUB |
update-grub, fix rd.lvm.lv= |
| Mount fails with old path | fstab still uses old mapper | blkid, switch to UUID |
df shows old name |
Mount not remounted | umount / mount or reboot |
Logical volume already exists |
Target name taken | Pick unused name, lvs |
References
- Red Hat Enterprise Linux 9 — Configuring LVM logical volumes (root rename planning)