![How to install Pyrit in Kali Linux [100% Working]](/install-pyrit-in-kali-linux/install_pyrit.jpg)
Getting started with Pyrit
Its developer describes Pyrit as follows: “Pyrit allows you to create huge databases of precomputed WPA/WPA2-PSK authentication phase in space-time exchange. Using the computing power of Multi-Core CPUs and other platforms via ATI-Stream, Nvidia CUDA and OpenCL, this is by far the strongest attack against one of the world's most used security protocols”
Pyrit uses a combination of CPU+GPU to enable faster fragmentation of raw data. For example, you can use this combined processing power to find the Wifi password, crack the WPA/WPA2 capture file.
Pyrit consists of basically two parts:
- The main module features the scheduling- and database-code and a basic extension-module that uses the CPU for computation. This main module is required for every system.
- Optionally, Nvidia-CUDA or OpenCL modules can be installed. Of course the hardware must support it. (You can find this option in the installation steps)
If you have multiple GPUs, you can use Pyrit to crack the password. Pyrit allows attackers to create massive amount of pre-computed WPA/WPA-PSK. Pyrit can be downloaded fromJPaulMora/Pyrit on GitHub. This tool uses other platforms, such as ATI-Stream, Nvidia CUDA, and OpenCL, with the computational power of multiple CPUs. An attacker can use John the Ripper andcowpattyalong with Pyrit to crack the password from the captured wireless traffic
Pre-requisites
You must have an up and running Kali Linux installed.
Step-1: Update System and Install Dependencies
For packages that need to be installed on your system, execute the following commands in terminal.
Update the system:
┌──(foc㉿foc)-[~]
└─$ sudo apt update -y
Install the dependencies:
┌──(foc㉿foc)-[~]
└─$ sudo apt install git python2-dev libssl-dev libpcap-dev -y
Step-2: Compile Pyrit
Let's pull the application from the Github page:
┌──(foc㉿foc)-[~]
└─$ git clone https://github.com/JPaulMora/Pyrit.git --depth=1

┌──(foc㉿foc)-[~]
└─$ sed -i "s/COMPILE_AESNI/COMPILE_AESNIX/" Pyrit/cpyrit/_cpyrit_cpu.c
If you skip the above step, you will get the following error after pyrit -h command:
┌──(foc㉿foc)-[~/Pyrit]
└─$  pyrit -h
Traceback (most recent call last):
  File "/usr/local/bin/pyrit", line 4, in
    import pyrit_cli
  File "/usr/local/lib/python2.7/dist-packages/cpyrit/util.py", line 54, in
    import _cpyrit_cpu
ImportError: /usr/local/lib/python2.7/dist-packages/cpyrit/_cpyrit_cpu.so: undefined symbol: aesni_key
Run the following steps in order:
┌──(foc㉿foc)-[~]
└─$ cd Pyrit

┌──(foc㉿foc)-[~/Pyrit]
└─$ python2 setup.py clean

┌──(foc㉿foc)-[~/Pyrit]
└─$ python2 setup.py build
running build
running build_py
creating build
creating build/lib.linux-x86_64-2.7
copying pyrit_cli.py -> build/lib.linux-x86_64-2.7
creating build/lib.linux-x86_64-2.7/cpyrit
.
.
.
running build_scripts
creating build/scripts-2.7
copying and adjusting pyrit -> build/scripts-2.7
changing mode of build/scripts-2.7/pyrit from 644 to 755
Step-3: Install Pyrit
It may give some warnings after compilation. Then run the install
command:
┌──(foc㉿foc)-[~/Pyrit]
└─$ sudo python2 setup.py install
running install
running build
running build_py
running build_ext
running build_scripts
running install_lib
creating /usr/local/lib/python2.7/dist-packages/cpyrit
copying build/lib.linux-x86_64-2.7/cpyrit/_cpyrit_cpu.so -> /usr/local/lib/python2.7/dist-packages/cpyrit
copying build/lib.linux-x86_64-2.7/cpyrit/cpyrit.py -> /usr/local/lib/python2.7/dist-packages/cpyrit
copying build/lib.linux-x86_64-2.7/cpyrit/pckttools.py ->
.
.
.
byte-compiling /usr/local/lib/python2.7/dist-packages/pyrit_cli.py to pyrit_cli.pyc
writing byte-compilation script '/tmp/tmpEBSxgv.py'
/usr/bin/python2 -O /tmp/tmpEBSxgv.py
removing /tmp/tmpEBSxgv.py
running install_scripts
copying build/scripts-2.7/pyrit -> /usr/local/bin
changing mode of /usr/local/bin/pyrit to 755
running install_egg_info
Writing /usr/local/lib/python2.7/dist-packages/pyrit-0.5.1.egg-info
After this step, go up one directory to avoid messing with module searches:
┌──(foc㉿foc)-[~/Pyrit]
└─$ cd ..

┌──(foc㉿foc)-[~]
└─$ pyrit -h
Pyrit 0.5.1 (C) 2008-2011 Lukas Lueg - 2015 John Mora
- JPaulMora/Pyrit
This code is distributed under the GNU General Public License v3+

Usage: pyrit [options] command

Recognized options:
  -b               : Filters AccessPoint by BSSID
  -e               : Filters AccessPoint by ESSID
  -h               : Print help for a certain command
  -i               : Filename for input ('-' is stdin)
  -o               : Filename for output ('-' is stdout)
  -r               : Packet capture source in pcap-format
  -u               : URL of the storage-system to use
  --all-handshakes : Use all handshakes instead of the best one
  --aes            : Use AES

Recognized commands:
  analyze                 : Analyze a packet-capture file
  attack_batch            : Attack a handshake with PMKs/passwords from the db
  attack_cowpatty         : Attack a handshake with PMKs from a cowpatty-file
  attack_db               : Attack a handshake with PMKs from the db
  attack_passthrough      : Attack a handshake with passwords from a file
  batch                   : Batchprocess the database
  benchmark               : Determine performance of available cores
  benchmark_long          : Longer and more accurate version of benchmark (5 minutes)
  check_db                : Check the database for errors
.
.
.
  passthrough             : Compute PMKs and write results to a file
  relay                   : Relay a storage-url via RPC
  selftest                : Test hardware to ensure it computes correct results
  serve                   : Serve local hardware to other Pyrit clients
  strip                   : Strip packet-capture files to the relevant packets
  stripLive               : Capture relevant packets from a live capture-source
  verify                  : Verify 10% of the results by recomputation
Step-5: Using Pyrit
Run the following command to list the available cores:
┌──(foc㉿foc)-[~]
└─$ pyrit list_cores
Pyrit 0.5.1 (C) 2008-2011 Lukas Lueg - 2015 John Mora
- JPaulMora/Pyrit
This code is distributed under the GNU General Public License v3+

The following cores seem available...
#1:  'CPU-Core (SSE2)'
Benchmark Pyrit

┌──(foc㉿foc)-[~]
└─$ pyrit benchmark
Pyrit 0.5.1 (C) 2008-2011 Lukas Lueg - 2015 John Mora
- JPaulMora/Pyrit
This code is distributed under the GNU General Public License v3+

Running benchmark (1130.3 PMKs/s)... -

Computed 1126.53 PMKs/s total.
#1: 'CPU-Core (SSE2)': 1194.5 PMKs/s (RTT 2.9)
OpenCL:
Nvidia-CUDA and OpenCL Steps
CUDA (Compute Unified Device Architecture) is a parallel computing platform and application programming interface that allows software to use certain types of graphics processing units (GPUs) for general purpose processing. It is a software layer that provides direct access to the GPU's virtual instruction set and parallel computing elements for the execution of the compute cores.
Two methods to find out your GPU's CUDA Support.
Method-1: Wikipedia
Find out your GPU's CUDA Support
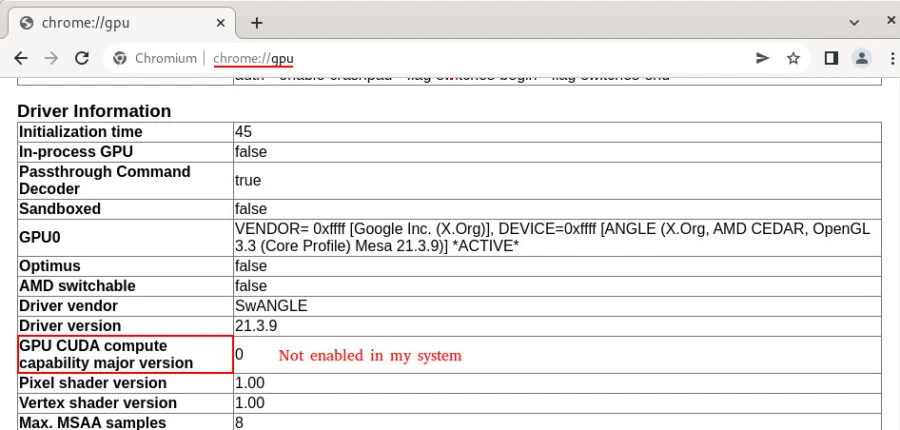
Method-2: With Web Browser
First of all, Open Chrome based browser in
your
system. After that go to the url
chrome://gpu.
You can see the supported version on the screen below. (In my case not enabled)
For Nvidia
Install the following dependency:
┌──(foc㉿foc)-[~]
└─$ sudo apt install nvidia-cuda-toolkit -y
Go to the [cpyrit_cuda] directory in the directory where you downloaded the pyrit, For example:
┌──(foc㉿foc)-[~]
└─$ cd Pyrit/modules/cpyrit_cuda/

┌──(foc㉿foc)-[~/Pyrit/modules/cpyrit_cuda]
└─$ python2 setup.py build
For Pyrit-OpenCL
Install the following dependency:
──(foc㉿foc)-[~/Pyrit/modules/cpyrit_opencl]
└─$ sudo python2 setup.py build
The headers required to build the OpenCL-kernel were not found. Trying to continue anyway...
running build
running build_ext
Building modules...
building 'cpyrit._cpyrit_opencl' extension

┌──(foc㉿foc)-[~/Pyrit/modules/cpyrit_opencl]
└─$ sudo python2 setup.py install
The headers required to build the OpenCL-kernel were not found. Trying to continue anyway...
running install
running build
running build_ext
Building modules...
running install_lib
copying build/lib.linux-x86_64-2.7/cpyrit/_cpyrit_opencl.so -> /usr/local/lib/python2.7/dist-packages/cpyrit
running install_egg_info
Writing /usr/local/lib/python2.7/dist-packages/cpyrit_opencl-0.5.0.egg-info
After deciding on OpenCL and Nvidia CUDA, change the configuration with the following steps:
┌──(foc㉿foc)-[~]
└─$ nano ~/.pyrit/config
Change use_OpenCL = true or false and use_CUDA = true or false.
Summary
What is described in this article has been tested on the latest Kali Linux version.
┌──(foc㉿foc)-[~]
└─$ uname -a
Linux foc 5.16.0-kali7-amd64 #1 SMP PREEMPT Debian 5.16.18-1kali1 (2022-04-01) x86_64 GNU/Linux

┌──(foc㉿foc)-[~]
└─$ cat /etc/os-release
PRETTY_NAME="Kali GNU/Linux Rolling"
NAME="Kali GNU/Linux"
ID=kali
VERSION="2022.2"
VERSION_ID="2022.2"
VERSION_CODENAME="kali-rolling"
ID_LIKE=debian
ANSI_COLOR="1;31"
HOME_URL="https://www.kali.org/"
SUPPORT_URL="https://forums.kali.org/"
BUG_REPORT_URL="https://bugs.kali.org/"
Many articles shared on the Internet are out of date. We hope you enjoy this article that we have prepared with the latest versions.
References
Install Pyrit - Pyrit Wiki Page
