![Install Tor Browser on Kali Linux [2 Methods]](/install-tor-browser-on-linux/install_tor_browser.jpg)
In this tutorial we will cover different methods which one can use to install Tor Browser on Kali Linux.
Have you ever wondered how to protect your privacy while browsing over the internet? The first solution that comes to your mind is using a VPN. Virtual Private Networks (VPNs) can be quite reliable for browsing the internet anonymously; however, there is a catch. A VPN works by routing your traffic to a remotely configured server where all your traffic originates. The flaw behind that is that there are VPN companies that store all your logs. Therefore, your IP address can still be traced back to you in case of any arising issue.
A better solution for preventing all these uncertainties is using the Tor browser. With Tor Browser, no one can trace your daily use, what you are doing online, the kinds of websites you visit and your logs are not stored anywhere. Additionally, it's the only browser that would enable you to access the Dark Web.
This article will cover different methods to install Tor Browser on Linux system where your default repo may or may not have tor browser related packages.
How does Tor Browser work?
Tor or The Onion Router works under the Tor network. The Tor network comprises countless nodes, or relay points, that pass your data along using layers of encryption - hence the onion metaphor. Each node that your data passes through peels off another layer of encryption, showing the previous node's IP address, as well as the IP of the next node. The last node your data passes through is the exit node, and it peels off the final layer of encryption and then delivers your data to the intended server. The point of origin, and the intermediary nodes, are completely unknown.
Why should you use Tor Browser?
- Tor Browser has multiple servers which encrypt traffic a couple of times as it passes over them; this makes your traffic more secure from anyone listening to your communication.
- Tor browser ensures zero monitoring of your browsing habits by either your service provider or anyone in the same network.
- Tor Browser is ads-free; Tor browser blocks third parties and ads from accessing your details.
- In addition, Tor Browser allows you to access sites from your home network restricted from accessing freely.
- Besides browsing the Internet, Tor users can utilize its hidden services to create private websites and messengers that are only accessible using the Tor browser. These private sites are part of the dark web where pages like Silk Road's famous Internet black market can be found.
However, not all activity on Tor is for nefarious purposes. Anonymous Internet usage can be important for journalists reaching out to sources, activists who live in countries that censor or block Internet usage, and even law-enforcement officers who use it for undercover operations.
Method 1: Using the Tor Browser Launcher
The tor browser launcher is a tool which simplifies the whole process of downloading and installing Tor Browser on Linux systems. Once executed, it will automatically check the latest available version, verify the signature and then adds a menu entry.
But first thing first, let's verify our repository is upto date using apt package manager:
sudo apt updateInstall Tor Browser Launcher
sudo apt install torbrowser-launcher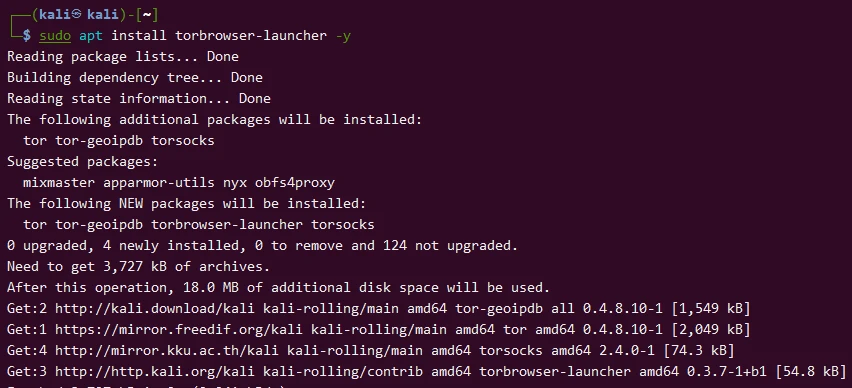
On the graphical interface, run the Tor Browser Launcher which will start the download process:
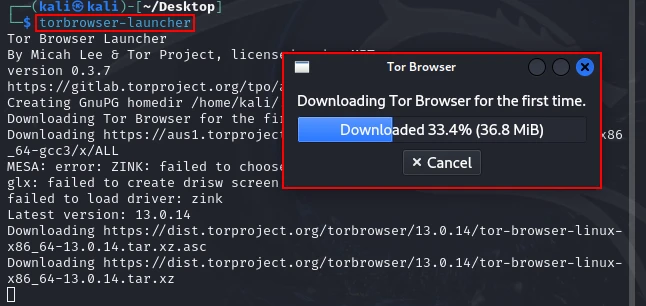
Once the download is completed, the tow browser will be opened where you can click on Connect to start browsing privately:
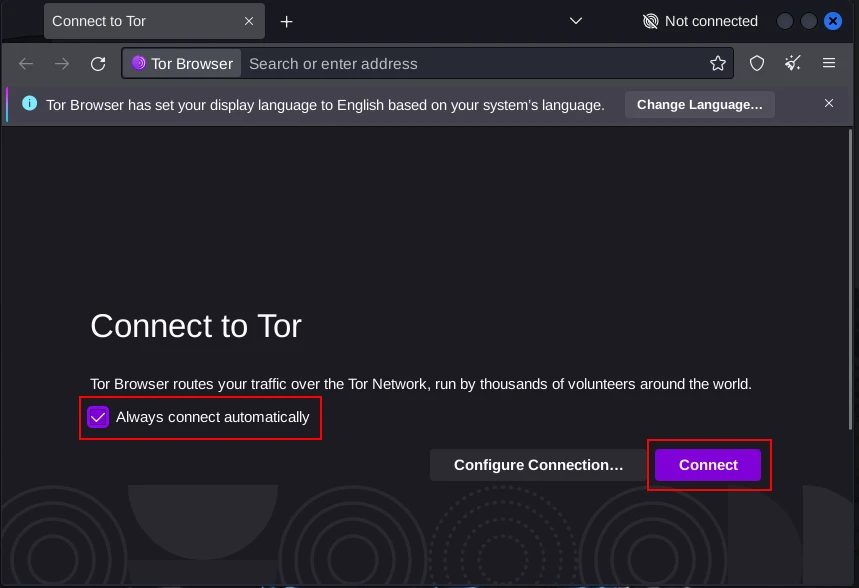
Voilla, we are connected and browse securely without anyone knowing our current IP Address. You will notice that Tor uses the DuckDuckGo search engine, which does not store user information compared to its counterpart Google.

Method 2: Install Tor Browser using Official Archive
If you use a Linux distribution that doesn't have Tor available in their repositories, this method will work like a charm. But before we start, let's install some pre-requisites which will help us with download and setup of tor browser in this method:
sudo apt install wget gnupgNavigate to the Tor download page and download the Linux package based on your CPU architecture.
wget https://dist.torproject.org/torbrowser/13.0.14/tor-browser-linux-x86_64-13.0.14.tar.xzVerify the signature of the download, this requires signature file for
the specific version we are downloading. The signature file is available
at the same download page with an extension .asc:
wget https://dist.torproject.org/torbrowser/13.0.14/tor-browser-linux-x86_64-13.0.14.tar.xz.ascTo verify the signature we will import the OpenPGP key used by Tor Browser developers for signing individual releases:
gpg --auto-key-locate nodefault,wkd --locate-keys [email protected]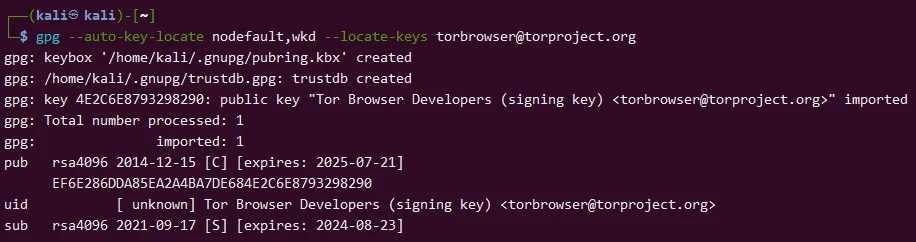
Once the key is imported, use the following command to verify the tarball against its signature:
gpg --verify tor-browser-linux-x86_64-13.0.14.tar.xz.asc tor-browser-linux-x86_64-13.0.14.tar.xz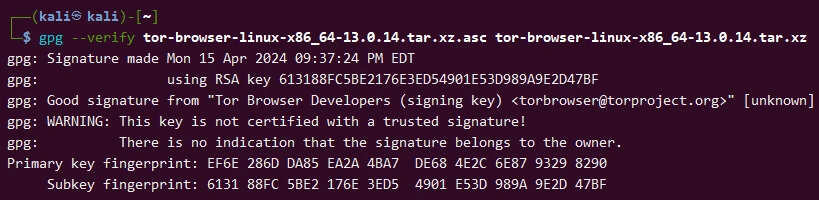
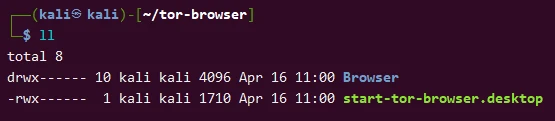
After a successful verification, extract the tor browser archive file using tar command as shown below:
tar -xf tor-browser-linux-x86_64-13.0.14.tar.xzWhen done, use the cd command to navigate inside the newly created tor
directory. When you run the ls command, you will see there are two
files inside. The Browser directory and the start-tor-browser.desktop
file.
Run the .desktop file as shown in the image below to start the Tor
browser.
chmod +x start-tor-browser.desktop
./start-tor-browser.desktopTip: Do not run the .desktop with sudo command or root privileges.
You won't see the "Download Tor For the first time" window with this second method. You will be taken directly to the Tor browser window, as sown in the image below.
!image
Once connected, you can start browsing privately:
!image
Force the Tor Browser to Use a Specific Exit Node
As we have discussed above, the Tor network makes use of Entry and Exit nodes. The Entry node is the node that relays your traffic into the Tor network. Additionally, it's the only node that knows the user's identity, but it doesn't know the traffic's final destination. The final destination is only known by the Exit node. Therefore, if somebody tries monitoring your online activity, they will only see you connect to a Tor network but won't know which specific server you are accessing.
Now, let's say you want to access information only available in Australia; you would need to fine-tune your Tor browser to use an Exit node in Australia. To specify an exit, navigate to Tor Brower installation directory:
Browser/TorBrowser/Data/Tor/torrcOr, for standalone Tor installations, it might be in:
/etc/tor/torrcOpen the torrc file with a text editor. If you’re using a terminal,
you can use nano or vim: To specify an exit node, you can use any of
the three methods below:
Use a specific IP address by adding the line below in the file. Remember to replace the IP address with your IP.
ExitNodes 226.10.99.202Specify an exit node with a fingerprint, as shown below.
ExitNodes 19B6F025B4580795FBD9F3ED3C6574CDAF979A2FSpecify an Exit node using a country code as shown below. Replace
{CA} with the country code of your choice.
ExitNodes {CA} StrictNodes 1You can set several Exit nodes as shown below.
ExitNodes {US},{AG},{BB} StrictNodes 1When done, save the file and restart the Tor browser to apply the changes.
Restart the Tor service for the changes to take effect. If you are using the Tor Browser, simply closing it and reopening it should suffice. For standalone Tor services, use:
Control the running service with systemctl start, stop, or restart; see the systemctl command for try-restart and dependency behavior.
sudo systemctl restart torConclusion
This post has given a step by step procedure on running Tor on your Linux system. Please feel free to share your views in the comments. If you encounter any issues installing Tor, please, don't hesitate to leave a comment below.
