This is a continuation guide on using gophish framework for performing phishing tests on a corporate. In the first guide, we learnt how to install gophish and the different functions found on the pages within the framework. On this guide we will be learning how to use the framework to successfully launch a phishing campaign and how to analyze the reports generated from the campaigns. We will also learn how to add the required information in order to launch a successful phishing campaign on gophish framework.
Requirements
- Have gophish framework installed on your PC.
- Landing page template and email template. (You can get premade profiles to use on this Github repo).
- Have target emails (Gathering prior information on the target will help in making the phishing more successful).
- Have an email address domain to use to send the phishing emails.
With that in mind, let us jump right into ourguide.
Step 1: Setting up a gophish framework sending profile
We install, start and login to the gophish frameworkas illustrated on our first gophish guide. Our first step will be to setup a Sending Profile. We will be using this profile to send out the phishing emails. You can use any email service provider as long as you are familiar with the required SMTP details. We will be using a gmail email on our phishing campaign so I go on to add the SMTP information as shown on the image below.
After creating the sending profile, you have to test if the sending profile works by sending a test email.
![Create phishing campaign with Gophish [Step-by-Step]](/create-phishing-campaign-gophish/sending-profile.webp)
Step 2:Adding Email template on gophish
Next step is to add an email template to be used in the phishing campaign. We will be downloading a pre-made email template to use for this phishing campaign. Navigate to the gophish Email Templates page to add the email.
Gophish has an option where you can create an email template on the page. You can also add a tracking image on your emails to know the status of your sent emails. i.e. received, clicked and opened emails.
On our test we can use a Breaking News email template. Gophish also has an option where you can add a link which which will redirect the victim to the landing page. On the landing page you can proceed to request for more valuable information from the user.
![Create phishing campaign with Gophish [Step-by-Step]](/create-phishing-campaign-gophish/Picture2-8.webp)
Step 3: Adding landing page
The third step is to add a landing page from where the target will be redirected to on clicking a link found on the email template. On the Landing Pages option you can use a landing page where the target person can enter passwords and other important information which can be used to determine the success of the phishing campaign.
Gophish framework has the default link to landing page as
http://0.0.0.0:80. Below image shows an
example of adding landing page on gophish. You can also import an
already existing landing page. You also have to add a page where the
user will be redirected after submitting his/her credentials.
![Create phishing campaign with Gophish [Step-by-Step]](/create-phishing-campaign-gophish/landing-page.webp)
Step 4: Adding user groups
On User & Groups section, we will be adding the target emails. Gophish framework requires us to add the first name, last name, email and the rank of the target person on the user groups page as shown below. Gophish framework also has an option where you can import the target details from a CSV file saved on your computer.
![Create phishing campaign with Gophish [Step-by-Step]](/create-phishing-campaign-gophish/user-group.webp)
Step 5: Creating gophish campaign
Having saved all the required information to launch a phishing campaign, we can now launch the campaign. We navigate to the Campaigns page to launch the campaign. We have to select the email and landing template we require for the campaign. We also have to provide a link pointing to the landing page server and the target group for the campaign.
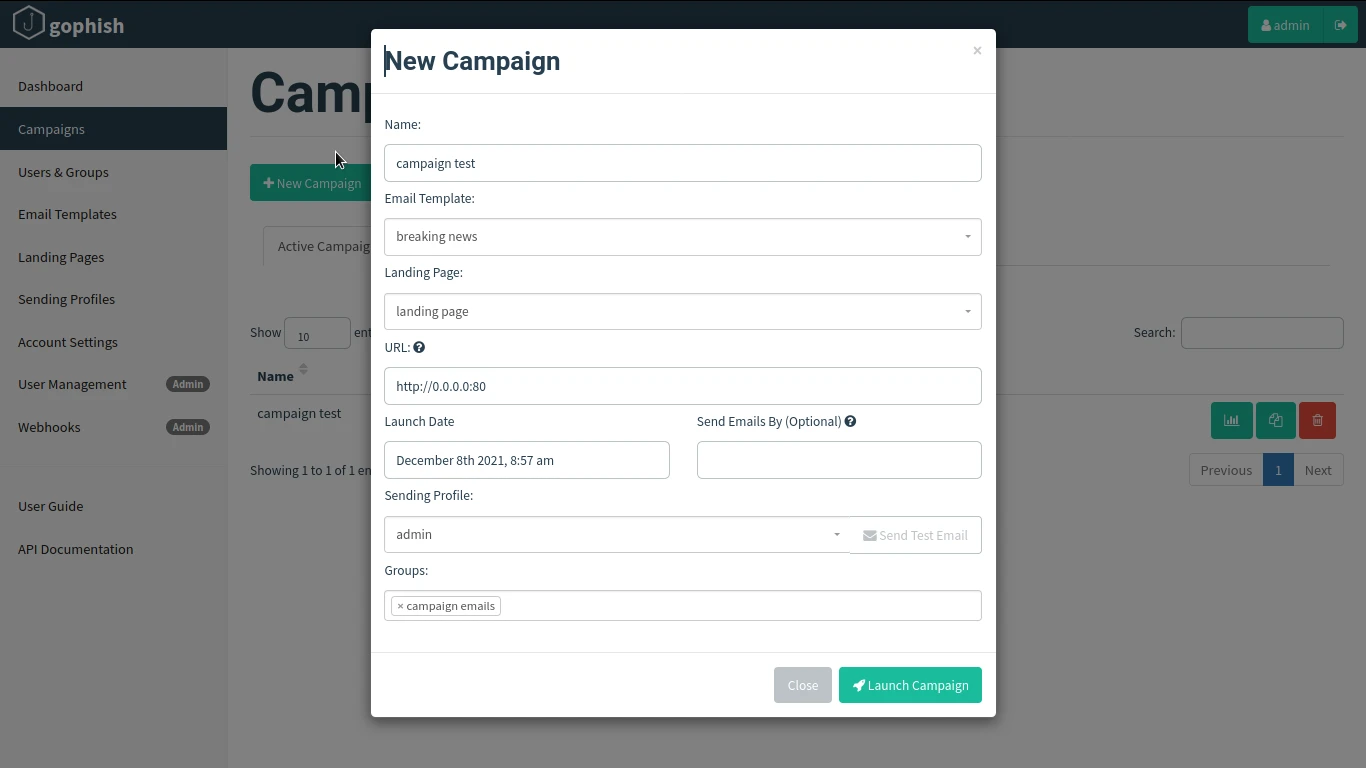
Gophish framework has an option where you can select the date by when we need the sending of emails should end. This may come in handy when your sending profile is limited to sending a specific number of emails. It can also help when you want to send the emails in intervals in order to avoid raising the suspicion by the targets. After filling in the information we launch the campaign.
![Create phishing campaign with Gophish [Step-by-Step]](/create-phishing-campaign-gophish/Picture6-9.webp)
We now wait for our target to open and click on the phishing links found on the email and landing page. All the important information on the campaign can be found on the dashboard. When I check the target email, below is an image of the email as received.
![Create phishing campaign with Gophish [Step-by-Step]](/create-phishing-campaign-gophish/Picture7-11.webp)
Step 6:Analyzing the campaign reports
On the Dashboard is where, all the phishing reports on gophish framework relating to a specific campaign can be found. From this page we can see the sent emails, opened emails, clicked links, submitted data and even the emails that have been reported as phishing emails b the targets. Below is an image of the dashboard page with information relating to the phishing campaign we just launched.

Conclusion
In the above guide we were able to create a test phishing campaign on gophish framework. We have configured sending profile, added the sending profile and templates required to carry out the phishing tests. Cybersecurity experts can use gophish for professional cybersecurity tests on institutions both small and those that have complex hierarchies as gophish supports this by having an option to create a list of your target groups.
To ensure the success of such gophish campaigns, cybersecurity professionals can also go on to make the campaign look more authentic by tuning minor vital details used in the campaign. i.e. using an email domain almost similar to the domain which is used by the specific corporate to make communications which are related to our phishing templates.